Showing posts with label Chatterbox sentiment/ verse. Show all posts

Tuesday, May 31, 2022

Farmyard Favorites for Father's Day!

  Father's Day is coming, and the Virtual Stamp Night Mini Sneak Peek was held just a few days ago.  The first one wants your card theme to be farm animals...like in Old MacDonald's farm.  I'm thinking someway I will build a Father's Day card out of this challenge.

My son-in-law is such a good Dad!  His daughter, and my middle granddaughter, was three this past March.  From the time she was three months old, he has taken her to oodles of animal places and events...zoos, summer fairs, petting zoos, etc. You name it, if it's within 50-miles of their location (even on vacation), he will find an animal place to take Sienna.  As a result, she just loves animals, has no fear, and you can see why. Her first favorite was a cow, and one of her first words was moo-moo! 

I'm a lover of "simple" vintage cards (those without too much frou-frou), and for some reason, I've not made many vintage cards in the last few years. I went to my stash, because I remember a vintage cow image that I almost made into a card a few years ago.  I had to scrap the idea at the last minute, because I forgot to take the image and any papers with me to a retreat where I planned to make the card! I had even mounted it on homemade script paper that I made prior to leaving that talks about medieval farming as I needed a computer and printer to do so. Using it now, was just a matter of deciding the layout, design, and papers!  I actually copied my design layout that I used on the replacement card. Take a peek at my finished card below with its vintage slant!
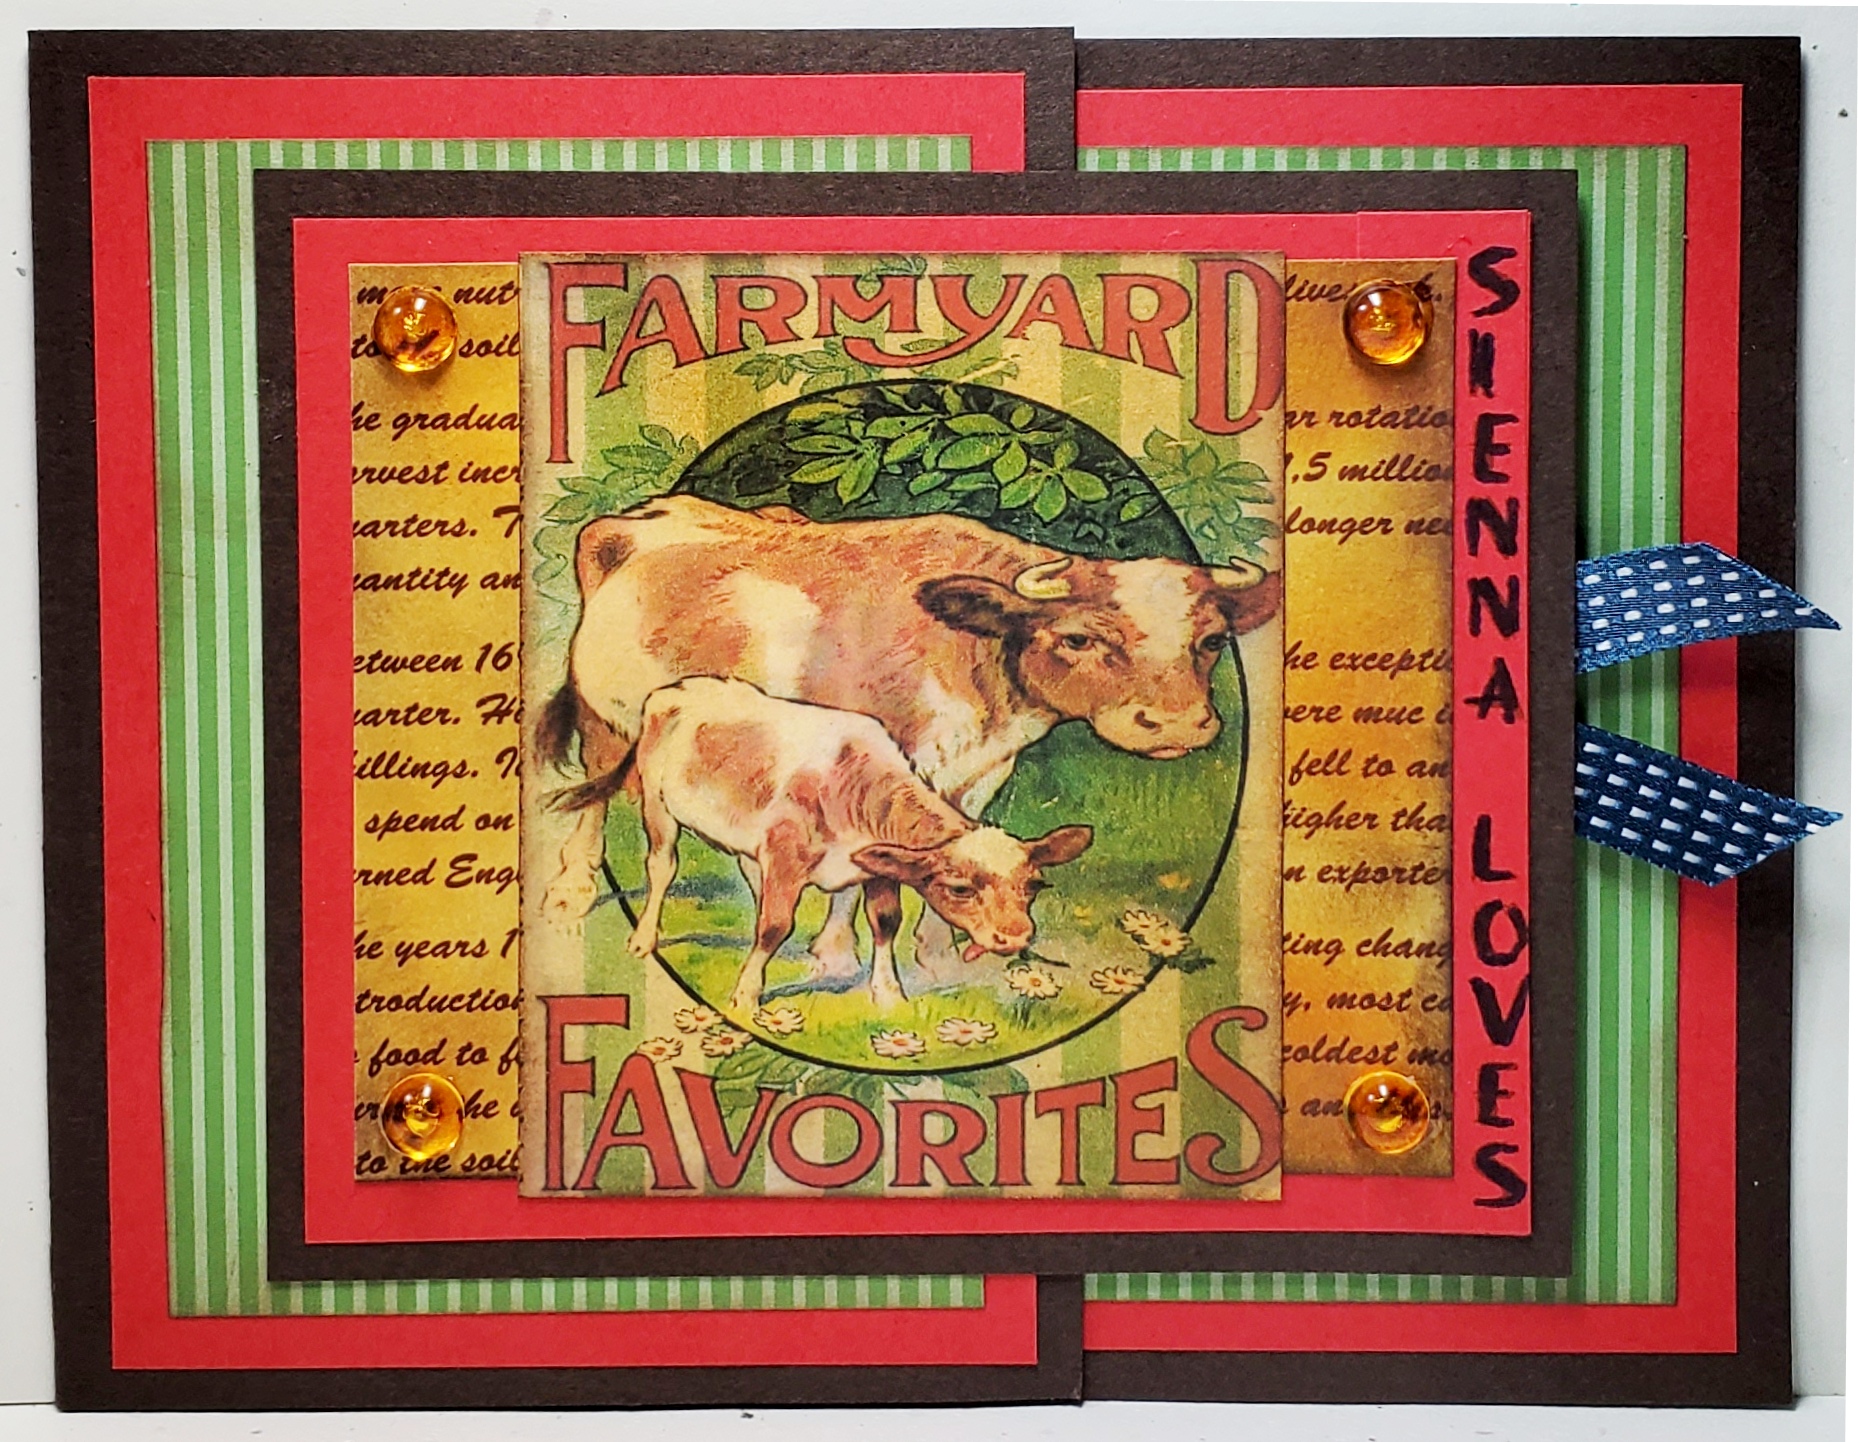
(NOTE: The ribbon peeking out the right side is attached to the gift card holder.  It's a blue ribbon seal for a First Place Dad!)

Ingredients: Stampin' Up: Cardstocks--Early Espresso, Poppy Parade, And Very Vanilla. Patterned DSP--2012-2013 DSP Stack--Wild Wasabi Stripe. Inks--Soft Suede, More Mustard, Chocolate Chip.  Other: Patterned Paper--Medieval English Farming Script (homemade/ink distressed). Vintage Farmyard print (stash). Gems--Robin's Nest DewDrops-Golden. Technique--Short Front Flap Card. Chatterbox computer verse. 4-3/4" x 6."

Saturday, April 30, 2022

My Mother is Celebrated & Loved!

It is already May, and I really need to get my Mom's Mothers' Day card made, compose my inside verse, finish the inside card design, and get it into the mail ASAP in order for it to arrive on time.  After reviewing various Splitcoaststamper challenge possibilities, I decided to finish one of my card class designs (original by Luci Kirschbaum) that I remembered was lurking in my “To Do Stash,” but there were some changes I wanted to make that occurred to me while in class. I wanted to jazz it up a bit and make it more me by adding layers, making it larger, and change the sentiment and its presentation.


I added layers below the card front with a Poppy Parade cardbase and a White Iridescent Glimmer layer.  I changed the label shape and sentiment theme from a simple fishtail flag to the Lovely Labels punch design, and I made my new sentiment Mothers' Day wording using two computer fonts I really liked. I have to say, I really like all my changes. 


I composed an inside verse using the computer and added a two-layer corner punch design to the four corners of the verse cardstock. I coordinated these punch corners with the card front's beautiful tulip dsp and the iridescent glitter paper. I'm just sure Mom will love her card......take a peek below:


Ingredients: Stampin' Up: Paper--Poppy Parade cs, Petal Pink cs, Flowering Fields dsp (2 patterns); Punch: Lovely Labels; Ribbon--3/8" White Taffeta; Gems--Opal Rounds. Other: Recollections White Iridescent Glitter paper; EK Punch--Victorian Corner; Chatterbox Creations sentiment/ verse. Size: 4-3/4 x 6 inches.

Saturday, March 19, 2022

Bringing Comfort in Loss

One of my Splitcoaststamper friends recently lost her mother, and I wanted to send her a sympathy card in the hope of bringing her comfort, knowing that her friends are thinking about her and sending lots of prayers.


I had a challenge I needed to complete that required a clean and simple style card, using only a small percentage of the front card surface.  Now, this is really a challenge for me since clean and simple is definitely not my style, though I often like cards others have done that have this style.  I would certainly agree that this style lends itself well to sympathy cards; therefore, I thought I'd give it a go.


I'm actually pretty happy with my finished card, and I hope my friend will find it brings that comfort and peace I'm hoping for her.  I do have to admit, I just had to add a very petite mat layer border provided by the card base and in a color pulled from the ink-blended, masked circle behind the bird. Take a peek at the finished card below, both inside and out:


Ingredients:  SU Melon Mambo cs, White Metallic Shimmer cs (Amazon). SU stamps: Best Bird (2016-2018). SU dies: Flourish Thinlits (2016-2018/ trimmed). SU Inks: Daffodil Yellow, Calypso Coral, Melon Mambo. Melon Mambo flicked splatters. SU punch: Curvy Corner Trio (2015-2017inside). SU sequins: Iridescent Assortment. SU: Blending Brushes. Wink of Stella/ Clear. Chatterbox sentiment/ verse. Size: 4-1/2 x 6 inches.

Wednesday, January 19, 2022

Under the Weather?

My youngest son has been quite sick for going on his second week.  I thought I'd make a fun card to get a little smile and give some encouragement to get well.  I've been wanting to finish off some OLD Alphabet Challenge Rounds using the letter Z for Zany, so I purposeful sought out a zany, quirky digital image to color with my Copics.  I think I found the perfect image to make a fun card and to fulfill zany all rolled into one!  Take a look below at the finished card inside and out!


Ingredients:  Stampin' Up:  Cardstock--Real Red. DSP--2012-2014 In-Color Stack (Midnight Muse Stripe, Summer Starfruit Dots). Dies: Reverse Confetti Lacy Scallop Frame; Lawn Fawn--Grassy Hillside.  Digital image: source unknown.  Copic Markers.  Journal Black Pen.  White Gel pen. 

Thursday, January 13, 2022

An Anniversary for January!

This card is for my youngest daughter and her husband in celebration their fifth anniversary.  I wanted to send them a card to mark this half-decade event, and I decided on a little bit of fall to mark the season in the year that we all spent so much time together getting the wedding and reception all arranged.  They married in a large barn, and my son-in-law was instrumental in using CAD software to arrange the layout for the wedding area and the reception.  One-third of the barn was used for the wedding "stage" with garden arbor and seating, and the other two-thirds was set up for the reception.  I distinctly remember one blustery fall evening when we drove to the barn for measurements to see if his drawings worked...being an engineer, I never doubted him!


Take a look at their finished anniversary card.  I may have to explain the fall design to them, but I'm sure they will enjoy their card made by one of their Moms
!


Ingredients:  BoBunny Double Dot--Rust; Echo Park patterned dsp; Papertrey Ink: Autumn Acorns stamps/ dies. Spellbinders: Labels 16 Nested dies (sentiment frame); 3/8" stash ribbon; Computer-made sentiment.

Tuesday, December 7, 2021

Being Strong!

My brother recently lost his wife quite suddenly and unexpectedly!  It was a shock to all of us.  I wanted to send him a Thinking of You card to let him know I'm keeping him in my prayers and thought each and everyday!


This is a CASE of a card designed by Liz Thayer for her class that I attended way back in the fall of 2013.  It has been lurking in my "To Do" stash of partially completed cards needing to be finished.  I made some of my own modifications and changes
 to enlarge the card, add a bit of sparkle, and change the sentiment as well.  I added a new Natural Ivory card base plus a dark brown glitter mat layer to the already existing Crumb Cake mat layer and my card became a thinking of you card rather than a thank you card.  I also decorated the inside and added my own computer-made verse.


I'm really pleased with the added layers and glitter paper.  It really dressed up the card a lot.  I think my brother will be pleased with his card and really like the inside verse, as it fits the occasion perfectly.  Take a peek below at the finished card inside and out.


Ingredients:  Stampin' Up products:  Cardstocks--Naturals Ivory, Crumb Cake, Bashful Blue. Ink--Crumb Cake, Early Espresso. Stamps--Truly Grateful stamps (circle bg, acorns-2013 Holiday). Dies--Window Framelits Collection ((2013-14 Annual). Embossing Folder--Stylish Stripes. Festive Paper Piercing Pack. 1-1/4" Burlap Ribbon. Linen Thread. Dazzling Diamonds Glitter.  Other:  Recollections Signature 12" Assorted Glitter Pad (dark brown). EK punch: Victorian Corner.

Thursday, September 30, 2021

Sweet Belated Birthday Wishes!

Several of my crafting friends have birthdays in October, and I needed to get to my crafting table.  With so many cards to do, time was of the essence, I decided to CASE one of my own cards that I ran across recently while browsing my own blog.  I found my gumdrop card from 2018 that made me smile then and again when I revisited it now after three years!


Even though I got my friend's card started early enough, I did not quite get the sentiment attached and the inside finished so still missed her birthday.  I was unhappy that I couldn't get her card done in time, but unfortunately, my youngest granddaughter decided to pass me her nasty cold and flu on to me after one day of taking care of her.  I was down and out for over 10 days!  I even got a Covid test to be sure I wasn't even sicker than I thought, but fortunately, that was negative!  


When I was better, I was up against organizing and packing things I needed for a crafting event with nine of my super-close crafting friends.  We have all been looking forward to this fun time after a two-year hiatus due to Covid!  We have waited until we were all vaccinated and able to make reservations and be able meet King/ Snohomish County Covid restrictions/ requirements!  I really wanted to get the gumdrop card finished so I could at least take it with me as a belated offering!


When finally finished, I was super pleased with it even though it was the second time around.  It is such a cute, super happy card... so colorful and festive!  Here is a look at the repeat rendition of this card that I hope my friend will enjoy as much as I did when I spot it in my picture gallery once again and while making it a second time around!


Ingredients: Ingredients:  Stampin' Up products:  Cardstock-Crushed Curry, Lemon-Lime Twist, Real Red, Tangerine Tango, Whisper White; 2011-2012 DSP Stack (Bashful Blue Dots).  Stamps: Goody Goody Gumdrops.  Spellbinders Dies: Venise Lace Rectangles; Octagon Classic Nestabilities; Octagon Scallop Nestabilities.  Copic Markers.  Stash: Gold Iridescent Glitter; Gold Rhinestones; 3/8" Offray Plaid Stitched ribbon; Horizon Friendship Thread (Harlequin).  Chatterbox sentiment/ verse.  Size: 6" x 4-3/4". 

Thursday, June 18, 2020

Great Father's Make the World a Better Place!

I just received the new Stampin' Up Beautiful World stamp and die set, and I was anxious to use it.  I had a sentiment and verse percolating in my head, and I wanted to use them with this new set.  I also went in search of some Splitcoaststamper challenges that might work well with my card as well.


Next, I tried out my sentiment on vanilla cardstock and found a font I liked with the look of the stamps.  I printed it out, die-cut it and used the layered sentiment to build my card from using the SCS challenges to help me decide on the look and design.  Take a peek below at the final design both inside and out.


Ingredients:  Stampin' Up products:  Cardstock--Basic Black, Very Vanilla, Copper Foil.  Stamps/ Dies--Beautiful World/ World Maps Dies.  Embossing Folder--Hammered Metal.  Other products:  Patterned Paper--DCWV Maps, Text & Ledgers Stack.  Colorbox Ink--Chestnut Roan (ink distressed edges).  EK punch--Victorian Corner.  Pattern:  DCWV Maps, Text & Ledgers Stack.  Chatterbox sentiment/ verse.  A6 Size: 4-1/2 x 6-1/4 inches.

Wednesday, November 13, 2019

Remembering a Warm and Wonderful Lady!

My daughter-in-law lost her grandmother several months ago and her memorial service was held later in September, all when I was unable to make sympathy cards while recovering from hand surgeries.  Her grandma was a warm and delightful lady, who always had a big smile and never failed to stop and chat after church each Sunday.  She was always willing to lift and hand and do anything and everything to help.  She was part of the women's ministry who made and served our church's monthly breakfast, and she was an avid cake maker, as well...such beautiful creations!

I really wanted to acknowledge her memory and loss with a handmade sympathy card for my daughter-in -law and her mother.  Also, to let them know how thankful I was to have been able to get to know her even better after her granddaughter was engaged and married to my son!  Using the basic design from my October 28th post, I modified it once again with a change-up of colors, embossing folders, and the window creation using white heat embossing with the Flowering Flourish stamp, and for a more subtle effect, I used the reverse side.  I made the purple for my daughter-in-law and the pink for her mother.  Take a peek below at the finished cards inside and out!


Ingredients:  Stampin' Up products:  Cardstocks--Whisper White, Highland Heather, Pretty in Pink, Vellum-Translucent.  Stamps--Serene Garden (dove), Flourishing Phrases (oval window white embossed design).  Dies--Crosses of Hope (cross), Layering Ovals.  Ink--Sahara Sand (dove), Highland Heather & Pretty in Pink (oval window brayered coloring).  Embossing Powder--White.  Embossing Folder--Tufted Dynamic.  Other:  Colorbox--Snow Frost Glitter paper.  Dies--Spellbinders Grommet Tags w/modified ends using Spellbinders Classic Triple Scallop Edges. Ribbon--Offray 5/8" Sheer Stripe, 5/8" Sheer Ruffle.  Punch: EK Victorian Corners.  Copic coloring--doves.  Chatterbox sentiment/ verse.  Size:  4-3/4 x 6 inches.  (My card design was inspire by an Easter card by Dar Peterson.)

I've been on a mission to catch-up on back challenges that I was not able to enter for one reason or another; therefore, I checked my Splitcoaststamper Challenge List before beginning, I had lots of inspirations to be able to enter my finished cards into several challenges. 

Monday, October 28, 2019

Sympathy for the Loss of a Son!

A kind and thoughtful lady that I met, probably, ten years ago, who is my Mom's Stampin' Up demonstrator, lost her 16-year old son due to a car accident a few months ago.  I was unable to make a sympathy card for her son due to recovering from hand surgeries.  So, I had to be satisfied with sending thoughts and prayers to her and her family, as well as joining a Facebook condolence post on her behalf, but I made a note that I really wanted to make her a card in the future as soon as I was able.


Meanwhile, I had a card idea started "brewing" in my head based an Easter card made by my Stampin' Up demonstrator, Dar Peterson, several years ago.  I loved her idea of the pretty oval floral-printed vellum oval, which reminded me of a church stained glass window, that she used as the backdrop for the cross on her card.  I thought it would make a lovely feature for a sympathy card.  At the same time, I was reading up a little on the Splitcoaststamper challenges available at the time, especially the Inspiration Challenge, which I always like to enter.  I found a metal scroll, rustic cross and a light blue cross ornament, which reminded me of a scrolled lattice background stamp that in blue might make a lovely oval vellum "window" for my masculine sympathy card.  I searched through my background stamps and found the lattice-style stamp that I was thinking of and place it on my craft table as a reminder for the future when my hands were better.


My hand recovery came about just before my four-week visit to my Mom in California in October and November.  Before I left, I tried out my vellum oval "window" idea and made several ovals to take with me.  Space was limited as I was flying.  While there, Mom and I got busy making cards to try and catch-up on missed occasions and also to build our Christmas card stashes.  I specifically worked on my three needed sympathy cards...the first being the one for this lovely Stampin' Up friend's sorrowful loss.   


Using Dar's original design as an idea base, I made several modifications to her card to make it fit for a sympathy card, plus make it a "more me" card.  I enlarged my card by adding more color layers with a different embossing folder pattern, plus a different color treatment, ribbon style, and sentiment layering dies.  I also added Copic color to my dove, stamped my lattice-patterned oval vellum "window" using a background stamp in Baja Breeze ink, added a scallop mat layer, and composed my own sentiment and interior verse.  Take a peek below at the finished card inside and out!


Ingredients:  Stampin' Up products:  Cardstocks--Whisper White, Dapper Denim, Vellum-Translucent.  Stamps--Serene Garden (dove).  Dies--Crosses of Hope (cross), Layering Ovals.  Ink--Baja Breeze (oval window), Sahara Sand (dove)  Embossing Folder--Stripes.  Other:  Stamps--Just Rite Modern Lattice Background stamp (oval window).  Dies--Spellbinders Grommet Tags w/modified ends using Spellbinders Classic Triple Scallop Edges. Ribbon--Offray 5/8" Stitched.  Punch: EK Victorian Corners.  Copic coloring--dove.  Wink of Stella-Clear (dove wings).  Chatterbox sentiment/ verse.  Size:  4-3/4 x 6 inches.  (Thank you Dar Peterson for the wonderful card design from which my card evolved).

Thursday, October 10, 2019

A Birthday Card All About the Past!

I was looking for some mojo for a theme idea to make my son, Mark, a birthday card.  I checked out my Splitcoaststamper Challenge List, which got my juices flowing.  I found a fun card theme from the Free 4 All Challenge... all about the little things that make life fun.  I started reminiscing  about all the fun times and events in Mark's life while he was growing up, which led to this memory.  One year I made him a treasure chest birthday cake, and we had a Pirates Treasure Hunt around the neighborhood to look for pirate booty.  That was the same year that he and his sister became the cutest pirates ever on Halloween. 


I had some old October Afternoon patterned papers featuring a pirate theme and I thought the paper and the challenge would go well together. . .a pirate theme it would be!   I got further inspiration for the layout from a Sketch Challenge and a Featured Stamper card, and several other challenges lent me ideas as well.  Take a peek at my finished pirate/ treasure card below with its inside card design and the birthday treasure verse that I composed to keep up with the theme!


Ingredients List:
Stampin' Up products:  Cardstock: Basic Black, Very Vanilla, Kraft.   Mini Gold Tinsel Trim (2018 Holiday).  Silver stars (Copic colored red).  Ink: Baked Brown Sugar (edge distressing).  Other:  Patterned papers:  October Afternoon Treasure Map Collection/ X Marks the Spot.  Echo Park: Kate Lowercase Alphabet dies.  Chatterbox sentiment/ verse.  Size: 4-3/4" x 6".

Saturday, November 17, 2018

A Baby's Coming in the New Year?

My oldest son's girl friend asked me to make her a baby shower card for her son's first child and her first grandchild. . .a little baby girl!  She had some specifics for me to work with, in that she wanted lavender to be the predominate color, it to be very feminine, and to have a baby elephant for the focal image.  She also wanted the inside verse to contain the baby's name.  Other than those specifics, I could let my creative juices flow!

Of course, my first thought was to check out current challenges at Splitcoasterstampers and then older challenges that I missed to work on my personal "challenge catch-up" goal.  I wanted to finish more of the current Alphabet Challenges for Round 10, so decided to focus on Letter E for elephant/ theme: animals.  I also used some older challenges for layout and inspiration.  Here is my finished card and inside verse using the baby's name:


Ingredients:   Papers~  Cardstock: Recollections Essentials (Violet); SU Whisper White.  Patterns~ Recollections: Purple Ditsy Floral; K&Co.-Watercolor Bouquet-Purple.  Stamps~ Wild Rose Studio/ Bella (retired).  Ink~ Memento Tuxedo Black.  Dies:~Lifestyles Lacey Squares (retired); Sizzix/ SU: Layering Squares; Lifestyles Lacey Circles (retired); Spellbinders Classic Circles LG.  Punches~ SU: Curvy Corners (retired); Martha Stewart: Double Loops Edger; QuicKutz Scallop Photo Corners (retired).  Ribbon~ Offray 5/8" Sheer Violet.  Copic Marker coloring.  Chatterbox sentiment tag/ inside verse.  Card Size:  4-3/4 x 6-inches.

Friday, October 26, 2018

Cute Skeleton Bones for Halloween

It's that time of year where I get to make Halloween cards.  I just really enjoy putting together interesting and offbeat cards, and my four adult children and their spouses enjoy receiving them.  For my DD#1 (darling daughter), I found two challenges at Splitcoasters that spurred along my imagination and my creative mojo began to rumble!


I wanted to use skeleton bones on my card, and I pulled out an old 2015 Stampin' Up set that I had not ever inked up.  Being that this card would be for my oldest daughter, I thought a few feminine touches might be nice, so my skeleton ends up being a wee girl skeleton but not so terribly scary.  I am really happy with the results that morphed as I put it together.  I completed the inside with my very own Chatterbox verse and added some embellishments to coordinate with the card front.  Take a peek below. . .I think DD#1 will be delight!


Ingredients:  Papers:  Stampin' Up Basic Black, Shimmer White, Whisper White, Happy Haunting dsp (stars); Darice Core'dinations Glitter Silk--Silver Mist. Stamp/Die set: Howl-O-Ween Treat/ Boo To You dies (2015 Holiday).  Dies:  Pierced Scallop Background.  SU Punch:  Ornate Tag Topper.  SU: Lucky Stars EF.  SU Embellishments:  3/8" Glitter Ribbon-White, Metallic Thread-Silver, Iced Rhinestone.  Chatterbox sentiment/ verse (handwritten/ computer printed).  Size: 4-3/4 x 6 inches.

Wednesday, October 17, 2018

Fall Happy Birthday!

I have oodles of birthday cards to make for Fall, and this one is for a cardmaking good friend.  I wanted to make her a Fall card with a little bit of a vintage flair.  After checking out several Splitcoaststamper challenges, I knew exactly what I wanted to do! 

Ultimately, I ended up casing a card designed and  developed by my sister, Heidi Gonzales, over five years ago, because I had a stash of her leftover papers and elements that she used, including a delightful "Autumn Wind" digital bookmark image, some the ribbon, and the recycled lace.  I made my own oval layered backdrop and sentiment to finish my card.  


In keeping with one set of SCS challenge requirements to add things of  Scottish, Irish, and Welsh tradition, I have included the plaid on my card, which is important to all three countries, and depicts their family or clan heritage.  No two families or clans use the same plaid.  I've also included acorns, representing the Acorn Oak, which once formed over 1/3 of the tree coverage in all of the British Isles and was important to the shipbuilding industry.  


My thanks to Heidi for allowing me to case her card...it has such a lovely vintage flair and perfect Fall elements!  Take a peek at the results of my finished card front, as well as my coordinating interior design and Chatterbox sentiment and verse. 


Ingredients:   Papers:  Stampin' Up Cardstock--Crumb Cke, Early Espresso, Tangerine Tango, Very Vanilla, Antique Linen.  Stash: unknown acorns and plaid.  Digital Pre-colored bookmark: Autumn Wind by Digital Papers.  Chestnut Roan ink distressing.  Dies:  Stampin' Up--Layering Ovals; Spellbinders--Classic Ovals LG, Classic Scallop Ovals LG, Petite Ovals LG, Petite Scallop Ovals LG.  Recycled Lace (bottom edging on old over-blouse.  Ribbon Stash: Silk Variegated; Pumpkin Stickers; Gold Metallic gems.  Linen Twine (acorn).  Chatterbox sentiment/ verse.  Size: 4-7/8" x 6".

Friday, August 24, 2018

Birthday Wishes for a DIL Who Brings Sunshine!

My daughter-in-law celebrates her birthday in mid-August, but we will be celebrating her a little bit late this year during our family camping trip coming next week.  Actually, we will be celebrating three birthdays in one celebration while camping:  my daughter-in-law, my youngest daughter's mother-in-law, and my own.  The menu includes barbecued baby back ribs, barbecued chicken, honey baked beans, corn on the cob, and strawberries and cheesecake.  Boy does that sound like a gourmet meal or what?

Well back to the card.  I decided to do a bit of coloring and fussy-cutting on this card, and since it's summertime, a little Magnolia Tilda stamp in a summer sundress and bare feet seemed the perfect image to choose.  Of course, I had to color her hair milk chocolate brown because that is my daughter-in-law's hair color, and that, plus adding some other "M" colors, makes the card a perfect fit for the Splitcoaststampers Alphabet Challenge, Letter M!  Tilda's sundress dress will be pink tones, and I will also add a double layered background frame and a bit of lace, all things that will fit other challenges in keeping with my challenge keep-up and catch-up goals!

After compiling all my thoughts from five different challenges and my mojo going full steam ahead, I finished the birthday card, and also created the perfect inside design and verse to fit the fact that we'll be celebrating her day just a little bit late.  Composing the birthday verse brought to mind the perfect sentiment for the card front as well!  Take a peek below at my finished card for my daughter-in-law who brings sunshine to our lives!


INSIDE VIEW
UNDER CONSTRUCTION


Ingredients:  Paper products:  SU Cardstock--Whisper White, Pool Party.  Papertrey Ink: Bitty Dots/ Brown.  Pattern:  Unknown/ stash.  Stamps: Magnolia/ Sundress Tilda.  Copic coloring.  Dies: Spellbinders Labels 9 Nestabilities.  Punch: EK-Victorian Photo Corners Medium (inside).  Colorbox Chestnut Roan: Edge distressing.  Stash: 3/8" Cotton Lace; Rose Pink button; Embroidery string.  Chatterbox sentiment/ verse.  Size: 4-3/4' x 6".  

Monday, August 13, 2018

Getting Ready for October Birthdays!

My good friend Carla is hosting her first Dare to Get Dirty challenge this month, and though I am sorry to say, I do not have any time to really get into the nitty gritty of trying to get all these challenges completed, I thought I'd at least try Carla's challenge.

These Dare to Get Dirty Challenges are created for fan club members to participate in, and we are not allowed to divulge the nuts and bolts of the challenge requirements, but I also checked out some of the other SCS challenges currently running to see if they would tweak my creative mojo.  


An Inspiration Challenge orange t-shirt with leaves reminded me that I have a whole slew of October family birthdays that include sons, nephews, sister-in-laws, children and SCS friends.  I thought I'd make a card with a fall theme that would help my huge October card needs.  A fall theme will also work for the Alphabet Challenge, Letter P = Persimmon Orange and Pumpkin Orange.


My card idea will work for one of my sister-in-law cards or one of my female friends, but I think I might just earmark it for one of my good friends.  I thought I would take a walk down nostalgia lane and color the little girl image I chose with woodless-colored pencils.  The image is a CC Designs fall digital image of a little girl pulling a wagon filled with a delightful fall pumpkin.  I've had this digital image in my stash for a number of years.

My finished little girl with her rosy cheeks is ready to deliver her little red wagon loaded with her happy birthday pumpkin to my dear friend.  Now, I can put a check mark by my friend's name to show that her card is finished.  Take a peek at her finished birthday card inside and out.


Recipe:  SU cardstock:  Whisper White, Tangelo Twist, Chocolate Chip.  DSP: Joann's Open Stock.  CC Designs digital image: Pumpkin Emma.  Die:  Papertrey Ink-Large ZigZag.  Coloring: Progresso Koh-I-Noor Woodless-Colored Wax Pencils (Michaels).  Mineral Spirits (WalMart).  Stash:  Orange Felt, button, cream crochet thread.  Punch:  EK Scallop Photo Corners LG.  Chatterbox sentiment/verse (computer).  Size:  5-1/4" square.

Monday, July 16, 2018

The Loss of Another Loved One!

This blog is very difficult to write.  I have just finished another sympathy card for my friend and cardmaking buddy, who just lost her Dad at the end of June, and 18 days later; she lost her mother due to an automobile accident!  It is difficult to find words words to comfort her, but to let her know she is my thoughts and prayers and hope that she receives solace from knowing how much her family and friends are thinking of her.


After getting my creative mojo juices flowing by checking out a few Splitcoasterstamper (SCS) challenges ideas before starting my friend's much needed sympathy card, I decided to try a new background technique (for me) using Shaving Cream and stamp pad re-inkers.  I was really pleased with the results.  I had the butterfly I ultimately used sitting on my craft table for a while.  It was a leftover from a failed background attempt, but the butterfly turned out well, so I thought I'd save for future use.  My card's color scheme came from the Inspiration challenge and the butterfly.

I'm pretty pleased with my results and hope that this card will help ease some of my friend's grief, and at least let her know that I have her in my thoughts and prayers.  Take a peek at the card below.  If you are interested, the design and construction story follows below the card recipe for materials used.


.

Recipe:  Stampin' Up products:  Cardstock--Wild Wasabi, White Shimmer, and Watercolor paper.  DCWV Glitzy Glitter Stack (gold).  Stamps--Painted Petals (flowers).  Inks--Wild Wasabi, Crisp Cantaloupe, Calypso Coral.  Dies--Butterflies Thinlits; Layering Ovals Framelits.  Solid Thick Baker's Twine--Wild Wasabi.  Other:  Smooch--Pearlized Accent Ink/ Gold.  ImagineCrafts--Frost Shimmer Spritz.  Ribbon--Offray 5/8" Sheer Scallop/ White.  Chatterbox sentiment/ verse.  Size:      4-3/4" x 6".


The Story


One of the things I like about the challenges over at Splitcoaststampers is that you can enter them at any time.  If you missed one, and you've set yourself a goal to finish all challenges within a particular challenge in the current year., you can enter when you get the card made.  I always check out the current week's challenges first, and I usually starting with the Inspiration Challenge, which selects a website for you to browse for inspiration.  At Zazzle Souvenirs, I found a Celebration of Life Guest book with a lovely picture of a pretty butterfly, which reminded me of the finished butterfly that I had sitting around on my craft table for over three weeks waiting for an eventual home.  I thought this sympathy card might be a great way to use it.  


There was also a Free 4 All Challenge a few weeks ago that I missed where you were to find inspiration about something from one of your neighboring states from where you lived.  I researched Oregon, and found that they had several conservation programs going in different areas of the state and on different species of butterflies, because they were either endangered or close to being endangered because their habitats were being destroy by human growth in their migration paths.  There was also an old Ways To Use It Challenge back in March 2017 concerning butterflies that I missed with my knee surgery.  It seemed a foregone conclusion that I was meant to make a card with a butterfly on it!


Next, I searched the Featured Stamper Challenge that I missed last week for some layout ideas, and  I found several cards with layouts that I thought might work out.  I really had been wanting to try out the Shaving Cream background technique, so I checked out the Technique Lovers Challenge, and  found an old challenge from last year that involved using shaving cream.  I have shied away from this Technique Lovers Challenge and the Mix-Ability Challenge (mixed media) as I haven't tried many of the areas of cardmaking that these challenges often require.  I really feel nervous, as a beginning novice, to try many of the techniques and ideas that are used in these two challenges, but I've made myself a goal is start diving in...so I dive, I did!


My "stash" butterfly had a variegated color scheme.  I had used Stampin' Up's Wild Wasabi, Crisp Cantaloupe, and Calypso Coral inks with a Shimmer Frost Spritz on top and some smudged pearlized gold accent ink in a few spots, as well.  I decided to try the Wild Wasabi in the shaving cream on watercolor paper and see what happened.  I was trying for a Celadon Green (a soft light minty shade) so that I could enter the color-themed Alphabet Challenge for Letter C.  I was pretty thrilled with the results!  It turned out a lovely soft green just like I wanted.  It was several shades lighter than the actual Wild Wasabi ink color.  After drying the card front with my heat tool, I spritzed the entire surface with the Shimmer Frost Spritz.  


The layout idea had a verse panel with a bird perched on the top edge in the lower right third of the card front.  Instead of this, I stamped a floral arrangement on the lower right third using my MISTI stamping tool. I planned to have my butterfly rest on these blooms.  I flicked and dotted with Smooch pearlized gold accent ink, creating many tiny random gold dots over the surface.  I also added gold streaks to the flower leaves and stamen dots on the blooms.  As did the layout idea, I added the vertical ribbon band along the left side.  Mine was a white sheer scalloped ribbon, but instead of a ribbon bow, I centered a solid green thick Baker's twine down the ribbon center tying off with a green twine bow.  I added an oval sentiment with a gold glimmer scalloped mat toward the top left.  I die-cut a second open-cut butterfly from the gold glimmer paper and added it under my variegated "stash" butterfly, staggering it about 1/16" so that it just barely peeked under that top butterfly.  I was truly satisfied with my results.

Monday, July 9, 2018

Belated Birthday Wishes - Sister-in-Law #2!

I am trying to play catch-up with a few of the birthdays that I missed.  This one's for sister-in-law #2 of 8, who celebrated her birthday at the end of June.

Checking out possible Splitcoaststampers (SCS) challenges, reminded me of some MME papers I used on a friend's card last fall, and a card design from my sister several years ago using this same paper.  This, in turn, led me to two challenge possibilities, involving using recycled products and distressing.  It was time to get started and see where all these thoughts led.

I used a sheet of recycled cork from an accessory pack I won at a stamp gathering several years ago now.   I didn't really care for the flowers and symbols already printed on one side of the cork, so decided I could turn over the sheet and use dies to cut my own designs for my flowers.  My distressing would involve ink distressing, so I liberally inked the edges of all my layers:  mats, sentiment die-cuts, banners, flowers. doily and even the felt leaves (which doesn't show up well on the picture).  


See the finished card below (inside and out).  I think my sister-in-law will be pleased, but I do wish it was not a belated birthday wish!


Ingredients:  Papers:  Stampin' Up Cardstock: Old Olive, Island Indigo, Very Vanilla.  Patterned Papers:  MME-Miss Caroline--Dilly Dally/ Dolled Up/ Fiddlesticks, plus miscellaneous scraps.  SU Punches: Stampin' Up--Circles--1-1/4-inch, Scallop Circles--1-3/4-inch, 7/8-inch, Boho Blossoms (ret.-cork flowers), Itty Bitty Shapes (smallest scallop); WRMK Deco Corner Chomper.  Dies: Spellbinders--Nested Leaves (traced/ cut w-pinking shears); Sizzix Labels-Ornate #2 (sentiment).  Fishtail Flags: Hand-cut.  Wilton 3-1/2" Doily.  Ink Distressing: ColorBox: Chestnut Roan.  Pearls: Recollection (Copic RV-14 colored).  Stash: Dark Celery felt.  Recycle: Cork. Chatterbox sentiment/ inside verse.  Size: 4-1/2" x 5-5/8".  (Thank you Heidi Gonzales for your card design that I cased with some modification to the layering and sentiment.)

Thursday, July 5, 2018

Sister-in-Law #3 Has a "Freedom" Birthday!

I have mentioned in the past that I have eight (8) sister-in-laws!  With my knee surgery, I missed getting a card made for the first two in 2018.  My third sister-in-law has a birthday just a few days after the 4th of July.


After looking at possible SCS challenges to enter, I decided to do a whole different thing with her birthday and make a patriotic card all about freedom.  In her case, the birthday verse gives her the "freedom" to choose to be "29 again" this year; therefore, I used "FREEDOM for Your Birthday!" as the card front sentiment.

I've been chuckling as I've been making her card and thoroughly enjoying myself.  I do hope she likes her card as well as I think she will.  Take a peek below at the card front and my inside verse and design.


Ingredients:  Stampin' Up products:  Cardstock--Midnight Muse (ret.), Real Red, Very Vanilla, Naturals Ivory.  Punch: 3-Corner Curvy (inside-ret.).  Baker's Twine: Real Red/ White.  Patterned papers: Authentique Pride Collection:  Dignity (bg), Unified (Inchie-Dots), Assemble (Inchie-Stripe), Amend (Inchie-Plaid).  Hugs Seam Binding Ribbon: Union Blue.  Spellbinder Dies:  Stars Nestabilities, Postage Stamp Nestabilities (Inchies).  Queen & Co. Twinkle Goosebumps: Red (inside).  Button: stash.  Fishtail Flags--hand-cut.  Chatterbox sentiment/ verse (Fonts: Lobster 1.4 = sentiment/16--verse/15. Cut Above the Rest = setniment (freedom).  Size: 4-3/4" x 6".

Friday, June 29, 2018

A Birthday with Lots of Technique!

My oldest daughter is celebrating her birthday today!  I've been working on her card for a couple of days trying to work out its design.  I knew only one thing for sure when I started, my daughter's favorite color is turquoise, so it would have turquoise in it somehow, somewhere.  A couple of other things I knew were that I wanted to enter the finished card into some Splitcoaststamper challenges, and if it could somehow fit one of my remaining three Round 8, Letters, I'd be pleased!


My usual plan, as most of you who read my blog might know by now, is that I check out all SCS challenges for inspiration and ideas before I begin, which I did with this card.  I am happy to say that with my mojo, which started with the SCS Inspiration Challenge, which led to my being able to enter into Alphabet Challenge, Round 8, and others!  


See "The Story" below my card for more details.  Meanwhile, take a peek at my daughter, Michele's, card below (plus the inside design and verse).  I am truly excited about her card, how it evolved, and how it turned out, and I think she will be thrilled!


Ingredients:  Stampin Up products:  Cardstock--Night of Navy, Tempting Turquoise, Basic Gray.  Patterned Paper: 2012-2013 DSP Stack--Brights/ Pacific Point (umbrella).  Stamp--Marbling (background).  Inks--So Saffron, Pear Pizzaz, Tempting Turquoise.  Stencil--Pattern Party Decorative Masks (clouds).  SU White Embossing Paste.  Glitter--Dazzling Diamonds.  Other products:  Cardstock--Recollections Pack/ Punchy Florals.  Colourcraft Brushos--Turquoise, Grey.  MFT Stencil--Raindrops.  Stamps/Dies--Crazy Birds; Crazy Things (bird/hat).  Savvy Dies--Cityscape; Small Space Needle.  Elizabeth Dies:  Rainy Day (umbrella).  EK Punch: Med. Victorian Corner.  Techniques: Coloring Texture Paste; Copic Coloring; Marbling; Glitter Texture.  Chatterbox sentiment/ verse (computer/ Xiomara font).  Size: 4-3/4" x 6".

THE STORY:

EVOLVING A CARD TO FIT NUMEROUS CHALLENGES


By now, a lot of you who are also on the Splitcoaststamper (SCS) site know that I love to find inspiration from several SCS challenges. You might wonder how I do this.  So here goes an explanation:


I keep a running computer document with all SCS challenges listed chronologically by weekdays and dates within each challenge, then the monthly, annual, etc. challenges follow.  I check each week and add the challenge updates as the week progresses.  If I actually enter a challenge, I place a red check mark in front of the challenge number.  It makes it pretty easy to spot what I've entered and what I haven't, plus checking to see what inspiration I can get to decide what I might want to do to my card to fit the challenges I decide to enter.  It is often a work in progress as I create, and I may add or subtract a challenge as I work and possibly make changes to my original plan.


Almost everything on this Crazy Bird card started first by browsing the June 23, 2018 Inspiration Challenge/ Hayneedle online site for art work with blues and greens as I knew for sure I wanted to use turquoise.  This Inspiration Challenge led to seven other challenges.


#1.  Inspiration Challenge - IC655 - 6/23/18.  In my browsing through Hayneedle, several blue and green three wall art items led me to my card design:  a marbled background, though eliminating the browns shown and adding pear pizzaz and soft yellow to the turquoise; 2) a silhouetted Seattle skyline; and an aqua raindrops canvas led me to add rain and clouds. . .after all, it will be a Seattle scene!


#2. Free for All - F4A432: Baby It's Cold Outside - 6/1/18.  Since I was going to use rain and it was to be Seattle, I decided to use embossing paste and add color and glitter to my rain and clouds to evoke a cool feel to the card.


#3. Ways to Use It - WT680: World Water Day - 3/22/18. . .with all this talk about rain in Seattle, I remember a older WT challenge that talked about rain and umbrellas that I missed because it was issued just a few days before being AWOL with my knee surgery.  I re-checked and sure enough the rain and an umbrella worked for this challenge.


#4. Alphabet Challenge, Round 8 - DD8ABC21U - 1/3/18.  Letter U = UMBRELLA. . .one of my final three missing letters for Round 8!!! The BONUS challenge for using a faux finish fit my plan for a marbled background mentioned above. I was stoked!! 


#5. Mix-Ability - MIX280: Losing My Marbles - 6/8/18.  Marbling led me to think of the mix-ability challenges.  I was sure there was bound to be something about marbling.  In my searched through this challenge and found this one, which gave suggestions on making a marbled background, but it also mentioned that a marbling stamp could be used.  I decided to possibly invent my own marbling by using my SU Marbling BG stamp.  To get three colors in my marbling, I used my MISTI and shifted my paper about 1/8" with each of three colors: So Saffron, Pear Pizzaz, and Tempting Turquoise and blew it dry to set the ink.  I watercolor brushed more turquoise ink as the final coat to add more turquoise and to fill in any white areas, and blew it dry.  Next, I "painted" the entire marbled surface with glitter glue and sprinkled Dazzling Diamonds all over, lightly brushed off excess glitter, and blew it dry.  It looked like a HOT MESS during the process, but I was pretty pleased with the final result.


#6. Colored Texture Paste Technique. I colored my White Embossing Paste and stirred in a bit of Dazzling Diamonds glitter and Brushos Turquoise to stencil on my raindrops and blew them dry.  I also mixed a batch of light grey with a few sprinkles of Brushos Grey and glitter to stencil on my clouds.


#7. Teapot Challenge - MMTPT515: TPT Tic Tac Toe - 6/5/18.  I'd been watching out for using this one, because I love Tic Tac Toe challenges.  My diagonal Tic Tac Toe is: Stitching, Die-Cuts, and Patterned Paper.  I also added Watercoloring and Embossing (if the Embossing applies to Embossing Paste rather than just dry embossing).  My umbrella is a die-cut, and it became covered in patterned paper with hand-stitching. My bg uses watercoloring and Embossing Paste in the raindrops and clouds.


8. USEIT2018 - ongoing :  My new but dusty and never stuff:  the Crazy Birds stamps and dies and my Small Space Needle die.  I bought both at least two years ago and had not used them yet!  Also both stencils are new and have been languishing in their packages.  My used oldie is my CityScape die, which I have not used for 2-1/2 years! 


So, there's the explanation of my development of a card utilizing numerous challenges. I find this great fun, and a challenge in and of itself for me! Usually I start with a bit of an idea from a challenge then embellish upon the idea to fit other challenges, but as I mentioned before its a work in progress and challenges to be entered can change as the card evolves.