Wednesday, April 28, 2021

A Wondrous Gift is Given

More Christmas cards are needed for my 2021 Christmas stash.  This is a remake of a card made back in 2009, using the now retired Stampin' Up Lovely As A Tree stamp set that was so popular and remained current from 2001 to 2019!  My new card has more layers added, including some sparkly silver glimmer paper, Dazzling Diamonds glitter, and sequins that the original did not have.  


I just love the technique of layering trees in navy ink and silver embossing with a little added Dazzling Diamonds glitter into the mix.  Unfortunately, the photo does not pick up on the glitter added, but it is quite sparkly in RIL!  I've also added some sparkly sequins scattered about.  Take a peek at an update of an old card below:


Ingredients:  Stampin' Up products:  Cardstocks--Whisper White, Night of Navy, Silver Glimmer.  Stamps--Lovely As A Tree (ret. 2001-19), Wondrous Gift (ret. 2007-09), Snow Front (2019).  Ink--Night of Navy, Versamark.  Embossing Powder--Silver, Heat & Stick.  Glitter--Dazzling Diamonds.  Ribbon--1/4" Night of Navy Grosgrain; Silver Cording.  Size:  5 x 6-1/4 inch.

Wednesday, April 21, 2021

Minnie Mouse Visits for Birthday TWO!

I am finally getting around to posting the first granddaughter birthday for 2021, which was celebrated in late February, and I heard that her birthday party theme was to be Mickey & Minnie Mouse, using their traditional colors of red, black, and white.  I also heard that little Sienna would be dressed in her own Minnie dress in those same colors.  She would be TWO, so I needed to put on my creative thinking cap and find a card design that was appropriate. 


First,  I decided that I would stick to just a Minnie Mouse on the card so that it could be a big mouse with a big bow for her head.  I ended up deciding on a large Minnie punch-art head instead of a full-bodied Minnie.  Since the party theme was to be red, black, and white, I decided that would be my card colors as well!  Next, I needed some patterned papers, and I found a red with multi-sized white polka dots in my stash that I thought would be perfect.  I had some other red and black prints on standby just in case I needed a second pattern.


The card sort of evolved adding a little bit of this and a little bit of that.  I decided the white "head" background panel needed dressing up so I used a happy birthday embossing folder to add texture before adhering Minnie's head.  It occurred to me that it would be "cool" if the head parts looked like fur, so I used the Stampin' Up Subtle Dynamic folder to emboss the head and ear pieces.  I wanted the card to feature that it was her birthday number TWO, so I added a shimmery red number 2 to coordinate with the sweet, shimmery red and white diagonal striped ribbon that I found and thought I would use for Minnie's head bow.  


I continued adding background layering and popped the "head" panel onto the layered card base.  I was thrilled with the look and how well it worked to use the ribbon for the horizontal strip to host the die-cut birthday sentiment, as well as for Minnie's perky head bow.   Take a peek below at the finished card.  I was really quite happy with the results.


Ingredients:  Stampin' Up cardstock:  Poppy Parade, Basic Black, Whisper White.  Recollections pattern:  Red Dots.  Recollections Foil/ Brilliant (red).   Dies:  Cottage Cutz Expressions--Birthday, Girl; Sizzlits--Mango Tango Alphabet/ Numbers.  EK Punches:  2-1/2" circle, 1-3/8" circle, Arrow Slim Edger (SU: Pinking Hearts retired), Victorner corners.  Embossing Folder: Cuttlebug--Happy Birthday; SU--Subtles Dynamic.  Ribbon Stash: 7/8" Metallic Diagonal Strip.  Size: 4-3/4x6 inches.

Wednesday, April 14, 2021

Sympathy & Prayers

I needed to make sympathy cards for my son to give to a long-time friend from his high school days (and his parents), who lost his brother (and son) in an accident in late March.   His friend married a Polish young lady several years ago and resides in Poland; therefore, tragically, he was unable to come home for the funeral.  Our entire family sends prayers of comfort to help him and his family through this sorrowful time.


I decided to use the Stampin' Up Feels Like Frost nature scenes paper for both cards in the lavender and purple hues.  I think this paper, done in off-focus almost ethereal look, lends itself well to sympathy cards.  Both cards are in a similar design, one using a vellum overlay for the front and sentiment background and the other using the vellum only as a background for the sentiment.  Take a peek at the finished cards and inside scripture verses.


Ingredients:  Stampin' Up products:  Cardstock--Night of Navy, Gorgeous Grape, Heather Highland, Whisper White.  Patterned Paper--Feels Like Frost (2019-21 Holidays).  Vellum--Transluscent.  Dies--Crosses of Hope framelits (2018-20 retired).  Other:  Cottage Cutz Expressions dies.  Pretty Pink Posh sequins--Sparkling Clear & Iridescent.  Triveni Crafts Pearl Sunflowers-White.  EK Corner punch--Victorian.  Size: 4-3/4 x 6 inches.

Friday, April 9, 2021

A Tropical Birthday Drink!

As I mentioned back February on my blog of a friend's birthday card, I made a variety of cards that would be needed in the future while I was on my August, 2020 craft trip with my sister and Mom to Sisters, Oregon.  This has been my first and only trip that I have ventured out during COVID!  Weren't we lucky that this trip happened about two weeks before the horrendous fires all over Oregon's forests!


I also mentioned that because my mojo had been stymied by COVID's intervention, I had purchased several kits and subscribed to Stampin' Up's Paper Pumpkin to try to spur myself into getting into my craft room!   I was really excited about the June 2020 Paper Pumpkin Box of Sunshine kit because of its beautiful, rich colors, and its pineapple die-cuts!  I brought this kit and several others along to work on while in Sisters.


I like to make cards for people where the theme fits the person, whether it be focusing on a hobby, their job, their favorite song, movie, etc.  My husband's job took our family to Hawaii to live for about three years, and Jackie, our youngest daughter, was born there, thus my excitement over the pineapples in the June 2020 card kit.  I saw an alternative card idea in June, just a few weeks after the kit arrived that I really, really loved.  I remembered it and thought the "idea" was perfect for Jackie, but I did not save it to Pinterest, nor could not find it again.  I remembered it used the kit paper supplies, and particularly that it used the black/ white polka dot paper on a center panel.  There was also a pineapple with its top cut off to form a tropical beverage receptacle, plus an umbrella, a straw, and a flower.  It used one of the cardbase folds with the bright alcohol-ink-style background as the card front.  I wished I could find the exact card I saw to give that cardmaker credit for my "memory casing," but alas, no luck!


For my card, I love layers, so I cut the alcohol-ink-style background off the folded card base to use as a layer.  I made a new and larger cardbase using black cardstock and added a second layer of gold foil.  My third layer would be the AI-styled panel that I had cut off.  I cut a set of smaller papers for the center layers...black and white cardstocks and the kit's black & white polka dot paper (similar to my "memory-cased" card, I think).  I fussy-cut the pineapple top off along the diamond pineapple scales and saved it to use as greenery (my "memory-cased" card did something similar, because I remember thinking it was a nice filler).  Next, I worked on my tropical beverage pineapple drink.


My sister brought lots of her My Favorite Things stamp sets with her, one of which had a Hawaiian theme, so I was able to use her Hibiscus stamp for my drink's flower.  I brought my new SU umbrella stamp/ punch set, because Jackie also loves umbrellas.  I thought I might incorporate that into her card theme if my pineapple idea didn't work.  But, the pineapple tropical drink worked very well with the parts and pieces I was able to use from here and there.  I Copic-colored the umbrella and flower stamped images, plus added a bit of  Clear Wink of Stella to the flower for a bit of sheen.   I used the geometric die-cut and a stamp from the kit for the sentiment.  Take a peek below at how Jackie's card evolved into the finished design.  She was delighted with it, and the inside verse's play on a bit of humor!


Ingredients:  Stampin' Up products:  June 2020 PP Box of Sunshine--Patterned papers, sentiment stamp/ die-cut shape, pineapple die-cut.  Cardstock--Basic Black, Whisper White, Crushed Curry, Gold Foil.  Stamps--Under My Umbrella.  Other:  My Favorite Things--Birdie Brown Polynesian Paradise stamps (hibiscus).  ColorBox Ink: Chestnut Roan (ink distressing).  Copic Markers.  Wink of Stella/ Clear (hibiscus).  EK Corner Punch--Victorian Medium.  Chatterbox Computer verse.  Size:  4-3/4" x 6-1/4".

Thursday, April 1, 2021

God's Peace at Christmas!

This is another of my January New Year's resolution Christmas cards.  It was also another 2019 card kit from my Stampin' Up mentors, Dar Peterson and Luci Kirschbaum.  Its original design was presented by  Dar, and again I did some modifications that came to mind when I looked at the pieces. 


Those who read my blog regularly know that my favorite card size card is more like an A7 (4-3/4 x 6-1/4 inches) than the standard A2 card (4-1/4 x 5-1/2 inches).  I really like a 4-3/4 x 6-inch card the very best, which does not fit an "A" anything, and that is was I chose for this card.   So, of course, my first step was to cut a larger cardbase.  I decided on a white base, rather than starting with the Melon Mambo as in the original design.  Also, I exchanged Dar's silver layer for green, Call Me Clover.  I really wanted to bring out the green in the ribbon, and I achieved adding more color as well.  Next, I cut my vellum layer with a cross-stitch edged die to add a bit more texture and interest.  I'm not sure, but I think the original was colored on top of the vellum, but I chose to color with Copics on the backside of the vellum instead.   I retained the rhinestones in the four corners, but I Copic-colored them to a nice warm gold to coordinate with the gold embossing.  Take a peek below at my finished rendition...it will go into my Christmas stash for 2021 cards.


Ingredients:  Stampin' Up products:  Cardstocks--Whisper White, Melon Mambo, Call Me Clover, Vellum.  Stamps--God's Peace (candles/ sentiment--2019 Holiday).  Embossing Powder--Gold.  Rhinestones.  Other:  MemoryBox die--Cross-Stitched Frame Border Die.  Copic Markers.  Chatterbox verse (inside).  Size--4-3/4 x 6 inches.

Saturday, March 27, 2021

But, Of Course, Evie Gets a Ballerina too!

Evie celebrated her first birthday in November, 2020.  Not to be outdone by her cousins, Evie did not receive a birthday card in 2020 for her first birthday from Grandma either.  Mama and Evie were busy moving into their new home, and Grandma was busy helping Mama move storage unit boxes, babysit, and unpack many boxes as well.  Grandma also masked up, brought hand sanitizer, clorox wipes, etc. and timidly ventured out with Mama and Evie, while eyeballing my six-foot minimum distancing as we bought furniture, carpeting, closet doors, window coverings, paint, lumber, and hardware for all of Mama's myriad of projects she wanted to complete before officially moving in.  With everything freshly painted, renewed or replaced, Mama and Evie moved into their new home with three weeks to spare!  Grandma's house became very quiet...we surely missed Mama and Evie, but not to fret...it was only a 12-minute drive to their new doorstep!


Evie's Zoom Unicorn Birthday Party day arrived after many hours spent decorating with streamers, a birthday banner, balloons, and unicorn tidbits everywhere.  Unicorn cupcakes were made and party favors delivered to each party participant's porch the night before, and Mama made and decorating a beautiful unicorn cake with whip cream frosting and a beautiful pink, turquoise, and purple mane.  Grandma had her gift all wrap with a note that said, "Evie's birthday card is 'under creative construction.'  Hopefully, it will arrived completed soon!"


I am happy to say Evie's birthday card and my third ballerina card is complete!  I have to say, I thoroughly enjoy making these gems for my lovely girls!  Evie gets a turquoise ballerina with a dab of pink.  She has light brown hair to match Evie's very short locks, but the little ballerina doesn't show off the reddish glints in the sunlight that we see sparkling off little Miss Evie's head!  Take a peek at Evie's card below:


If you are interested in the Ballerina construction check out this link: A Ballerina Birthday for Callie!

Ingredients:   SU cardstock: Bermuda Bay, Blushing Bride, Whisper White.  ColorBok Glitter Paper: Glacier Springs/ White.  Patterned Paper: Raspberry Road Design by Susan Darter--Mini Roses/ Stripes.  Recollections: Turquoise Foil.  Cote'dinations Sparkle cardstock: Fashionista.  Bubbley White Shimmer Paper.  Spellbinders dies: Floral Ovals, Petite Ovals Large.  Lawn Fawn die: Party Balloons.  MemoryBox die: Varsity Numbers.  Autone dies (Amazon): Balloon Message Strings (happy birthday cutout/ sentiment).  Turquoise Glitter tulle (stash).  Wink of Stella/ Clear.  Offray ribbon: Turquoise Organdy.  SU: Pearl minis.  Size: 4-3/4" x 6-1/4".

Saturday, March 20, 2021

Christmas Dove Brings An Olive Branch!

This is another Christmas card for my 2021 stash!  I do love this Stampin' Up dove stamp and die set that I used, which I'm surprised wasn't carried over into the annual catalog.  

I wanted to use vellum for the dove, which I underlaid with Tempting Turquoise and added silvery wreath. I thought a night sky would be pretty, and I found a pretty piece of dsp with deep to mid-range blue tones.  To complete the look of my night sky, I embossed the dsp with the SU Winter Snow embossing folder and then sprinkle/ splattered it with white acrylic paint.  It was just the look I wanted.  

I used a silver heat-embossed sentiment on vellum with the Tempting Turquoise as an underlay mat as I did with the dove.  I modified this die-cut mat, cutting it down narrower to fit the width I wanted.  Take a look below at the finished card:


Ingredients:  Stampin' Up products:  Cardstock--Night of Navy, Tempting Turquoise (ret.), Silver Foil, Translucent Vellum.  Stamps/ Dies--Dove of Hope/ Detailed Dove dies; Wreath Builder dies, Ornate Frames dies (sentiment underlay/ modified).  Ink:  Shaded Spruce (sponged Shimmer cardstock).  Embossing Powder--Silver.  Embossing Folder--Winter Snow (SU-2020 Holiday).  Other:   Paper--Recollections Bold Brushstrokes 12x12 paper pad; DCWV Shimmer cardstock--white.  Folk Art--White acrylic paint.  Size--4-3/4 x 6-inches. 

Friday, March 12, 2021

A Little Pink Ballerina for Sienna!

 I've now finished my second ballerina card, and this one is for my second granddaughter.  They get to be granddaughter #1, #2, and #3, by their age.  Callie, who was just 4, is granddaughter #1.  Sienna, who was just 2, is granddaughter #2, and Evie, who is 16 mos., is granddaughter #3.  I love them all dearly, and I'm sure you know, their number has nothing to do with how much I dearly love them!  All clever, cute, and darling girls for sure!


So, I missed making Sienna's first birthday card, as I was just returning from several trips to California, just in time to attend her birthday party, but not get a card done!  Within 5 days of her birthday party,  Covid arrived in Washington...the first state with a Covid case, then schools closed, gatherings closed, restaurants closed, and life became anything but normal!   It seems everything stopped, even my creative mojo and ability to get myself to my crafting table stopped!  I think we were all in shock, and my husband and I were certainly in the age range where every precaution was needed!  I am happy to say...a year later, both my husband and I have received the vaccine, and we are looking forward to an end of the pandemic!  At least we can now socialize with our family members who are vaccinated...we are almost to 75% of our immediate family at this point.


I am also happy to say that I have finally made little Sienna her card for Birthday #1 to save in her memory box...a homemade card from Grandma in honor of her first birthday!  Sienna dressed in a darling little frilly pink birthday dress, so it was only right that her card should be pink...and with her very blonde hair, her ballerina surely must have yellow hair.  I followed the construction instructions provided on Callie's purple ballerina card, and here is that link:  A Ballerina for Callie! if you are interested in the ballerina's construction.  Take a peak below at Sienna's sweet little pink ballerina:


Ingredients:   SU cardstock: Melon Mambo, Whisper White.  ColorBok Glitter Paper: Glacier Springs/ White.  Little Yellow Bicycle Patterned Paper: Baby Safari Girl--Pink Floral/ Girl Small Squares.  Bazzill: Hot Pink Foil.  Gemstone Shimmer Cardstock: Rose Quartz. Alina dies--Ballerina. Spellbinders dies: Floral Ovals, Petite Ovals Large.  Lawn Fawn die: Party Balloons.  MemoryBox die: Varsity Numbers.  Savvy die:  Happy Birthday cursive.  Rose Glitter tulle (stash).  Offray ribbon: Hot Pink Organdy.  SU: Pearl minis.  Wink of Stella: Clear (hair sheen).  Size: 4-3/4" x 6-1/4".

Sunday, March 7, 2021

A Ballerina Birthday for Callie!

March is a time to celebrate two granddaughter's birthdays as their actual birth dates are only two days apart.  Callie is my oldest granddaughter, and it will be her fourth birthday.  I have been so out of mojo for over a year that she did not get a Grandma birthday card for year three! Since a bit of my creative mojo has returned, I wanted to make a very special card for her for birthday #4.  


A friend made me a "Thinking of You" step card during my hand surgery recoveries, and I loved the card so much, I borrowed the die, thinking Callie would love it.  What little girl wouldn't...its a ballerina!  I've since decided I need to make one for each of my other two granddaughter's in different colors and different patterned papers.


The die is from Alina Crafts, and I found some YouTube videos on construction using the die.  It turns out that it's meant to be used with a companion body-parts die, which can be used with a variety of other theme and wardrobe  "people" dies.  The die comes as one main die including the head, hair, neck, upper body, and flowery vine tutu skirt.  It also has dies that cut out the dress bodice, ballerina slippers, and the eyes and cheeks.  I didn't like the way the video put the face and hair parts together...let's just say, to me, it was weird.  So, of course, I had to do my own thing, which I've tried to explain below the card picture.  And,  voilà, here is my finished card!  I think Callie will love it! 


Note:  Inside & outside are identical shades...somehow camera lighting didn't take it that way!

Ingredients:  Stampin' Up products:  Cardstock--Gorgeous Grape, Purple Posie; Punch--Detailed Trio; Pearls-mini; Rhinestones--Copic colored.  Other:  Papers--K&Co. mini floral (from Stash); Paper Adventures--Dazzle Purple-Pink Stripes; Colorbox--White Glitter paper.  Dies:  Alina Crafts--Ballerina; Spellbinders--Floral Ovals, Petite Ovals Large; Lawn Fawn--Party Balloons; MemoryBox--Varsity Numbers.  Balloon strings--Lyon Sparkly Mini Yarn.  Stash--Flower Gems.  Chatterbox Verse.  Size: 4-3/4" x 6-1/4"


Ballerina Construction:

Die-Cutting/ Punching/ Fussy-Cutting:
1) Die-cut the chest/ skirt die (and the ballerina slipper dies) from purple foil, leaving off the head and neck.  2) Using this same die, out of flesh-colored cardstock, die-cut two sets of heads with chest down to the waist...do NOT include the "skirt."  3) Die-cut a third flesh-colored cardstock head/ hair rounding the lower edge of the face without a neck.  This piece will be the "final" face for the ballerina.  4) Die-cut the head/hair only from black cardstock for the hair.  5) Using the eye/cheek die, out of black cardstock, die-cut the "eyes."  6) Using the bodice die, die-cut the dress top out of a sparkly lavender cardstock.  You could use glimmer paper, but I wanted a little less sparkle than that.  7) Again, using the eye/cheek die, you could die-cut the cheeks using pink cardstock, which is what Alina intended to be done.  I decided to use Copic marker coloring/ shading on all flesh colored areas that would show when the ballerina is complete: the face, neck, upper torso, and arms flesh.  I also Copic-coloring rosy cheeks and added a white gel pen dot rather than using pink half-circle die-cuts.  I also added Copic-colored blue eye shadow.


There were no dies for the lower body, legs, arms, or a leotard, so I fashioned my own.   1) Using a retired SU Small Oval punch (3/4" x 15/16") for the arms (with an arms behind the back look), punch one oval from flesh-colored cardstock.  2) Using the same oval punch, punch out the leotard from same sparkly cardstock used for dress bodice.  3) Using a retired SU Large Oval punch (1-3/4" x 7/8"), punch one large oval  from the flesh-colored cardstock for the lower body (hips) and legs.  4) Turn this large punched oval vertically.  Leave one end of the oval as is for the hips.  5) Fussy-cut and shape legs with pointed toes from the other end of the oval.  Now, it was time to put my body parts together!  


Head/ Hair/ Face/ Upper Body & Arms:

1) I adhered the two head/ upper body flesh pieces together to form a stronger upper body unit.  2) I trimmed 1/16" around the head/hair down just to the neck.  3) I trimmed 1/16" along the chest/ upper body along the sides from shoulders to waist.  The head/hair was done so when the third "head/ face" flesh piece was added this double thickness would not show...only the top third layer would show and its round without a neck would form the chin.  The sides of the chest/ upper body edges were trimmed to allow the flesh cardstock Small Oval to form the shoulders and arms, looking like she was putting her arms behind her back.  4) I  Copic-colored/ shaded the face at this step and I did the same to the neck and chest of the two-layer piece.   5) I adhered this third Copic-colored face (hair, which did not need to be Copic colored or shaded) to the double-thick body making sure the head fit nicely on top and formed a "chin".  Now, my head is 3-layers thick!  6) I trimmed off just a bit of the flesh cardstock around the edges of the hair area so that none of the flesh color would show around the edges of the black hair color.  7) I fussy-cut the black hair from the head black cardstock so it would fits nicely over the flesh-colored hair area and adhered it to the flesh-colored hair.  When it was dried, I applied Clear Wink of Stella for a bit of shine to her hair.  8) I applied a tiny bit of glue to the back of her black eye/ lashes and used tweezers for correct placement.  (Be sure you have them turned over for the correct sides of the face when applying the glue).  9) I Copic-colored her rosy cheeks and added a white gel pen dot to their centers.  10) When eye glue dried, I Copic-colored her blue eye shadow.  11) Now, I was ready to add her arms.  I Copic colored/ shaded the flesh-colored Small Oval, but didn't bother to color the center of the oval where the chest/ upper body would be glued.  I positioned the oval horizontally, fitting it behind the back so the shoulders flared out at the base of the neck and adhered it to the back of the torso with glue. 


Lower Body/ Leotard/ Legs/ Ballerina Slippers: 

My ballerine needed a lower body, leotard and legs!  1) Take the leotard...the Small Oval cut from the sparkly bodice cardstock; turn the oval vertically, and trim 1/16" off the end of the oval curve using a straight cut.  2) Fit this straight edge up to the flesh waist bottom and glued it to the lower edge of the arm oval (which you will see extending below the waist) and snug it up to the waist flesh.  3)  Turn over the ballerina and glue her "hip/legs fashioned larger oval" behind the sparkly leotard so her hips are behind the leotard and legs extend below.  4)  Adhere the ballerina slippers over her pointy toes with the wider part of the slipper down covering the "pointy toes."  Set aside your girl to thoroughly dry while you form her skirt/ dress.


Skirt/ Bodice Top/ Hair Bow: 
1) With the purple foil skirt/ chest die-cut, narrow the chest area, all around three sides, down to approximately 1/4" wide and 1/8" high just to waist where skirt flares out; set aside.  2
) Cut 5 or 6 pieces of tulle (sparkly best) 2" long by 3" wide.  Overlay the pieces one layer over the other.  2) Using the metal die as a guide only, fussy-cut the tulle to the same shape as the die skirt and upper body.  3) Adhere the layers together with bitty glue does and larger if needed, keep the edge-shaping even along the skirt sides and upper body to form a unit.  4) Take the purple foil skirt/ chest and attached to the tulle unit to the backside of the chest (make sure no tulle shows along the "chest" part of the skirt).  5) Lift the skirt vines and streak with glue, pressing them on the tulle to attach and dry.  6)  When skirt/ tulle is dry, attach the lavender leotard and legs behind the tulle at the torso back with glue/ glue dots as needed.  7) Glue sparkly lavender bodice onto ballerina chest top and foil skirting.  8) Add 4 string pearls along waist.  9) Take a 4" to 5" piece of 1/4" sparkly ribbon and tie a bitty bow, cutting and angling its tails.  (Tip: my sheer ribbon was too wide, so I trimmed it to 1/4" width.)  10) If desired, you can add 2 bitty pearls to the bow knot area as well.

Monday, March 1, 2021

No Cake for David?

My oldest of four will be celebrating his birthday in the first week of March.  He is on the KETO diet, so he wants to say, "NO," to cake...can you imagine?!  I found it is now possible to purchase KETO ice cream, so we will be making an ice cream cake for his birthday.  He won't have to say NO to cake and he can have candles!  Now, I just had to get busy on a birthday card.


When I was last visiting my Mom, pre-COVID, I saw a card she made at her Stampin' Up demonstrator workshop.  I remember its sentiment from the stamp set, Amazing Life, and thought it would be perfect for my dieting son's card.  It also used the very masculine papers, In Good Taste, which I have, and thought one of the patterns might work nicely as well.  I decided to add a little black and a some recycle coppery foil (saved from an envelope insert...just too pretty to throw away!), plus a cupcake all work together.  Take a peek below at how my project evolved into David's finished card inside and out:


Ingredients:  Stampin' Up products:  Papers--Basic Black cs, Very Vanilla cs, In Good Taste dsp.  Copper Foil (saved from an envelope insert).  Stamps--Amazing Life (sentiment); Dies--Call Me Cupcake (framelits), Stitched Rectangles; Inks (sponging)--Bermuda Bay, Call Me Clover, Cherry Cobbler, Melon Mango; Clear Embossing Powder; 3/8" Black Shimmer ribbon; Metallic Brads.  Other:  Copic Markers.  Inside--Chatterbox verse.  EK Victorian Corner punch.  Size: 4-3/4" x 6."

Wednesday, February 24, 2021

A Special Friend's Birthday!

In August this past summer, I made one trip during the COVID pandemic to meet my sister and mother for a cardmaking holiday!  We traveled to Sister, Oregon, which was about a 5-1/2 hour drive for each of us.  I traveled south from Washington and they traveled north from northern California.  Each of us were a bit leery to do this even though we were in a lull in COVID outbreaks in the areas from which we traveled, as well as where we traveled to.  We quarantined in preparation just to be sure, and  brought an arsenal of remedies to wipe everything down in our Airbnb rental just in case.  We were fortunate to have no mishaps as a result, and we were very, very careful.  We bought groceries and prepared our own meals, and only ventured out twice, sanitizing thoroughly during and after our return.  We were happy to see the businesses mandated masks; were only allowing a few in their shops at a time; and requiring alcohol washing before entering and after leaving.


To save having to pack a lot of cardmaking supplies and because my creative mojo was pretty well shot, I focused on bringing only card kits, extra cardstock, foil, glimmers, embellishments, plus a few stamp sets that I thought might work well with the different kits.   My focus for my trip was to try to make birthday cards and thinking of you cards that I would be needing for friends and family so that my lackluster performance in my craft room would not continue to prevent me from getting needed cards out in a timely manner!  


My oldest kit was a Stampin' Up one that I purchased in May 2019, "Made to Bloom."  I thought I'd start out with it and make a card for a special friend's birthday that was about six months or so into the future (I missed her 2020 birthday with no mojo juices flowing)!  Though I liked at least two of the four card designs suggested, I decided to see what alternative card I could self-design from the materials at hand.  I mixed and match the background papers and flowers, did some fussy-cutting and layering not called for, and arrived at a card that I was pretty happy with.  Today, I finished my inside design and verse, and it is now totally ready to send when her birthday gets a little closer.  Take a peek below at this card that was made with my dear friend's birthday in mind.  I hope she enjoys it when her birthday time comes around. 


Ingredients:  Stampin' Up Products:  Papers--Basic Black cs, Gold Foil, Very Vanilla, Whisper White.   Kit--Made to Bloom (retired Occ. 2019).  Artistry Blooms sequins (2020-21 Annual).  Memento Tuxedo Black ink.  Other Products:  Reverse Confetti "Beautiful Banners" sentiment.  MemoryBox "Stitched Country Borders."  Cottage Cuts Stitched Ovals dies.  Spellbinders--Lacy Ovals dies.  Colorbox Chestnut Road ink (edge distressing).  Chatterbox verse.  Fussy-cutting.  3-D Paper Piecing.  Size: 4-3/4" x 6". 

Monday, February 15, 2021

Ladybug Birthday Greetings!

 I have several birthdays in February that I like to make cards for...one is for a dear friend and cardmaking buddy.  To lift her spirits and mine during this glum COVID pandemic, I thought we might both be in the mood for something lighthearted and whimsical.  This Little Ladybug stamp/ die set should be perfect for Carla, who loves to garden.  These little friends can be placed in her garden to multiple and flourish to eat to their heart's content while keeping her garden free of aphids come spring when it is full production!


If you've been reading my blog of late,  you know that I've had no creative mojo for months upon months.  In the last six months, I have resorted to kits, both homemade and purchased, and using them to try and spark my interest.  Another thing you may know from reading me in long ago posts, with a card kit, I just can't make the cards as they are designed.  They always spark ideas that I think I might make the card even better or will change something to make it a more me card!  Once an idea is sparked, I just can't resist, and I just have to try it out!


I have an old card kit from the Stampin' Up 2020 Sale-A-Bration freebie catalog, that I've only made one card with, using my own alternative design with the aqua kerchief paper.  I have not yet touched the red kerchief paper, and I thought it would be perfect with the cute little ladybug stamps.  Of course, this will be my own total alternative card design rather than one that came with the kit itself, which all feature popped flower designs with the die-cuts provided.


With this card, I got in some Copic coloring while creating my own card design...haven't done image coloring in many a month!  Take a peek below at my finished Red Kerchief paper alternative card design, both front and inside:


Ingredients:  Stampin' Up products:  2020 SAB Kerchief Card Kit (red kerchief paper / stitched sentiment die-cut); Cardstock--Basic Black, Real Red, Whisper White, Garden Green, So Saffron (inside); Stamps--Little Ladybug;  Dies--Stitched Scalloped Rectangles;  Ink--Memento Tuxedo Black.  Other:  Copic Markers (ladybug coloring); MFT /die-namics--Fresh Cut Grass; EK Punch--Medium Scallop Corners.  Pretty Pink Posh--gold small sequins.  Size--4-3/4" x 6.

Friday, February 5, 2021

A Snowflake Merry Christmas!

This is another of my January New Year's resolution Christmas cards.  It was also another 2019 card kit from my Stampin' Up mentors, Dar Peterson and Luci Kirschbaum.  Its original design was presented by  Luci, and again I did quite a bit of modifications that came to mind and to make the card more me, plus fitting some Splitcoaststamper challenges along the way!


First, turned my cardbase from horizontal to portrait, and I added more cardbase layers, one in Balmy Blue to add more color to the card front's framing.  I kept the white snowflake embossed layer to host the geometric card front shapes.   For this geometric card front, I  re-arranged, re-located, re-sized, and added to the patterned geometric shapes.  I used the same dsp patterned paper supplied in the kit, and when I cut and added to the number of these shapes.  My geometric placements were a lot more uniform and balanced and not quite so random.  I also centered up the sentiment layer and positioned only one glitter snowflake at its upper left corner, eliminating the second snowflake all together.  In addition, I added a few more sequins to finish.  Take a peek below at my finished card:

Ingredients:  Stampin' Up products:  Cardstock--Whisper White, Balmy Blue.  Pattern dsp--Snowflake Splendor.  Balmy Blue Glimmer (glitter paper).  Stamps--Itty Bitty Christmas (sentiment).  Dies--Stitched Nested dies (sentiment layers); So Many Snowflakes dies.  Ink--Balmy Blue.  Embossing Folder--Winter Snow EF.  Ribbon--1/4" Snowflake Splendor (2020 Holiday).  Gems--Blue Adhesive Gems (sentiment/ glitter snowflake).  Sequins--Artistry Blooms.  Size--4-3/4 x 6 inches. 

Sunday, January 31, 2021

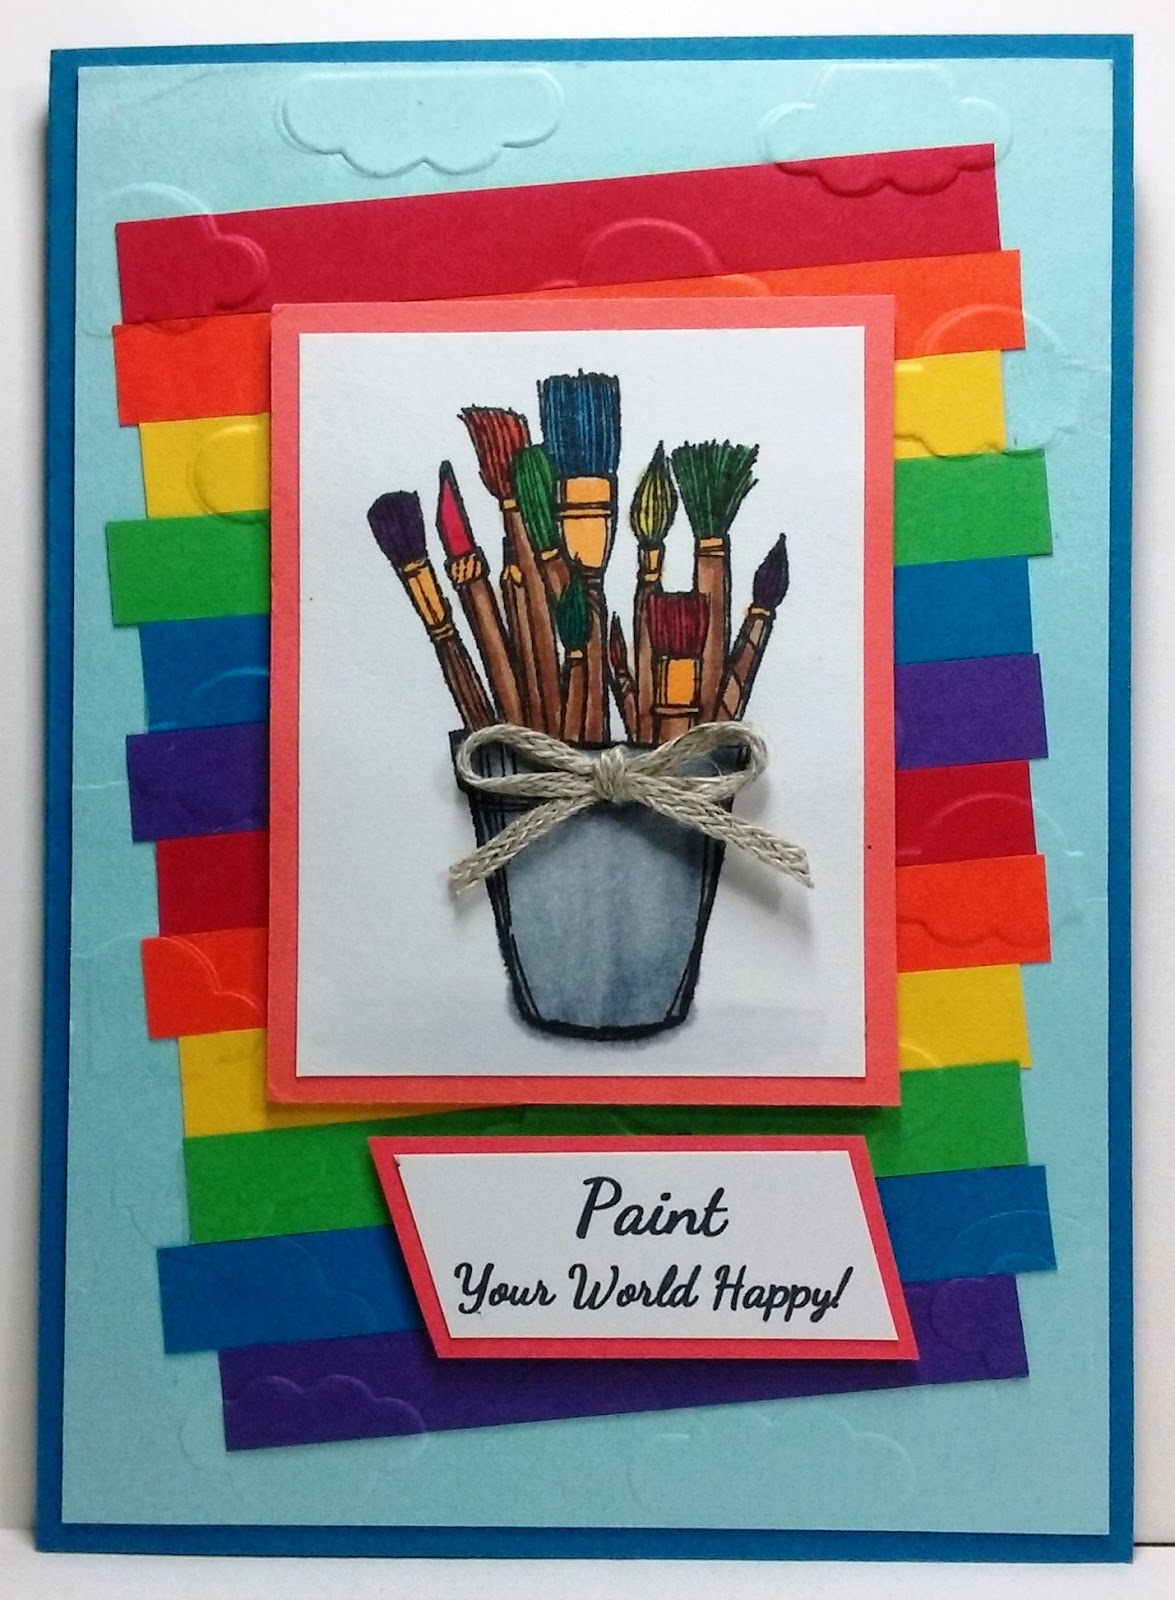
Paint Your World a Happy Rainbow!

Moving on with Splitcoaststampers' Virtual Stamp Night Mini Challenge.  Challenge #3 was posted at 7:00 p.m., ET and was entitled: Always Be A Rainbow.  Our hostess asked us to be inspired by the song Rainbow by Kacey Musgraves and create a card with a rainbow or using all the colors in a rainbow.


I chose to go with the idea of using all the colors in a rainbow rather than an actual rainbow.  The song is a bit sad, but also depicts another way to see your life, as there's always a rainbow in your life if you just look.  I decided my card would choose a happy rainbow with the sentiment Paint Your World Happy!  Note that it depicted crafting paint brushes...aren't we all happy when we are crafting, thus the sentiment works perfectly!  This little happy card will be for my friend, Sandy, whom I am missing during this long, never-ending social distancing. See the finished card below:


Ingredients:  Stampin' Up products:  Cardstocks:  Pacific Point, Balmy Blue, Real Red, Tangerine Tango, Daffodil Delight, Cucumber Crush, Pacific Point, Concord Crush, Poppy Parade, Whisper White.  Stamps--Crafting Forever (2017-19/ retired).  Trim--3/16" Braided Linen.  Wink of Stella--Clear.  Other:  Embossing Folder--Darice--Cloudy Sky.  Copic Markers.  Chatterbox sentiment (computer).  Size: 4-1/2" x 6-1/4."

Sunday, January 24, 2021

A Doily Gatefold Garden

I finally had the nudge to visit my craft room...yay!  I really wanted to put some cards together to send to some friends who have received no cards from me to celebrate their special times, even birthdays or Christmas while my mojo and cardmaking deserted me and ran amok for over a year!  My first thought was to motivate myself by trying to finish some cards already started that were gathering dust in the unfinished stash!


My first card is one I start back in the spring of 2019 when I traveled to visit my Mom in Redding, California before the COVID pandemic took over our lives.  While there, I attended a Stampin' Up card party given by Mom's Stampin' Up demonstrator, Darla Watson.   Darla is quite talented, and I always enjoy going to her parties when visiting Mom!  I am so glad my 95-year old "young" Mom still enjoys getting out and doing cardmaking with family and friends!


There were 5 card kits to make, all fun designs.  Some I completed at the party and others I took home half completed because ideas popped in my head while making them to add other layers or embellishments to the design.  This "popping into my head of ideas" is quite common when I'm making cards, my own or someone else's designs.  Most times, I feel pressured to pursue the ideas, or I will look at the finished card and say to myself, "what if" and drive myself crazy because I didn't at least see what I thought by using the "what if" ideas.  So, this card is one of those "what if" designs from Darla's long-ago designs that I found still unfinished and remembered my "pop in my head, what if" ideas.


As most of you know, who have read my blog for any length of time, I prefer cards larger than the standard A2 size.  The original card design had a white gatefold card base and a floral dsp layer added to the gatefold .  To me, it just needed more color, which meant layers, which automatically means...larger card.  I added a Blueberry Bushel (blue) bottom layer and a Call Me Clover (green) layer and then the white gatefold with flower dsp panels. 

 
It had a yellow belly-band as most gatefold cards do, but I decided to try a permanently attached horizontal band with Rose Red or Strawberry Slush scalloped edges.  The band starts on the center left side of the gatefold, under the doily, at the edge of the flower dsp and is adhered all the way around the back to the center right-edge of the gatefold.  The doily is only attached to the left side of the gatefold and becomes an overlay over to the right side.  Because of my modifications, I added a 1-3/4" white punched circle to the centerback of the doily underside to pretty it up now that its back shows when the card is opened.  


Thank you Darla for allowing me to modify your design many months later.  I always enjoy my visits and the fun times at your parties.  Here is my finished version of Darla's original card:


I'm send this card to a cardmaking buddy who did not receive cards from Chatterbox (me) while I hibernated in isolation.  Here is the added interior that she will received when she gets it in the mail!


Ingredients:  Stampin' Up products:  Cardstock--Blueberry Bushel, Call Me Clover, So Saffron, Melon Mambo, Whisper White;  Patterned Paper--Garden Impressions dsp 6x6;  Stamps--Eastern Beauty (sentiment);  Ink--Blueberry Bushel;  Punches--Bitty Blooms, 1-3/4" and 1-1/2" Circles, Leaf;  2-7/8" White Pearlized Doily; Bitty Basic Pearl Jewels.  Other products:  EK Punch--Victorian Corners.