Saturday, December 28, 2013

A Birthday for a Dear Friend!

One of the ladies that I worked with for over ten years has a birthday right after Christmas. It is my bad that I never seem to be able to get a card mailed to her for her special day. I know it is the busyness of the holiday season that hinders me every year with the all the shopping, wrapping, church events, family visiting, etc., but still that is just no darned excuse and I feel bad every year.  I was determined that this would not happen this year, so while visiting my mother in California during October, I made it a point to get Karen's card finished except for this inside decorations and verse, which I just finished the other day. 


I chose this card to make that came from a kit designed by Becca Feeken and had been saving for a very special person. And though it is not one of my own designs, I just love Becca Feeken's wonderful card designs, especially this cards message on front and its soft colors.  I hope Karen enjoys her birthday and likes my card, made especially for her.


I decorated the inside of the card to coordinate with the paper patterns on the front, and  I prepared a little verse in celebration of Karen's birthday as well. It commemorates our special friendship that started so many years ago. 


Recipe: Becca Feeken Amazing Grace Kit: October 2012.  Recipe:  Cardstocks: Neenah Cream (base), American Crafts-Kraft, Geyser. Kaisercraft-Magnolia 6x6 pad (Damask/ Rose Scallop Border). Stamps: JustRite It's Sew Vintage. SU Ink: Rose-Red. Spellbinders Exclusive Becca Feeken dies. Hug Snug Siam Pink seam binding ribbon. Vintage button. Double-head pearl hat pin.

Wednesday, December 25, 2013

MERRY CHRISTMAS: For the Birds!

Merry, Merry Christmas to all!  

Hope your day is delightful!

Here is another card that evolved from one I started at Liz Thayer's Totally Loving Christmas in August.  The card center was Liz's design with a smidgen of layout changes.  With my seeming need to layer and enlarge everything I seem to put my hand to, I trimmed the green embossed layer to an almost-square.  I then added three more layers beneath it, starting from a new Real Red cardbase, an Early Espresso mat layer, and then some patterned dotted paper from my stash. Again, with this card, I think the pattern made the little bird pop off the card more and added a bit of interest as well.  I loved the two different types of embossing that Liz planned for the mat behind the bird's circle and the Old Olive layer.  Wonderful touches on this card!

Recipe: SU products: Stamps-For the Birds. Cardstock-Real Red base, Early Espresso, Old Olive, Whisper White. Silver Glimmer. Embossing folders: Fancy Fan, Northern Flurry. Punch: 2-1/2” Circle punch. Deco Labels framelit. Markers: Rose-Red, Midnight Muse, Old Olive. Rhinestones. SU Early Espresso 1/8” Taffeta ribbon.  Recollections Christmas Stack (pattern). StazOn Black Ink.

Monday, December 23, 2013

Santa's New Suit!

I went to a cardmaking event this past August and made over 12 Christmas cards for the coming Christmas.  One card was depicting Santa's bright red suit with belt buckle.  After completing the card, I decided it would be just right for my oldest son, David, but it just need something more added.  


I went to work remaking the idea of the card with just a bit more flair.  My Santa suit would have the white fir edged in scallops to create the idea of a furry white trim.  Straight sides just didn't suggest fir to me.  I decided rather than a "belly band" belt, it should be a real belt, so I trimmed the overlap in a "V" shape to represent the end of the belt and attached it directly the the card so that it was no longer a slip off/ slip on "belly band." Then, I dropped my belt and its buckle lower as one would usually sees on a fat man, because the belt just won't quite fit around his jolly fat middle.  I felt the coat buttons were too small and too plain, so I chose larger black faceted buttons with a silver rim, and I spaced them further apart.  Now, it was looking like I thought it should! I know David will really like his Santa's festive red suit.


Here is a peek below at the inside design and the computer verse that I composed to suit the card's exterior design.


Recipe:  Stampin' Up products:  Cardstocks - Real Red, Basic Black, Whisper White, Basic Gray.  Punch - Decorative Label.  Embossing Folder -  Petals A Plenty.  Dazzling Details - Silver Sparkle (glitter glue).  Candy Dots w/silver brads).  Brads - mini black.  EK punches: Scalloped Scallop Edger; CardCreators - Interlaced Corner.  Computer verse.

Friday, December 20, 2013

Sassy Little Penguin!

I went to a Christmas cardmaking event at the Rock, Paper, Scissors store in Redding, CA when visiting my mother about a year ago.  We were given 18 card kits to make at the event (and, unfortunately, it has since gone out of business).  I was not able to stay to finish all of the card, so took several home with me unfinished.  I pulled some of the bagged kits out to finish this year, but found that somehow I did not have the instructions, but only pieces of papers and embellishments in the bags.  Enclosed in one of the kit bags was a little penguin that I would say may have been cut using a Cricuit, but I'm not sure as I'm not familiar with the Cricuit myself.   I was not sure exactly how he was to go together and there really seemed to be too many pieces for the front of the card, so I thought I would just focus on the penguin and his possible parts. I decided to put on my creative mojo cap and see what I could some up with.


First, there was not enough papers to create a card with any layering, so out came my Christmas paper stash.  I was on the hunt to look for papers that would go with the olive/white dotted paper provided and a red and yellow penguin!  I decided to leave the cardbase white, though I had to enlarge it because of adding layers.  I also decided to add a layer of red, a stripe with compatible coloring, and a doily.  The sentiment in the bag did not seem to fit the size of the papers, so I found a new "Merry Christmas" sentiment that would fit the width, deciding to layer it in red with fishtail ends. He also needed eyes...little black eyes to be sure and some holly berries for his hat.  Now, I was ready to begin, and here is how my penguin ended up in its finished product.

Recipe:  Georgia Pacific White cs. Bazzill Classic Red/ Bling cs. Bella Blvd.: Christmas Wishes/ North Pole-dots. Fancy Pants: Traditions-Christmas Morning/stripe. Stampin’ Up stamp: Greetings of the Season. Stampin’ Up Ink: Early Espresso. Wilton 4” Doily. Cricuit penguin cutout. Stampin’ Up 2” Oval punch.  WRMK Deco Corner Chomper. Cherry Red MultiCraft Gumdrop Glitter Gems.

Wednesday, December 18, 2013

A Little Copic Coloring at Christmas!

During this past year, I have done very little Copic coloring, and I have so many cute little stamps from Stampin' Up that just need a bit of coloring to make the card just right!  In looking over my Christmas stamp stash, I found a cute little set that I had not yet used:  Polar Party.   Without really knowing how I wanted this card to look when finished, I colored my trees and decided it needed a bit of new-fallen snow on the ground below the trees, using Stampin' Up Iridescent Dazzling Delights over the ground that I had lightly colored in pale mint green.  I set my image off to the side to dry while I search for the perfect papers to compliment it.  Even though this stamp set doesn't jump right out as a vintage style stamp, somehow, I managed to choose papers that allowed it to be turned into my vintage simple style.  


After the papers where chose, I decided my trees needed red, gold, and white rhinestone and pearl ornaments and tree-toppers.  I decided to cut my image with a circle die and used Spellbinder Dahlia as a back frame.  From there the red sparkle netting seemed to fit just right.  I love using netting, but the card has to be just right for it to be the right touch!  I hope you like my little tree card...I think it turned out very festive.

Recipe:  Bazzill Classic Red cs. DCWV Christmas stack (2011).  Authentique: Festive-Joyful stripe.  Stampin’ Up stamp: Polar Party.  Stampin’ Up Ink: Basic Black.  Copic Markers.  Recollections: pearls & rhinestones.  Stampin’ Up Dazzling Details: Iridescent.  EK Punch: Grateful Hearts.  Spellbinders die: Dahlia + Classic Circles LG.  WRMK Deco Corner Chomper.  JoAnns: Red Sparkle Netting (fabric). 

Monday, December 16, 2013

Snowflakes Glisten!

My Christmas paper stash is brimming!  In thumbing through, I found a perfect group of papers from Echo Park named Winter Park.  These papers are all in beautiful winter blues, grays, white, and silvers that jump right out and say:  "snowflakes in winter wonderland at Christmas."  I have several lovely snowflake punches, dies, and border punches and thought that was where I should start.  My card would also need some Glittery paper as well to enhance the Winter Park paper for sure.  Here is what happened when all these paper and tools came out to play!

Recipe:  Papers: Georgia Pacific-White cs.  Stampin’ Up-Not Quite Navy cs.  Echo Park-Winter Park stripe.  Recollection-Silver Gray Glitter.  Stampin’ Up stamp: Christmas Punch (ret).  Stampin’ Up Ink: Soft Suede,  Stampin’ Up Snowflake Punch.  Martha Stewart Snowflake Punch (2 sizes). Spellbinder dies: Classic Ovals + Classic Scallop Ovals.  Stampin’ Up Scallop border punch. Martha Stewart Snowflake border punch.  Zutter Corner Rounder.  WRMK Deco Corner Chomper. Recollections Silver Adhesive Large Brad.

Friday, December 13, 2013

Serene Silhouettes Inspiration!

I made a little card designed by my friend, Liz Thayer, at her Totally Loving Christmas event back in August.  I had this stamp set in my stash, but had never used it or thought about it in terms of a Christmas stamp.  It was such a wonderful, serene Christmas scene that it inspired me to make another, using her fog technique and torn snow mounds.  As I like layering in my cards, I added a few more layers and patterned paper to the look, as well as enlarging my card.  I really liked how the pattern paper picked up and enhanced the bird coloring to make them pop.  Thanks Liz for the wonderfully pleasing effect of this card.  It makes you feel like you are looking out the window at a pristine snow-covered world that no one has dared to walk upon to mare its excellence!

Recipe:  SU stamps: Serene Silhouettes, Gorgeous Grunge (background illuminate), Petite Pars (sentiment). SU cardstock: Basic Black (base), Whisper White, Rich Razzleberry. Sycamore Street dsp. SU ink: Smoky Slate (stamping, sponging, distressing), Illuminate Glimmer. SU markers: Basic Black, Rich Razzleberry. SU Dazzling Details-silver. 

Wednesday, December 11, 2013

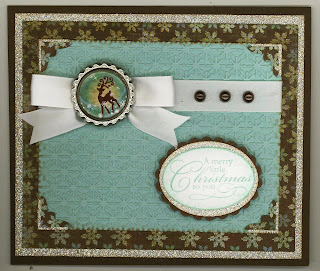
A Reindeer Bottle Cap!

I bought some bottle caps last year in two different sizes and have never used them.  Of course, it was time to try making an embellishment to use on a card for sure.  I also purchased some one-inch stickers that could be used with bottle caps, and I remembered that one of the images in particular was a favorite.  He was a little Christmas reindeer and he came to mind as I've been busy making my Christmas cards to be mailed during this festive season.  I got out all the necessary pieces: bottle cap, reindeer sticker, and an acrylic bubble.  I looked up some directions on bottle caps and found that running it through the Big Shot in a sandwich would smash down the edges and make it a perfect frame for my reindeer to fit right inside.  In checking out the acrylic bubble, I realized that it was adhesive on the flat side and just glued right down on top of the sticker and into the bottle cap...no muss no fuss!  WOW...I was thinking it was going to be so much more complicated than that!  


Now the search was on for the perfect papers and embellishments to fit my little reindeer bauble with snowflakes glistening.  I found this lovely snowflake paper, but it didn't have quite enough of the Pool Party aqua on the snowflakes that would show around the edges of my matting.  My answer was to color them by sponging these snowflakes with Pool Party stamping ink where needed.  Below is the finished product that developed.

Recipe:  Stampin’ Up Papers: Early Espresso cs, Pool Party cs, Silver Glimmer. MME: Signature Christmas 6x6 pad (brown snowflake). Stampin’ Up stamp: Christmas Punch (ret.). Stampin’ Up Ink:  Pool Party.  Stampin’ Up EF: Snowflake (ret.). EK punch: Vintage Corner Medium. Spellbinder die: Classic Ovals + Scallop Ovals.  The Bottle Co.: 1” bottle cap, 1”Epoxy Dot, Santa Baby Bottle Cap Images (reindeer).  Offray 5/8” White Satin ribbon. Recollections Chocolate Pearls.  

Monday, December 9, 2013

A Vintage Santa!

One of the style of cards that I dearly love is vintage simple.  This is a name I give to vintage cards that are not too over the top with too many frou-frou embellishments and details.  At Christmas, vintage Santas are one of my favorite images.  I have been collecting them in a file on my computer, but have never used one.  I decided this was the year that I had to try my hand at a card featuring a vintage Santa.  I love to frame vintage pictures, and I decided that would be what I would do with my lovely old guy!  Here is how my vintage Santa card evolved.

Recipe: Georgia Pacific White cs. Bazzill Blush Red Medium cs.  DCWV Christmas Stack (2011): green snowflakes. Authentique: Festive-Joyful stripe. DCWV Glitter paper: lime. Graphic Fairy: Old St. Nick color image. Wilton 6” Doily (modified). Colorbox Chestnut Roan distressing. Stampin’ Up Scallop Border punch. Spellbinders: Scallop Ovals LG, Ovals SM, Scallop Squares LG.  Petalloo Poinsettias. Recollections Rhinestones.

Saturday, December 7, 2013

A New R.N. in the Family!

Congratulations are in order for my youngest daughter, Jackie!  Today, our family and Jackie's long-time friends gathered to watch and celebrate her R.N. pinning ceremony upon completion of her final quarter in her associate R.N. nursing degree.  She has worked so very hard putting aside many things in her singular effort to become a registered nurse.  We are very proud of all her hard work and her 4.0 grade point average.


So, of course, I had to make a card for Jackie for this special occasion. I made her card while on my vacation in California from an original design by my sister, Heidi Gonzales (mylilscrapcorner.blogspot).   As I was creating it, I thought it would be perfect for this occasion with the grandfather clock denoting it was time to celebrate something very special.  After completing the outside and deciding on the right sentiment for the front of the card, I began to formulate my inside verse to celebrate Jackie.  I hope she likes the card and the special words meant just for her.

Recipe:  Papertrey Ink designer paper and cardstocks. SU Punches: Modern Label, Word Window. EK Fancy Corners. Papertrey Mehndi Medallion Impression Plate. Sizzix Tags. Wilton 4-inch Doily. Hug Snug Melon seambinding ribbon. MFT Felt: Jellybean Green. Prima flower. Stash: Lace & Fringe.

It has been an interesting voyage watching this young lady grow from a gawky teenager to a beautiful young lady.  She began her college career thinking she wanted to be a professional photographer.  Her first college degree at the local community college was an Associated of Arts degree.  She went from there to the Seattle Art Institute and received a photography degree...her specialty fashion photography!   After several years of working in photography, she came to the conclusion that to be really successful in her preferred line of photography, she would have to move from the northwest, and she had no desire to do that.


During these years and somewhere along the way, she became interested in nursing as a possible change for her life's career.  This isn't too strange because both of her grandmothers were nurses, and she has numerous aunts and cousins who are nurses.  To be sure that was her calling, she volunteered at Harborview Medical Center and went back to college to get her Certified Nursing Assistant license.  She was able to get her first CNA job at Harborview and was elated.  After a year of working at Harborview, she was sure she wanted to be a nurse. 


Her attempt to achieve this goal is a little slower than some, as she basically had to start college all over again changing from arts to science!  So, back to college she went while still working part-time at Harborview to acquire the prerequisites needed to even be able to even apply for a nursing program.  It was a long and arduous trek, taking biology, chemistry, microbiology, anatomy & physiology, psychology, and numerous other classes, but she was finally ready to find a school.  Trying to get her nursing degree in an economical manner, she chose the L.P.N. to R.N. bridging route at our local community college, which would mean four full-time quarters, and then apply and test for her L.P.N. nursing license.  Working for a year after passing the L.P.N., she bridged to an associate part-time R.N. program while still working part-time in private pediatric care. 


Today, she finished the next step in the ladder to her final goal, getting her B.S.N.  She has already formulated her plan to work as an R.N. for a year, and then apply to the University of Washington's Bachelors of Science R.N. part-time bridge program.  Personally, I think the Bachelor's degree may not end up being the final step, but we'll see as time unfolds.  Her entire family, of course, wishes her the very best and will continue to love and support her!  Though 
this story became rather lengthy, I hope I did not rattle on too long...can you tell I'm a proud parent!

Thursday, December 5, 2013

Using Stampin' Ups New "Merry" Expressions Thinlit #2!

I was so excited when the man in brown delivered by Stampin' Up order to me while vacationing in California.  During a weekend crop at my Mom's, I just had to try out my "Merry" Thinlit on a card of my own.  I love this Teresa Collins Cottage Christmas paper that I purchased last year and didn't get a chance to use.  It is so very festive and perfect for my new cursive die!  I'm big on layers, so I didn't seemed to be satisfied until I had added a minimum of eight layers, including embellishments.  But, surprisingly, even with all those layers, the card remains fairly simplistic in look.  I hope you enjoy my "Merry" little card.

Recipe:  Stampin’ Up Papers: Cherry Cobbler cs (base); Red Glimmer. Recollections: White Glimmer.  Teresa Collins-Christmas Cottage: Sentiments/ Tiny Flowers Stripe. SU Expressions Thinlits. WRMK Deco Corner Chomper. Zutter Corner Rounder. Petaloo Poinsettia. SU Rhinestones (Copic colored).  Ribbon stash: 5/8” white ruffed sheer; Felt rick rack.

Tuesday, December 3, 2013

Using Stampin' Ups New "MERRY" Expressions Thinlit #1!

I just purchased Stampin' Up's new Expressions Thinlits a few weeks ago.  The first time I saw this new die and also got to use it was at a Christmas Cardmaking Event hosted by my friend, Liz Thayer.  First, I am including the very first "MERRY" card I made designed by Liz for her cardmaking event.  I did tweak the card a bit with my own ideas by adding a white cardbase below the red to give it another layer and fishtailed my ribbon instead of burying it edges beneath a layer.  This card is just too darn cute and I know whomever I decide to give it to will be delighted!  In my next post, I will show my own card that I designed using this new "MERRY" die.

Recipe:  Stampin' Up products:  Paper-Whisper White cardbase, Real Red cs, Red Glimmer, Season of Style dsp.  Stamp: Happy Hour. Ink: Cherry Cobbler, Gumball Green. Dies: Expressions Thinlits-Merry. 5/8" Satin-Sheer.

Sunday, December 1, 2013

Christmas Glitter Window #3!

Here is my third and final use this year of the Glitter Window technique using Stampin' Up Ornament Keepsake dies.  As you can see the same effect can be accomplished with dies and not just punches.  I've had this red and white spiral paper in my stash for a few years and decided I either needed to throw it out or try to make something with it.  I thought a Glitter Window in the center of its spiral might be interesting.  I found some peppermint candy paper with an aqua background to use as the ornaments decoration.  I ended up fussy cutting one of the peppermints out of the paper and using Pool Party cardstock behind in order to isolate a single peppermint.  I have certainly confirmed that I love the effect of the Glitter Window.

Recipe: Stampin' Up products: Whisper White (base), Real Red, Pool Party cardstocks. Die: Ornament Keepsakes. Clear button. Recollections 180 Christmas Stack. Queen&Co. Red Crystal-coated pearls. Darice fine white glitter. Scotch 3M 2-inch Clear Packing tape. Lyon mini yarn (JoAnns). Karen Foster Scrapper's Floss: Red. Stash: 5/8" white satin-sheer ribbon; 3/8" seafoam satin ribbon; Lyon white/silver mini yarn.

Friday, November 29, 2013

Tickets to Christmas #2!

I wanted to try out the Glitter Window technique again...I just love its effect!  This time I decided to try using a patterned paper behind the window instead of washi tape for the ornament's decoration.  I also wanted to use one of my other ornament punches to see how that would look.  I love Stampin' Up's Winter Frost  designer paper in the Holiday booklet and their Silver Glimmer paper and those were my choices for this card.  I was pretty happy with it when it was finished, reminding me of a cold and crisp winter day with a bit of snow on the ground!

Recipe:  Stampin Up products:  Papers: Island Indigo (base), Smoky Slate, Pool Party cardstocks; Winter Frost dsp; Silver Glimmer. Ink: Island Indigo. Stamp: That's the Ticket. Punches: Ornament (retired), Boho Blossoms. Embossing Folder: Snowburst (retired). Rhinestones. Dimensionals. Stash:  Satin-Sheer ribbons - white and seafoam.

Thursday, November 28, 2013

Happy Thanksgiving to ALL!

I want to wish all those who take a peak at my blog a wonderfully warm and 

Happy Thanksgiving!  

I hope each and every one of you have a delightful day, enjoying good food and pleasing company!


My card was inspired by one originally designed by Misty Bradley over a year ago, and I thank her for that inspiration.  As you may know by now, I really like square cards, so my card had to be square, and I decided it needed a few more color layers.  I veined my leaves by folding at just the right angles and sponging these folds with Colorbox's Chestnut Roan to simulate the dinner-plate-sized maple leaves that fall in our front and back yards every year.  I also tweaked the papers used, adjusted the layout a bit, and added embellishments.  I just love the little wooden button and twine and decided it was just the right finishing touch.  I think my card turned out to be really warm, thankful, and encouraging, and I hope you enjoy it on this special Thanksgiving Day!

Inspired by Misty Bradley 2012 original.  Recipe:  Papers: Bazzill Dotted Swiss-Honey; Bazzill-Burning Ember/ Aqua; Stampin' Up Naturals Ivory (base), Early Espresso cs; Echo Park-Fall Fever: Trees & Stripe. Stampin' Up Punch: Open Scallop Border. Colorbox Chestnut Roan (sponging and distressing). Wrights Orange Citrus Twill. May Arts brown twine. Stash: wood button.

Tuesday, November 26, 2013

Santa's Little Stocking!

This little card is similar to some I've seen created by Stampin' Up cardmakers.  It uses all Stampin' Up products.  My card has an added white cardbase than most I've seen, and it is larger (of course)!  I decided I like using the heel and toe silver to match the stocking cuff, where most I've seen to not add to the base of the stocking and leave it all red.  For my sentiment I have used the Sizzlits Lots of Tags die and modified both pieces. . .that was an interesting project.  I decided this card will go to a really good friend of mine who entered my life as the wife of a co-worker of my husband's, then became a Mom at the school where I worked, and finally went to work for the district as a substitute office worker, where I requested her for our building many times.  Thus, evolved a long-time friendship that has endured into my retirement.


Recipe: SU stamp: More Merry Messages (sentiment). SU papers: Whisper White cs, Real Red cs, Silver Glimmer paper, Red Glimmer paper. SU Holiday Stocking Bigz die. SU Embossing Folder (Stripe). Sizzlits Lots of Tags (modified). Real Red 5/8” satin ribbon.

Saturday, November 23, 2013

Tickets to Merry Christmas #1!

I went to a Christmas card-making event sponsored by my friend, Liz Thayer.  She shared several techniques that I really enjoyed.  One was the glitter window (like a snow globe shaken), the second was double embossing, and the third was techniques and ways to use washi tape.  My card was inspired by one that Liz had us make during this event.  


The double embossing was done with Stampin' Up's Stripe Embossing Folder, which is a diagonal multi-stripe. By rotating the paper 180 degrees and embossing it a second time, it made a diamond-shape embossed plaid.  On this card, the glitter window is created by punching out the ornament shape and putting clear 2-inch wide packing tape over the hole on the back side with the sticky surface showing through the ornament window and then sprinkling with white fine glitter and tapping off excess glitter.  On this card, three patterns of washi tape are diagonally placed on the second paper surface beneath the window, creating a pattern to show through as the ornament's pattern and through the glitter window.  The washi tape was also used diagonally on one of the tickets.  Just love the way this card turned out.

Recipe:  Stampin' Up products: Old Olive (base), Cherry Cobbler, Soft Suede cardstocks.  Authentique: Festive-Glistening (plaid); Stamps: That's the Ticket; Ink: Old Olive; Punch: Ticket Duo, Christmas Ornament; Stripe Embossing Folder; Washi tape set: Season of Style; Soft Suede seam binding ribbon.  Scotch 3M 2" Clear Packing tape. Martha Stewart white fine glitter.

Thursday, November 21, 2013

Merry Christmas Glitter - Tag Card #6

My last a final tag card conversion.  This was just such fun to prove to myself that I was right...a tag could be made into a lovely card.  Again, I change and tweaked the layout on this tag and added some elements to fill in areas to fit my ribbon and bow that I wanted to add to this card.  I also added tiny rhinestones for Christmas tree lights, and, yes, I am much happier with the smaller rhinestones than the size I used in Tag Card #4,  I deviated from all Stampin' Up papers on this bone and used BoBunny's Double Dot Frost Blue for my main background mat.  I really like the use of the oval Silver Glimmer paper on the Crumb Cake Decorative Label to fill in, and the addition of the small Silver Glimmer snowflake and the rhinestone center on scalloped circle element is a plus as well.  Now, I am inspired to try a tag on other occasion cards as well.


Inspiration from Christmas Tags by Heidi Gonzales - mylilscrapcorner.blogspot.com.Recipe:  SU stamps: Scentsational Season (tree), Mixed Medley (scallop design/ sentiment). SU dies: Two Tags Bigz, Holiday Collections framelits, Finishing Touches Edgelits (trim). SU Punch: 2-3/8” Scallop, 1-1/4” Scallop, 3/4” circle, 1-3/4” large oval, Decorative Label. Martha Stewart Punch: Aspen corner (mini snowflake). SU papers: Cardstocks-Early Espresso base, Cherry Cobbler, Very Vanilla-tag; Silver Glitter paper; Festival of Prints dsp stack. SU Ink: Early Espresso, Gumball Green. Colorbox Chestnut Roan (distressing). SU Rhinestones (Copic color). Queen&Co. Twinkle Goosebumps-crystal. Hug Snug seam binding-Tropic Wine. Stash: Silver ribbon. SU Early Espresso Baker’s Twine.

Monday, November 18, 2013

Christmas & Hot Chocolate Go Together! Tag Card #5

I just love this Stampin' Up stamp and die that creates a hot cup of...hot chocolate, hot toddies, coffee, tea, etc.  I made quite a few paper, ribbon, and layout changes to this tag, plus added a scallop border and embellishments.  I also had this lovely sheer snowflake ribbon that just absolutely begged to be used.  I didn't have a picture at the time I was making this tag, so I just ad libbed with the pieces that I had.  I was really happy with how my tag and card turned out.  Hope you like it as well!


Inspiration from Christmas Tags by Heidi Gonzales - mylilscrapcorner.blogspot.com.Recipe:  SU stamp/die set: Scentsational Season (cup), Jolly Bingo Bits (snowflake). SU dies: Two Tags Bigz, Holiday Collections framelits, Snow Flurry Bigz. SU Punch: 2-3/8” Scallop, Scallop Edge Border. EK Punch: 3/4” Scallop Circle, Medium Scallop Photo Corner, Scalloped Scallops Edge Border. SU papers: Cardstocks-Early Espresso base, Baja Breeze, Cherry Cobbler, Very Vanilla; Snow Festival dsp (scallop trim), Festival of Prints dsp stack, Silver Glitter paper. SU Ink: Soft Suede. Colorbox Chestnut Roan (distressing). Rhinestones. Stash: Cream crochet thread; Snowflake glitter ribbon (Michaels).

Friday, November 15, 2013

Christmas Tree Sparkle - Tag Card #4!

Tag Card #4 really brings on the Christmas season with its sparkly little Christmas tree.  I made a few paper and layout changes to this tag, plus added lots of little rhinestones for tree lights instead of leaving them white.  There is a story behind that, of course.  


I tried using Perfect Pearls liquid first.  I just couldn't get all the round dots to be uniform so that I was happy with it.  After the liquid pearls dried, it confirmed that I just wouldn't be satisfied with the way it turned out.  I took my trusty Cricuit spatula and scraped off the dried liquid pearls.   This little Cricuit spatula (looks like a mini pancake turner) is so good for lifting off glued down items...don't know what I would do without it...even though, obviously, I am not using it for the purpose for which it was created.  I was able to get the pearls off and have a flat surface again, but the pearls "stained" the tree's circles red, green, blue, etc.  Therefore, I had to put on rhinestones at least large enough to cover the staining.  I would have been happier with rhinestones the next size smaller.  By the way, I colored my rhinestones with Copic markers to match the color shades in the paper used.


Inspiration from Christmas Tags by Heidi Gonzales - mylilscrapcorner.blogspot.com.Recipe:  SU stamps: Scentsational Season (tree), Mixed Medley (snowflake). SU dies: Two Tags Bigz, Holiday Collections framelits. SU Punch: 2-3/8” Scallop, 3/4” circle, 1-1/4” Scallop. Zutter Corner Rounder. SU papers: Cardstocks- Cherry Cobbler base, Marine Mist, Very Vanilla; Festival of Prints dsp stack, First Edition Specialty dsp, Silver Glitter paper. SU Ink: Early Espresso, Gumball Green. Colorbox Chestnut Roan (distressing). SU Rhinestones (Copic colored). Queen&Co. Twinkle Goosebumps-green. Hug Snug seam binding ribbon: Gabardine Green, Spring Green. SU Cherry Cobbler Baker’s Twine.

Tuesday, November 12, 2013

Candy Canes Christmas Tag Card #3

I'm having such great fun turning these tags into Christmas cards!  It is really putting me in a festive mood.  I just love the candy canes on my Tag card #3.


I added an an Old Olive Open Scallop punched border to the design running down the center of my tag to give it a bit more color.  I also changed the scalloped circle to a green paper with a bit of red as I thought this would also add more color.  I stamped my Crumb Cake (tan) Decorative Label with SU's Crumb Cake ink and the Flowering Flouishes stamp to give the plain cardstock some additional interest.  I added to and changed the tag ribbons, added some candy dots and a Cherry Cobbler fishtail mat behind the sentiment.  Following is a picture of Tag card #3 with a picture of Heidi's original tag.  By comparing the two you can see how card #3 evolved.  


Inspiration from Christmas Tags by Heidi Gonzales - mylilscrapcorner.blogspot.com.
Recipe:  SU stamps: Scentsational Season (canes), Flowering Flourishes, More Merry Messages (sentiment). SU dies: Two Tags Bigz, Holiday Collections framelits. SU Punch: 2-3/8” Scallop, 3/4” circle, Decorative Label, Scallop Trim border. EK Punch: Medium Scallop Photo Corner. SU papers: Cardstocks- Very Vanilla base/tag, Cherry Cobbler, Lucky Limeade; Festival of Prints dsp stack, Silver Glitter paper. SU Ink: Soft Suede, Real Red. Colorbox Chestnut Roan (distressing). Old Olive Candy Dots. Hug Snug seam binding ribbon: Moss Green. SU Crochet Trim. SU Cherry Cobbler Baker’s Twine.

Saturday, November 9, 2013

Merry Christmas Gingerbread Man! Tag Card #2

With my first tag card conversion under my belt, I learned I need to decide on the card papers and layers to go along with my tag before I assemble my tag because the manila background on most of the tags doesn't show off the tag well against the Stampin' Up Festival of Prints papers Heidi used.  This is probably because the papers use white rather than cream in their design.  On the first tag, I made the tag first and then  added a piece of Cherry Cobbler to back the manila to make it show up against the paper better.  Fortunately, I found that my Zutter corner rounder had the exact same shaped corners as the tags, so I was able to cut a rectangle slightly larger than the tag dimensions and round its corners to match the tag's corners.  It did not have the curved top, but the ribbon through the tag hole covered up this omission so it doesn't show.  


With this 2nd tag card, I, fortunately, have the exact tag die that was used, so I cut a tag outline of the patterned paper she used at the bottom as an accent.  This covered the entire tag, so I did not use it as an accent piece.  Instead, I added a strip of Cherry Cobbler accent and placed my scalloped silver glimmer on top.  Below is my 2nd card, along with Heidi's picture of her original tag.  In comparing the two, you can see the changes I made to develop my tag into a card!


Inspiration from Christmas Tags by Heidi Gonzales - mylilscrapcorner.blogspot.com.
Recipe:  SU stamps: Scentsational Season (gingerbread), Mixed Medley (snowflake), Teeny Tiny Wishes. SU dies: Two Tags Bigz, Holiday Collections framelits. SU Punch: 2-3/8” Scallop, 1-1/4” Scallop, 3/4” circle, Decorative Label (modified), Word Window. SU papers: Cardstocks-Whisper White-base, Gumball Green, Very Vanilla-tag, Cherry Cobbler; Silver Glitter paper; Festival of Prints dsp stack. Be of Good Cheer dsp. SU Ink: Soft Suede, Crumb Cake. Colorbox Chestnut Roan (distressing). SU Rhinestones (Copic color). Queen&Co. Twinkle Goosebump-green. Hug Snug seam binding Spring Green. SU Linen Thread.

Wednesday, November 6, 2013

Christmas is Coming - Snowflake-Gingerbread Man - Tag Card #1!

Guess what...the rest of the month of November leaves me free and clear of any birthdays, anniversaries, or other non-holiday cards needed or that I want to make.  Yahoo!  This means I can devote all of my cardmaking creativity to getting ready for Christmas!  


I bought a kit of six Christmas tags in 2012 that were designed by my sister, Heidi Gonzales (mylilscrapcorner.blogspot.com).  They are all using Stampin' Up's Scentsational Scents stamp and die set.  I decided to bring out the kit and get started.  Now, I knew when I bought this set of tags that I would not be using them as package tags, but rather converting them to Christmas cards; therefore, I have taken the liberty of making some paper layout changes to help with the card layering that I wanted to use.  Following, is the first tag I converted to a card.  


With this tag, I added the Cherry Cobbler mat behind the tag to give it more color against the green patterned layer next to the tag.  I also shortened my center fishtail banner and added rhinestone buttons to Mr. Gingerbread.  I used Cherry Cobbler as my cardbase as well.  Next, I added a layer of silver glimmer paper and the matching green pattern, with Cherry Cobbler seam binding ribbon with a double bow.  I was very pleased with my "tag" card, and am excited to make the other five "tag" cards.  Watch for them as they appear in my blog throughout the month of November!

Recipe:  Recipe:  SU stamps: Scentsational Season (gingerbread), Snowflake Soiree. SU dies: Two Tags Bigz, Holiday Collections framelits, Finishing Touches Edgelits (pinking). SU Punch: 2-3/8” Scallop, 1-3/4” circle. Zutter Corner Rounder. SU papers: Cardstocks- Cherry Cobbler-base, Very Vanilla-tag; Silver Glitter paper; Be of Good Cheer dsp, Festival of Prints dsp stack. SU Ink: Early Espresso, Soft Suede. Colorbox Chestnut Roan (distressing). SU Rhinestones. Hug Snug seam binding cream. SU Cherry Cobbler Baker’s Twine.

Monday, November 4, 2013

Get Well!

A lovely, elderly lady, who happens to be my daughter-in-laws grandmother, has taken a fall and broken her hip, some ribs, and has some serious bruising, all of which caused her to be admitted to the hospital and then to a therapy/recovery care center.  I wanted to send her a little get well and thinking about you card so she would know that she is not forgotten and is in our thoughts and prayers for her speedy recovery.  


Because I have quite a number of cards that I have made, but not shared with anyone, I dove into to my stash looking for a cheerful card to suit my purpose.  I found this little card that I made at a card class hosted by Misty Bradley over two years ago.  It was not originally a get well card, but I changed the sentiment and now it is just right.  I have always loved this paper by My Mind's Eye...it is so bright and cheerful. I am hoping my card brings her wonderful smile back to her normally cheerful face!


Recipe:  Georgia Pacific White cs, MME: Fine & Dandy-Tickled Pink. Core'inations: Gemstone-Turquoise. Spellbiners Labels LG. WRMK Deco Corner Chomper. Colorbox Chestnut Roan (distressing). Martha Stewart Deco Fan corner punch. May Arts 5/8" Twill-white. Petaloo Mulberry paper daisies. Recollections pearls. Computer-made sentiment/ verse.

Thursday, October 31, 2013

Vintage Halloween!

I really wanted to make a vintage Halloween card, I selected a little girl holding a pumpkin candle to light her way from my stash and designed my card around her.  This card is definitely for my mother.  I think she will really like this cute little girl image for sure.  I wanted three distinct layers beneath my framed image, so I actually built this card from the top down to get my layer sizing compatible with the size of the framed image.  I'm sure it could have been done the normal way---from the bottom up--but I do seem to choose the more difficult method at times!  LOL  I then composed a little verse for the inside and add decorations and embellishment to compliment the front of the card.  I can't wait until Mom gets a chance to open her card!


Recipe:  Stampin' Up cardstocks: Basic Black, Pumpkin Pie, Whisper White.  DCWV Halloween & Fall Stack (2011), Paper Pizzazz (stripe).  Digital vintage image (2.65" x 2.10"). Colobox Charcoal (distressing).  EK Large Scallop Corner punch, Spellbinders die: Classic Rectangles & Scalloped Rectangles.  Recollections flower. Stampin' Up Dazzling Details. Stash: ribbons.  Computer-made verse. 

Wednesday, October 30, 2013

A Raven Visits West Virginia!

I attended a craftmaking affair last year, on my annual fall visit to my mothers, at the Rock, Paper, Scissors store in Redding, CA, which has now, unfortunately, closed since that visit.  We made several Fall/ Halloween items: two card, a paper sack gift card holder, a framed papercraft project, and a Harvest mini block.  Each was taught by a different store design team member or local craft artist.  The framed papercraft project was taught by Sara Moreno, and I loved its design, but as I do not generally decorate my walls for Halloween, I decided to turn my project into a card.


My card retains the flavor of the original project using the same papers and center design embellishments; but, I made the following changes.  I re-sized the orange word mat layer to a 5-1/2" card size and placed it on a black cardbase.  I moved the dripping ooze border and the black bow to the top of the card.  I added a ribbon strip over the ooze edge, silver sparkle to the rosette spines, offset the button in the center design area, and gave the raven a little back bead for its eye.  I was very happy with my card and decided it was perfect for a visit on Halloween to my daughter and her husband in West Virginia.  I hope they like my raven card, and it makes their Halloween more fun knowing they are remember and loved!


Recipe:  SU Basic Black (base), Authentique Enchanted-Haunted, DCWV Fall & Halloween stack (2012), SU Whisper White.  Spellbinder die: Fleur de Lis Squares. Martha Stewart punches: Icicle, Spider Web corner.  SU Dazzling Delights Silver.  Rosette (handmade). Black seam binding ribbon crinkled.  Colorbox Charcoal (sponging/ distressing).  Stash: Orange button, Black twine.

Halloween Cauldron of Potions!

I recently purchased a few Halloween QuicKutz dies that I was anxious to try out.  I envisioned a Halloween scene with a witch's cauldron of oozing, bubbling green slime and wicked flasks of potions ready to be added to the brew.  I decide circling bats would add to the eerie night scene.  The ideas for this card seemed a perfect fit for my son, David.  I hope he enjoys this little card I made just for him.


Recipe: DCWV Halloween & Fall stack (2011), Stampin' Up Cardstock: Basic Black, Cajun Craze, Daffodil Delight, Old Olive. DCWV Glimmer stack (moon). Recollections glimmer (lime). Stash: cork paper. Martha Stewart bat and spider stickers.  Recollections Halloween embellishments (quarter moon). Martha Stewart Spider Web border punch. Tim Holtz fence die. Stampin' Up: Googlie eyes. Colorbox Chestnut Roan sponging. Colorbox Charcoal distressing.  Stash: mesh netting. 

Tuesday, October 29, 2013

Grab Your Broom!

I made this little Halloween card last year using a card kit from Rock, Paper, Scissors in Redding, CA.  The card retains the flavor of the originally designed card, but I tweaked the layout spacing and the mat layer sizing a bit, added color to the witch's boot with Copics, added the glimmer brads, composed a verse, and decorated the inside of the card to compliment the card front.  I just love this Stampin' Up stamp and thought it was perfect for my daughter Jackie to place in her holiday shadow box picture frames.


Recipe:  Bazzill cardstocks: Blackbird, Yam, Clay.  Bazzill Dot.  Pattern paper: Authentique Enchanted.  Stamps: SU Bootiful Occasions.  Ink: Memento Tuxedo Black. Colorbox Charcoal (distressing). Stampin' Up Glimmer Brads.  Spellbinders dies: Classic Ovals/ Scalloped Ovals. EK Large Scallop Corner Punch (inside). Copic Markers. Computer-made verse; Font: Homemade Apple/ size 11.  Card size: 5-1/2" square.

Monday, October 28, 2013

Punch Art "Otzi the Mummy" for Halloween!

After making Scary Mr. Frankie (and a pirate punch art card in between), I decided why not a mummy, so I put myself to the task.  I have seen several rectangular cards made with mummies and even made one at a Liz Thayer cardmaking class in September.  Liz's card was my favorite of all that I've seen because she used the torn paper technique, which I thought made the bandages more authentic.  So, I decided to try my mummy with the Top Note die punch art technique, which was one I have never seen done.  I then made up a little verse and complimentary inside decorations.  My sister was particularly fond of Otzi the Mummy when I finished him, so I thought it only appropriate that he go to here to wish her a frightful Halloween!


Recipe: SU CS: B. Black, Tang. Tango, Ivory Naturals-torn. Echo Park Chillingsworth Manor: Apothecarthy Labels green chevron. DCWV Halloween/Fall 2011 Stack-dots. SUInk: B.Gray-distress, B.Black-markings. SU TopNote die-head. SU Punch: Circles-3/4"-iris, 1-1/4"-eyeball, 1-3/8”-eye orange; 2" Ex Lrg Oval-ears. EK Stickos-pupil. WRMK Deco CornerChomper. SU ChalkMarker. M.Stewart Halloween ribbon. Stash: Black/Orange seambinding.

Punch Art Busyness for Halloween!

I love to make Halloween cards!  So many thoughts and ideas roaming in my head.  I wanted to try my hand at Top Note Die punch art.  My first attempt was Scary Mr. Frankie whose inspiration came from Jacqueline Dorer-Russell (http://sugarssmilinpapercrafts.blogspot.com/2013/09/frankenstein-card.html) when I saw her Frankie card on Pinterest. I decided to tweak his ears a bit, as she is now using the Stampin' Up Decorative Label as shown on her video tutorial.  I also wanted to use patterned Halloween papers from my huge stash.  I decided to put him on a 3/4 front-fold card so I could use SCARY alphabet letters beside him, and give him a bow-tie as well.  I designed an interior to compliment the outside and added a little verse that I composed.  Scary Mr. Frankie will be going to my son Mark and his wife Ginger, to wish them lots of fun on Halloween!


Recipe:  SU Basic Black cs, Wild Wasabi cs, Recollections Spice Market Burnt Orange cs, Karen Foster: Spooky Collage, Bazzill cs: Honeycomb; DCWV Halloween & Fall Stack (dots). SU Top Note die (head). SU Punches: 3/4" circle (eye pupil), 1" circle (eyeball/ lids), Round Tab (nose), 2" Extra Large Oval (ears), Decorative Label (mouth). Sharpie marker. SU Chalk Marker. SU Ink: Basic Black (distressing). Sizzix Wingo Zingo Alphabet Sizzlits. SU Dazzling Details (frost). Stash: 3/8" dot satin ribbon, Halloween Baker's Twine.

Saturday, October 26, 2013

Ladybug Tilda Visits for a Niece's Birthday

Another of my niece's has an October birthday. . .this time late in the month.  Sara has bought her first home and has a lovely garden every year.  My guess is she probably has some very large pumpkins in her garden right now.  Last year she should have entered the Guiness Book of Records because I think she would have won for the strangest looking and strangest shaped pumpkin grown.  She managed a hybrid between a green squash and a pumpkin somehow without even trying!  With this in mind, I thought a visit from Ladybug Tilda would be just right.  Tilda brings a large ladybug with her, which I have heard are good for gardens!


This card features a Magnolia stamp on its front and was one of the cards I made when I first started cardmaking back in 2010.  I look back on it and think, "you know that wasn't too bad."  I had never done any coloring before, and this class I took from my sister, Heidi Gonzales (My Lil' Scrap Corner) taught woodless-colored pencil coloring using mineral spirits to set the color.  It was a fun way to color images for cards, but I have to say, I do prefer my Copic markers today!  I hope Sara enjoys her Tilda with her Ladybug birthday card.

Recipe:  Magnolia stamp: Ladybug Tilda. Woodless Coloring Pencils (available at Michaels). Papers: cream cs, Bazzill-Paprika & Sour Lemon cs, MME-Be Loved. SU Punches: Modern Label, Word Window. Offray 3/8" Mint satin ribbon. Red-Orange dew drops.

Wednesday, October 23, 2013

Three Masculine Birthdays!

October brings three male birthdays in my family~all nephews or nephew-in-laws, and of course, all living in states other than mine!  I went to my card stash because I knew I had at least three masculine cards made that would be useful.  In addition, as I was making these cards, I was thinking, "Oh, these will be nice to have when all those October male birthdays arrive at my doorstep demanding attention, and I am so short of time getting ready for my annual fall trip to visit my mother."  


So, out from the stash they came to receive verses and embellishments to compliment the already complete exteriors and with each gentleman in mind as I worked.  My next step was to get them into bubble-wrap-protected packaging to fit into mailing envelopes, addressed, and then I would be all set!  I hope Davis, Jesse, and Jared enjoy their cards when they arrive throughout the month of October.  Below is a picture of each card.

This card is for Davis and was made at a Stampin' Up Card Club hosted by Amy Muhly, using all Stampin' Up products.

The inspiration for this card came from one made at a Stampin' Up card class given by Misty Bradley (Rock, Paper, Scissors - Redding, CA).  In my version of the card, I have added trim and black pearls and changed the layout positioning a bit.  I also added the black matting to give it another layer.  My sentiment is computer-generated.  I hope Jesse enjoys it on his birthday.

Again, inspiration was from a previous card made by Misty Bradley (Rock, Paper, Scissors - Redding, CA).  The black and white color theme is the same as the original card, but layout elements are re-arranged and embellishments added: white and black buttons, ribbons, Baker's twine, and white enamel brads. This one is for Jared who is serving our country and stationed on the East Coast.  Here is hoping he enjoys his card, and know we are thinking about him and his family!