Showing posts with label Copic markers. Show all posts

Monday, September 19, 2022

Glowing Lights At Christmas!

I recently went on a five-day crafting retreat with my group of 10 to 12 crafty lady friends. There were only nine of us attending this time, which is the smallest number we've ever been in the last seven years we've been going and sometimes twice a year, due to different health issues from colds to surgery recovery for two of our friends. We really missed the four ladies who planned to attend, but were unable to as time drew closer to departure.  The bulk of us are cardmakers, but we have one lady who was making fabric bags, zippered pouches, and starting a quilt and another was making a paper-crafting Halloween mini album for a niece.


I was making a Christmas card for Splitcoaststamper (SCS) challenges, plus four alternative Christmas kit cards.  SCS challenges can be the current week's challenge and/or a make-up challenge from several months old to several years old as challenges can be entered at any time you want. I started a personal goal for challenge completions of all the different challenge categories available since 2017 by making a WORD table list of all these different SCS challenges. Eventually, I am trying to catch up by participating in all them up to the most current week of challenges. Most challenges on Splitcoaststampers have a new challenge each week. There is no limit to the number of different challenges that a person can enter with one card, though you may not enter the same challenge category with the same card more than once.  For instance, if I enter the Color Challenge, I can enter only one week's Color challenge, but I may enter the Ways to Use It Challenges, the Sketch Challenges, the Teapot Challenge, etc. as long as I only enter one week's challenge date for each.  


Each week, I check out all challenges left that I have not yet entered from my list and try to adjust my card design so as many will fit as is allowed. I am usually able to enter 10 to 15 challenges each week. It will be the higher number if it is a Christmas card as that opens up at least two additional challenge categories involving the Christmas theme. Check out my Christmas card finished this week below. I was able to fit 15 challenges, because of the two Christmas card challenges available.


Ingredients: Stampin' Up products: Cardstock--Evening Evergreen, Cherry Cobbler, Whisper White. Papers--Distressed Gold, Glow Lights dsp (strip). Stamps--Brightest Glow (sentiment). Dies--Twinkling Lights (tree), Decorated Pine (stars). Basic Rhinestones. Other: MFT--Photo Corner Die-namics. Copic Marker (gem coloring). Chatterbox verse (inside). Size--4-3/4" x 6".

Saturday, August 6, 2022

Birthday Love!

My Mom's 97th birthday is right around the corner, and I needed to get a card finished and off in the mail very soon. I got busy checking out Splitcoaststamper challenges to see what I might come up with.  I usually start with the Sketch Challenge, the  Inspiration Challenge, or the Featured Stamper Challenge and move on to others from there.  I play a little Challenge Catch-up game with myself, trying to incorporate as many challenges as possible in my card from the design, to the theme, or the color scheme. This week I found 12 challenges I could enter for this card!


From the Inspiration Challenge, I decided on a monochromatic card mostly in blue shades from light to dark. I'm using a ribbon bow, an idea from the Featured Stamper Challenge. Other challenges influenced my card design as well.


I remembered the Boho Indigo Card Kit that came out in the Stampin' Up 2020-21 Annual Catalog that I purchased and that I had never gotten around to using it to make any cards.  I really can't tell you why that is, because the 6x6 paper pad is full of gorgeous double-sided patterns in many shades of blue, including white. It also includes some ivory-white pre-embossed papers as well. I certainly planned to use it now for Mom's card, plus I added some Metallic Shimmer White, Balmy Blue, and Night of Navy cardstock layers, in addition to some Dotted Swiss vellum. Take a peek below at the finished card inside and out:


Ingredients: Papers: Cardstock--SU-Night of Navy, Balmy Blue, Basic White (inside);  Bubbley White Metallic Shimmer (Amazon); Paper Pizzaz Vellum Dots; SU Boho Indigo 6x6 dsp. Stamps: SU-Boho Indigo Kit stamps. Dies: MFT-Stitched Circle STAX; Spellbinders-Pinking Circles LG. Punch: Martha Stewart--Trio of Butterflies, SU Pearls, Ribbon-3/8" Navy w/White Stitch (stash). White Sequins-Pink Posh (Copic colored navy). Wink of Stella-Clear (butterflies). Chatterbox verse (inside). Size--4-3/4" x 6."

Sunday, June 26, 2022

Father's Day at the Beach!

Being raised in the Pacific Northwest near the ocean, spending at day at the beach, means the ocean is definitely the scenery.  I thought I'd give my youngest son a day off to enjoy some ocean scenery; after all, he was the only one of the four children who never lived in Hawaii where ocean beaches were very much a part of everyday life!


I used the Stampin' Up Waves of Inspiration stamps and the coordinating Waves Dies with Balmy Blue, Pacific Point, and Night of Navy inks.  I brushed and ink-blended the white cardstock top panel with Balmy Blue giving it a filtered blue sky look (a light blue sky with wispy white clouds blended into the blue).   


My wave was next, which I built with the Balmy Blue, Pacific Point, and Night of Navy inks.  I stamped my colors in layers using these three inks one on top the other...over-stamping...but stamped-off with the two darker colors.  I kept adding over-stamping until I got the look I wanted. I used my Misti to aid me in this process. My last stamping was done by applying Night of Navy on the lower portion of the waves only by using a Stamp Write marker inked onto the bottom of the stamp surface.  After it was completely dry, I ink blended with Balmy Blue until I was satisfied with this lighter color mixed into my waves. 


Then, I had an accident...while trying to stamp my seagulls where I wanted them (before popping on the clouds), my stamp block got ink on its edge, which transferred to my card front next to two of my seagulls!  Whoa as me...not the first time I've had this problem with tiny stamped objects!  So not to lose all my carefully ink waves, which I thought turned out rather spectacular, I fussy-cut the wave off and after preparing a new card front with my Balmy Blue brushed ink blending, I glued my waves to the bottom of my new card front.


I decided not to re-stamp my seagulls, as I just didn't want to chance the same problem, so I practice a little of drawing my own seagulls with a fine mechanical pencil and then flicking over with Copic markers in T5, T4, T2.  It worked so well, and I could make them larger or smaller as desired! I found adding them with Copic markers works best for me! I die cut the clouds and cloud edges, which give the clouds more texture and dimension; I popped the clouds off the card surface; and overlapped two the smaller clouds and popped them off each other.


I originally started this card thinking to make a birthday card for my stash, as I never have enough birthday cards. I pulled out my Teeny Tiny Wishes stamp set (retired) and stamped with Night of Navy ink onto Balmy Blue cs and die-cut it with the narrow die that I knew would work well for sentiments.  I attached Linen Twine through the open ends to the sentiment strip and added it to the middle of the card.  Taking a look, I realized it would be a great masculine card, and I still needed another Father's Day card for our delayed family Father's Day get together, which would be taking place next week-end.  I didn't want to re-do the die-cut with the twine, so I carefully made a new sentiment on the computer that I could carefully cut and paste over the happy birthday stamping.  It worked perfect...take a look below:


(NOTE: When I say spatulated off, I used an OLD Cricut spatula, which is irreplaceable and works wonders when for this purpose because of its narrow, thin blade,  Unfortunately, Cricut re-designed their spatula over 10 years ago so these old ones are almost impossible to come by!!)

Ingredients:  Stampin' Up:  Night of Navy, Balmy Blue, Basic White cardstocks. Stamp/ Dies--Waves of Inspiration/ Wave Dies; Teeny Tiny Sentiments (retired). Inks--Night of Navy, Pacific Blue, Balmy Blue, *Basic Gray (seagulls). Linen Twine.  Other: Copic markers--T5, T4, T2 (*Handmade seagulls, rather than stamped). Fussy-cutting. Chatterbox sentiment/ verse. Size--4-3/4" x 6."

Sunday, May 15, 2022

Let's Party with Dinosaurs!

My oldest son is newly engaged, and they intend to tie the knot in June 2023 if everything goes according to plan.  Through this union, I have acquired what would be a great granddaughter.  She will be  three years old on her birthday in a few weeks...the same age range as are my three natural granddaughters, which is 2-1/2 to 5 years.  Her Mom and grandmother (who is my son's fiancĂ©) planned a dinosaur-themed birthday party.  So, needless to say, I needed a birthday card and wanted to try my hand at the dinosaur theme.


I found a darling little cartoon line-art baby dinosaur, who had just hatched from his uniquely designed egg.  I thought this would be a good place to start.  Next, I found some pink, white, and green digital dinosaur  paper to add to the plan.  My next task was to search out some Splitcoaststamper challenges to fit this card into my "challenge catch-up" goal.  With all these thoughts in mind, I came with up my card design, which started with the Standing Pop-Up card fold technique. 


The face of Amara's card got so heavy, the card wouldn't stand up, so I invented a little paper fold "hinge" to insert into the hollow box-like rectangular front platform that allows the card to fold down flat to insert it into an envelope for mailing and also to pop-up and open to allow the card to stand on a flat surface.(1)  My "hinge" isn't a terribly difficult addition if you can do it before you form the box and while the cardbase is still flat, but it becomes much more tedious  to insert the "hinge" with the attachment flat covered in glue after the box is formed! 


With all that was said above, take a look below at Amara's finished baby dinosaur Standing Pop-Up card when finished.  I think she will love it, as well as Mommy and her grandmother!


Ingredients:  Stampin' Up products:  Papers--Garden Green, Basic White cardstocks, Subtles & Brights Patterned DSP Stacks (Garden Green + Wild Washi--pattern years unknown);  Stamps/Dies--Dino Days(4), Little Letters Framelit dies; Cloudy Day EF--retired(5); Ink--Smoky Slate, Garden Green; Other: White Metallic Shimmer cs (Amazon), Digital paper(2): Cute Baby Dinosaur Dinosaurs s & Confetti Rain-Pink(2) (source unknown--computer stash); Dies--Spellbinders Grand Labels Eleven (retired); Lawn Fawn Grassy Hillsides; Copic Markers; Fussy-cutting; Verse--Chatterbox design(6); Card Size--4-3/4" x 6".

Construction Notes:  1)See "hinge" note for Standing Pop-up fold in dialogue above.  2)Digital papers printed on Amazon White Metallic Shimmer cardstock .  3) Confetti Rain-Pink die-cut letters Copic colored to change to a Rose color.  4)Palm trees from Dino Days stamp/dies; leaves die-cut from SU DSP Patterned Stacks listed & then overstamped with palm stamp.  5)Embossed Clouds: inked raised or positive side of folder to give clouds a gray outline for a typical northwest cloudy day.  Added additional very light brushed ink blending to add more grey to background and edges as well.  6 )Inside "verse" with computer = Chatterbox design (that's me);

Monday, April 11, 2022

Little Lamb is Coming for Easter!

Easter is coming, and its time to get busy to allow for mailing.  I checked my "Need to Finish...TO DO Stash" to see if any Easter cards lurked that needed finishing.  I found a lamb image already colored and some paper pieces for possible finishing, but I wanted my card a bit bigger than the original card, so I decided to remodel the original design by Liz Thayer.


I kept the cardbase and first layer the same colors but changed the card face from a vanilla to a very soft yellow that I found in my 12x12-inch paper stash.  It was probably one I picked up from either Joanns or Michaels years ago.  There was a little Mint Macaron banner pre-cut, but I decided I wanted it longer.  I wanted to add some ribbon, and found a pretty Offray pink with white dots sheer ribbon that I thought would go nicely.


Take a look below at the finished card inside and out.  That little lamb is just darn cute!


Ingredients:  Stampin' Up:  Cardstock--Blushing Bride, Mint Macaron, Crumb Cake. Stamp--Easter Lamb for Baby (2016 Occasions).  Dies--Layering Ovals. Ink--Early Espresso, Cajun Craze, Memento Tuxedo Black. Banner Triple punch. Enamel Dot--It's My Party. Other--Soft Yellow Cardstock (stash, Dot paper (stash), Copic markers, Sergeant Colored Pencils, Offray pink-dot sheer ribbon, Uniball Signo White gel pen.

Wednesday, January 5, 2022

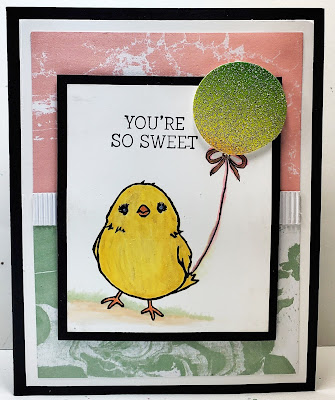
So Sweet Thank You!

 My Mom has been my go-to-person for getting my stamps, dies, and "must have" Stampin' Up items since I resigned as a Stampin' Up demonstrator back in August.  If they would just stop inventing new stuff that I just can't live without, it would help.  I wanted to send her a little thank you card just to let her know how much I appreciate all her work...I do know what a big job it is to get things entered and on order in a timely manner in order to take advantage of sales that pop up every now and then!


I decided to check out my “To Dos” stash and finish a card I started back in early 2016.  This little chick was an SAB freebie, and I started coloring her when I was away from home, and didn't have my Copic markers with me.  I was not super happy with how she turned out.  I don't find I'm very skillful using water-base markers in getting any blending or shading.  I did try to go back and "fix her up" with my Copic markers later, but I'm not sure I improved upon her at all!  I did add a little ground shading so she was not floating in the air!

  
Originally, I was trying out a honeycomb paper balloon embellishment, but I found they don't store well and are flimsy and pull apart easily, so I tore off the honeycomb and added a glitter balloon made from a Duck Tape Rainbow Glitter roll that I bought about three years ago, but never opened the package to try it out.  It really is quite pretty and I think it works quite well with my color scheme.


I shipped off a check to pay Mom for my order along with this little So Sweet thank you card.  I think Mom will enjoy the thoughtfulness even if it was just a quick and speedy card!  Take a peek below at my inside and outside finished card for Mom!


Ingredients:  Ingredients: SU Products: Cardstock--Basic Black, Basic White. DSP: Perfectly Artistic (2016 SAB) Stamps: Honeycomb Happiness (2016 SAB). Ink: Memento Tuxedo Black. Punch: 1-1/2" Circle. Stamp-Write Markers: Daffodil Delight, Pumpkin Pie. Copic Markers. Ribbon: stash. Inside: Mint Macaron, Blushing Bride. Scalloped Scallops punch.  Other: Savvy Dies: Thank You Cursive. Duck Tape: Rainbow Glitter. Size-4-3/4" x 6".

Monday, June 21, 2021

Batter Up! Father's Day Alternative #2

 My second Father's Day card will be for my son-in-law.  Once again, I will use the May 2021 Paper Pumpkin - Batter Up! card kit, but making my own Alternative #2 card design totally unrelated to those provided in the kit.  I will use the Seattle Mariners as the theme for this card as I did on the card for my son.


I will use papers and inks not provided in the kit for the Seattle Mariners team colors, as the kits was off on another color journey totally unrelated to Mariner colors.  I was able to use the pocket die-cut, baseball, bats, and the stamps provided in the kit.  I also used the SU - Hats Off / Hat Builder stamps for the #1 (stamp) and the baseball hat (a die).  Take a peek at my finished card.  I think Josh will like it.


Ingredients:  Stampin' Up products:  Cardstock--Night of Navy, Tranquil Tide (inside) Smokey Slate (inside). Patterned Paper--Regals 6x6 dsp-Shaded Spruce (2018-19). Stamps/ Dies--Hats Off/ Hat Builder dies (stamp-#1+die-hat). Ink--Tranquil Tide. Paper Pumpkin/June 2021--Batter Up! Kit--stamps, baseball, bats, gray pocket.  Gems--Glitter Enamel Dots (Copic colored Dk. Blue).  Other: Papertrey die--To Die for Sentiments/-Happy Father's Day (inside). EK Punch--Victorian Corners.  Copic Markers.  Wink of Stella--Clear. Size--4-3/4x6 inches.

Friday, April 9, 2021

A Tropical Birthday Drink!

As I mentioned back February on my blog of a friend's birthday card, I made a variety of cards that would be needed in the future while I was on my August, 2020 craft trip with my sister and Mom to Sisters, Oregon.  This has been my first and only trip that I have ventured out during COVID!  Weren't we lucky that this trip happened about two weeks before the horrendous fires all over Oregon's forests!


I also mentioned that because my mojo had been stymied by COVID's intervention, I had purchased several kits and subscribed to Stampin' Up's Paper Pumpkin to try to spur myself into getting into my craft room!   I was really excited about the June 2020 Paper Pumpkin Box of Sunshine kit because of its beautiful, rich colors, and its pineapple die-cuts!  I brought this kit and several others along to work on while in Sisters.


I like to make cards for people where the theme fits the person, whether it be focusing on a hobby, their job, their favorite song, movie, etc.  My husband's job took our family to Hawaii to live for about three years, and Jackie, our youngest daughter, was born there, thus my excitement over the pineapples in the June 2020 card kit.  I saw an alternative card idea in June, just a few weeks after the kit arrived that I really, really loved.  I remembered it and thought the "idea" was perfect for Jackie, but I did not save it to Pinterest, nor could not find it again.  I remembered it used the kit paper supplies, and particularly that it used the black/ white polka dot paper on a center panel.  There was also a pineapple with its top cut off to form a tropical beverage receptacle, plus an umbrella, a straw, and a flower.  It used one of the cardbase folds with the bright alcohol-ink-style background as the card front.  I wished I could find the exact card I saw to give that cardmaker credit for my "memory casing," but alas, no luck!


For my card, I love layers, so I cut the alcohol-ink-style background off the folded card base to use as a layer.  I made a new and larger cardbase using black cardstock and added a second layer of gold foil.  My third layer would be the AI-styled panel that I had cut off.  I cut a set of smaller papers for the center layers...black and white cardstocks and the kit's black & white polka dot paper (similar to my "memory-cased" card, I think).  I fussy-cut the pineapple top off along the diamond pineapple scales and saved it to use as greenery (my "memory-cased" card did something similar, because I remember thinking it was a nice filler).  Next, I worked on my tropical beverage pineapple drink.


My sister brought lots of her My Favorite Things stamp sets with her, one of which had a Hawaiian theme, so I was able to use her Hibiscus stamp for my drink's flower.  I brought my new SU umbrella stamp/ punch set, because Jackie also loves umbrellas.  I thought I might incorporate that into her card theme if my pineapple idea didn't work.  But, the pineapple tropical drink worked very well with the parts and pieces I was able to use from here and there.  I Copic-colored the umbrella and flower stamped images, plus added a bit of  Clear Wink of Stella to the flower for a bit of sheen.   I used the geometric die-cut and a stamp from the kit for the sentiment.  Take a peek below at how Jackie's card evolved into the finished design.  She was delighted with it, and the inside verse's play on a bit of humor!


Ingredients:  Stampin' Up products:  June 2020 PP Box of Sunshine--Patterned papers, sentiment stamp/ die-cut shape, pineapple die-cut.  Cardstock--Basic Black, Whisper White, Crushed Curry, Gold Foil.  Stamps--Under My Umbrella.  Other:  My Favorite Things--Birdie Brown Polynesian Paradise stamps (hibiscus).  ColorBox Ink: Chestnut Roan (ink distressing).  Copic Markers.  Wink of Stella/ Clear (hibiscus).  EK Corner Punch--Victorian Medium.  Chatterbox Computer verse.  Size:  4-3/4" x 6-1/4".

Friday, November 8, 2019

A Cardmaking Birthday Buddy to Celebrate!

One of my cardmaking buddies had a birthday in mid-October, and we finally got to celebrate with her a few days past a month overdue!  She made a wonderful week-long trip to Hawaii for her birthday, which delayed our original plan to celebrate in October.  Then, you know how it is...first their was my daughter's baby shower, then another friend's son went hunting and his sick dog needed babysitting, then my trip to visit my Mom...and on, and on, and on, it went!  But, we were determined and finally got it done with lots of fun and laughter to make the day special!

This was a card I made while visiting my Mom in California.  I got a card kit designed by Darla Watson, Mom's Stampin' Up lady, from her October card class. I put them together while visiting in Redding.  Of course, I always have to add a little personal pizzazz to make them more me, first by enlarging them, as I always like cards bigger than the traditional A2 sizing most commonly used.

For this card, I change its sentiment focus from thank you card to a birthday card.  I ink-distressed all edges to add a bit of a vintage flair.  I added an Early Espresso cardbase and a gold glitter mat layer and embossed the background of the front layer.  I framed the tree square with more layers and switched from Soft Suede to Early Espresso, plus a gold glitter mat layer between.  Instead of stamping the sentiment directly on the card front, I popped it up on a three-layer rectangle, which included the same Early Espresso and gold glitter paper.  I brayered my sentiment paper to match the brayering in the tree picture and stamped it with a sentiment befitting a birthday and added copper brads to finish.  I was super happy with the results and pretty sure my cardmaking buddy would enjoy it as well.  Take a peek below at the finished design inside and out.


Ingredients:   Stampin' Up products:  Cardstocks--Early Espresso, Mint Macaron, Whisper White, Pear Pizzaz.  Stamps--Snow Front (2019 Holiday), Express Yourself (sentiment).  Inks--Early Espresso, Pear Pizzaz, Mango Melody, Merry Merlot, Crushed Curry, Mint Macaron.  Embossing Folder--Square Lattice (retired).  Linen Thread.  Sponge Brayer.  Other:  Recollections Antique Gold Glimmer paper.  Copic markers to add extra fall leaves to trees/ ground.  Recollection mini brads--Copper.  EK Punch--Victorian Corners.  Size: 4-3/4 x 6 inches.