Tuesday, September 6, 2022
Tuesday, August 30, 2022
Candy Cane Wishes for Christmas!
I still have very few Christmas cards ready for Christmas giving this year. It is starting to weigh heavily on me that I'm so far behind; therefore, my next card must be a Christmas card for my stash! I just received my Sweet Candy Cane stamps/dies and the Christmas Banner stamps/ dies that I ordered from the current Stampin' Up mini catalog so I'm eager to try them out.
The Sweetest Christmas dsp in that same catalog has a lot of wonderful patterns
and strips. I decided on a criss-cross background effect by using a striped
diagonal paper pattern overlaid with the diagonal panel die-cut. I used all
three colors in the striped paper on my card front stamping and die-cuts: Real
Red, Garden Green, and Pool Party, plus I added a bit of aqua glitter paper to
add some sparkle and bling!
As most candy canes come in individually wrapped, clear cellophane wrappers, I
decided to cover my Real Red, ink-stamped canes with Scotch clear packing tape
to resemble these cellophane wrappers. This is an idea we used in a class card
designed by Dar Peterson that I borrowed. I am pretty happy with the way my card looked upon completion...take a peak below at the finished card:
Ingredients: Stampin' Up-- Cardstock: Basic White, Garden Green, Pool Party. DSP: Sweetest Christmas. Stamps/Dies (J-D 2022 Mini): Sweet Candy Canes/ Candy Cane dies; Christmas Banner dies (pine boughs). Ink: Real Red. Punch: 1-1/4" Circle. Ribbon: 3/8" Pool Party Sheer. Gems: Elegant Faceted Gems. Other-- Paper: DCWV 6"x6" Glitter Pastels Mat Stack. Spellbinders Dies: Splendid Circles. Scotch 2" Clear Packing Tape.
Sunday, July 31, 2022
Mitering with a Twisted Oval Christmas!
I seem to be on a short hiatus from cardmaking of late! I've been really busy with other activities at home, away from home, and with family. As usual, I have lots of cardmaking events that have pasted me by!
One thing that has been passing me by quite regularly is getting started on my Christmas stash this year. I have been worrying about it, and since we've seen "Christmas in July" come and go, I actually got the yen to make a card very late in July! I had a lot of incentive from Splitcoaststampers' challenges as well, and I will be posting it there as well.
I received some new free paper through the Stampin' Up Sale-A-Bration event going on in July and August, called Silver and Gold Specialty dsp (white glossy with gold or silver foiling), and somehow it got me interested in getting at least one Christmas card in July finished. Take a peak below at my finished card, though I have not completed the inside verse or design, which I usually post. I'm actually realizing that Christmas cards do not usually get a peak at the inside verse, because I'm not usually mailing them at the time that I make them!
Tuesday, May 31, 2022
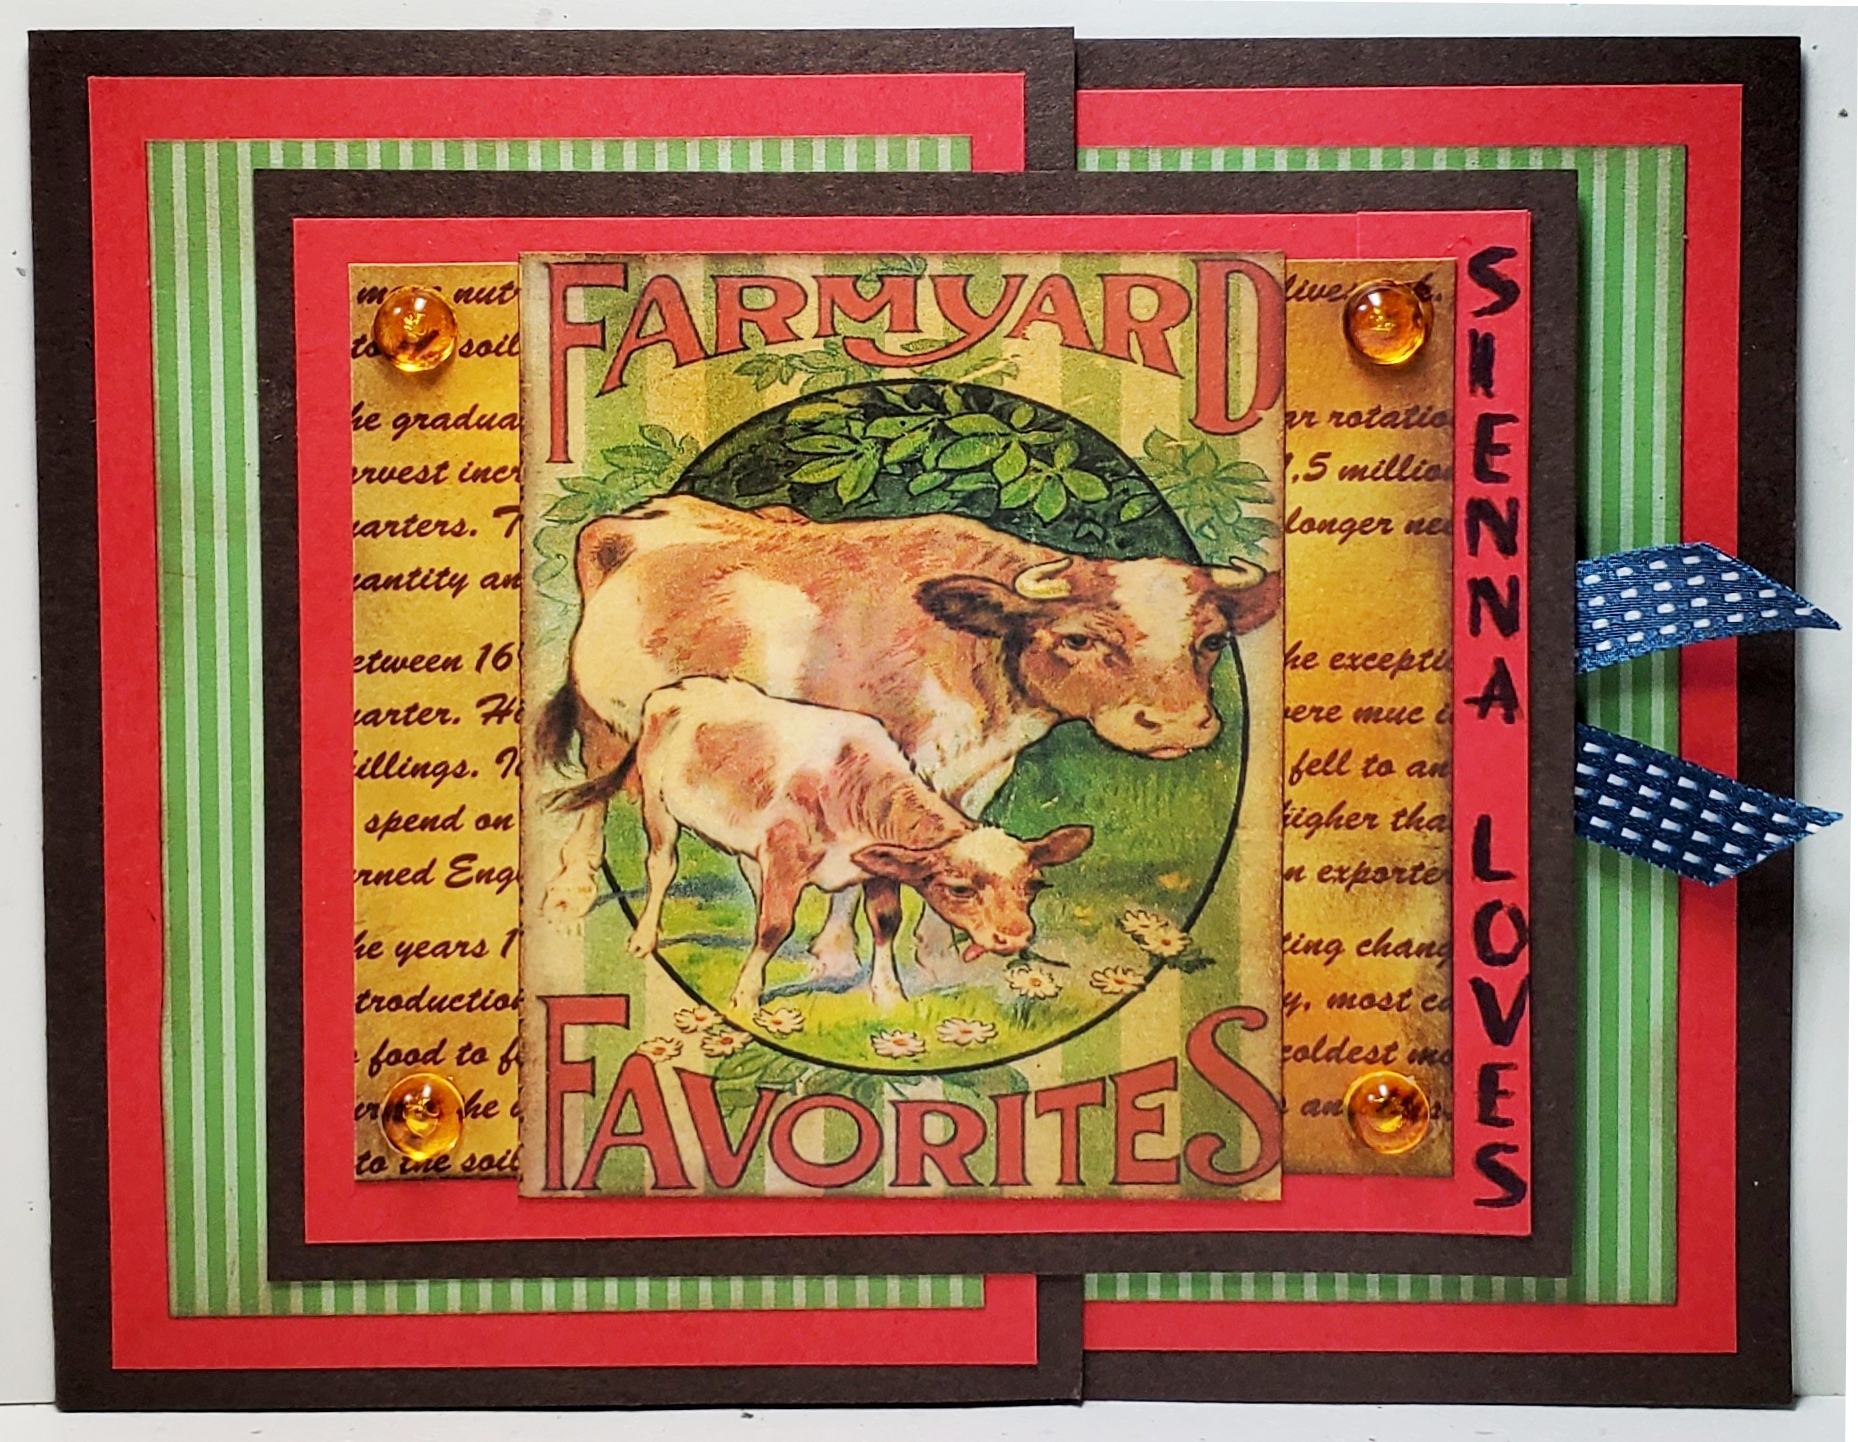
Farmyard Favorites for Father's Day!
Father's Day is coming, and the Virtual Stamp Night Mini Sneak Peek was held just a few days ago. The first one wants your card theme to be farm animals...like in Old MacDonald's farm. I'm thinking someway I will build a Father's Day card out of this challenge.
My son-in-law is such a good Dad! His daughter, and my middle granddaughter, was three this past March. From the time she was three months old, he has taken her to oodles of animal places and events...zoos, summer fairs, petting zoos, etc. You name it, if it's within 50-miles of their location (even on vacation), he will find an animal place to take Sienna. As a result, she just loves animals, has no fear, and you can see why. Her first favorite was a cow, and one of her first words was moo-moo!
I'm a lover of "simple" vintage cards (those without too much frou-frou), and for some reason, I've not made many vintage cards in the last few years. I went to my stash, because I remember a vintage cow image that I almost made into a card a few years ago. I had to scrap the idea at the last minute, because I forgot to take the image and any papers with me to a retreat where I planned to make the card! I had even mounted it on homemade script paper that I made prior to leaving that talks about medieval farming as I needed a computer and printer to do so. Using it now, was just a matter of deciding the layout, design, and papers! I actually copied my design layout that I used on the replacement card. Take a peek at my finished card below with its vintage slant!
Ingredients: Stampin' Up: Cardstocks--Early Espresso, Poppy Parade, And Very Vanilla. Patterned DSP--2012-2013 DSP Stack--Wild Wasabi Stripe. Inks--Soft Suede, More Mustard, Chocolate Chip. Other: Patterned Paper--Medieval English Farming Script (homemade/ink distressed). Vintage Farmyard print (stash). Gems--Robin's Nest DewDrops-Golden. Technique--Short Front Flap Card. Chatterbox computer verse. 4-3/4" x 6."
Monday, April 11, 2022
Little Lamb is Coming for Easter!
Easter is coming, and its time to get busy to allow for mailing. I checked my "Need to Finish...TO DO Stash" to see if any Easter cards lurked that needed finishing. I found a lamb image already colored and some paper pieces for possible finishing, but I wanted my card a bit bigger than the original card, so I decided to remodel the original design by Liz Thayer.
I kept the cardbase and first layer the same colors but changed the card face from a vanilla to a very soft yellow that I found in my 12x12-inch paper stash. It was probably one I picked up from either Joanns or Michaels years ago. There was a little Mint Macaron banner pre-cut, but I decided I wanted it longer. I wanted to add some ribbon, and found a pretty Offray pink with white dots sheer ribbon that I thought would go nicely.
Take a look below at the finished card inside and out. That little lamb is just darn cute!
Friday, February 4, 2022
January Celebrations...Just A Little Bit Late!
I missed a few birthdays in January and here I am playing catch-up! I think that word, "catch-up" might be imprinted on my DNA! I'm still finding myself in the mood to search out oldies to use from my stash. I've decided if I don't think I'm ever going to reuse it (or even use it for the first time), it might be time to send it on to some other pasture, however that old saying goes! I found an old 2008 wood stamp set a friend gave me. Since I really don't like wood stamps, it was time to unmount it if I'm going to keep it and use it an even better idea! I thought I'd give it a go and see how it might fit my card. Then, I found the 2013 SAB Feeling Sentimental stamp set...I love the penny-farthing bicycle, I and have used it, but not the sentiment "Celebrate," which could be used for this birthday card. Before letting my creative mojo get ramped up to far, I needed to take a look at my Splitcoaststampers Challenge List to add those guidelines into my thoughts.
With my two stamps in mind, I was able to find 11 SCS challenges that I could use if I designed my card just right! Take a look at my finished card inside and out after letting all my notes percolate. I'm hoping the recipient likes her card when it finally arrives!
Wednesday, January 5, 2022
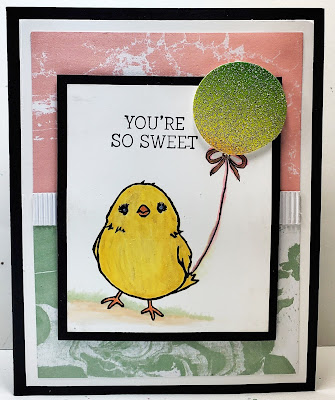
So Sweet Thank You!
My Mom has been my go-to-person for getting my stamps, dies, and "must have" Stampin' Up items since I resigned as a Stampin' Up demonstrator back in August. If they would just stop inventing new stuff that I just can't live without, it would help. I wanted to send her a little thank you card just to let her know how much I appreciate all her work...I do know what a big job it is to get things entered and on order in a timely manner in order to take advantage of sales that pop up every now and then!
I decided to check out my “To Dos” stash and finish a card I started back in early 2016. This little chick was an SAB freebie, and I started coloring her when I was away from home, and didn't have my Copic markers with me. I was not super happy with how she turned out. I don't find I'm very skillful using water-base markers in getting any blending or shading. I did try to go back and "fix her up" with my Copic markers later, but I'm not sure I improved upon her at all! I did add a little ground shading so she was not floating in the air!
Originally, I was trying out a honeycomb paper balloon embellishment, but I found they don't store well and are flimsy and pull apart easily, so I tore off the honeycomb and added a glitter balloon made from a Duck Tape Rainbow Glitter roll that I bought about three years ago, but never opened the package to try it out. It really is quite pretty and I think it works quite well with my color scheme.
I shipped off a check to pay Mom for my order along with this little So Sweet thank you card. I think Mom will enjoy the thoughtfulness even if it was just a quick and speedy card! Take a peek below at my inside and outside finished card for Mom!
Friday, June 26, 2020
A Little Paris for Your Birthday!
My oldest daughter's birthday is coming up next week. Her sister is hosting an early, social-distancing, birthday party in her gigantic backyard this Sunday. It is a potluck...bring your own masks, gloves, wipes, hand cleaner, side dish, beverages, and lawn chairs. That way we are not touching an ice chest or chair that belongs to someone outside our own household.
I needed to have her birthday card finished early for this week-end celebration. I had several things going on in my head. I just signed up for Stampin' Up's Paper Pumpkin after avoiding it since its inception. I am not one to make cards from pre-set kits, but I have seen several this last year that I really wished I'd been able to get, plus I bought a kit from the catalog and tried it out and found I could use the kit parts to make other cards not exactly like the pre-designed cards. I also got the free kit during the annual 2020 Sale-A-Bration (SAB) back in December (a perk as a "hobby demonstrator," and I had yet to open it to even make sure all the parts were there!
My first Paper Pumpkin kit, A Box of Sunshine, arrived a few days ago, and I was going to try it out by making my own design from part of its paper and embellishments. But, my daughter loves turquoise/ aqua colors, and there was no aqua to be found in this new kit! I really wanted to go with her favorite color, which is when I remembered that SAB Kerchief Card Kit had the perfect color in one of its flower kerchief papers. Needless to say, I immediately switched gears.
One day in early March, when we were first housebound with "social distancing," I did a Pinterest search for ideas to use with the Kerchief kit. I fell in love with a card by Krystal Roberts that used the Eiffel Tower die from the new SU Mini Catalog and saved it to my Board. I particularly remembered it, because a few years ago on a Las Vegas vacation with this daughter, our hotel window had a close-up view of the Paris Casino Eiffel Tower without any impediments...what a gorgeous site to see each night with its colorful lights changing every half hour! To commemorate that fun trip, I purposefully revisited Kyrstal's Kerchief card yesterday. I was still in love with it and my commemorative idea, so I decided to plan my card using the Eiffel Tower die as she did.
I did do some changes, but because of using the patterned paper, dotted vellum, and prepared flower die-cuts in the Kerchief Kit, it still bound to resembles\ her card a lot, thus I give her credit and thank her, hoping it is okay to CASE her card if I give her credit!
For my card, I cut the flower-patterned front off the aqua linen pre-folded cardbase provided in the kit. I added a larger Night of Navy card base and a gold foil mat layer under the flower-patterned card front, which enlarged my card much more to my liking. I did not use the kit's pre-cut oval, the two-tone green leaves, or the burlap twine. I die-cut my own Night of Navy label, using the Stitched So Sweetly label die and my own Pear Pizzazz leaves, using an old Sizzix Leaf Branch Sizzlet. I did used the kit's gold foil leaves and mini flowers. I lightly ink distressed my flower-patterned layer and the rose die-cut with navy ink. I added a gold embossed, stitched flag sentiment as well. Take a peek below at the finished card inside and out. The inside verse is my own Chatterbox verse.
INSIDE "UNDER CONTRUCTION"
Ingredients: Stampin' Up products: Cardstock--Night of Navy, Pear Pizzazz, Gold Foil, Kerchief Card Kit papers/flowers/leaves; Stamps--Birthday Banners (modified sentiment); Dies--Parisian dies (Eiffel Tower), Stitched So Sweetly (navy label). Other: Dies--MFT Basic Stitch Lines (sentiment flag). Sizzix Sizzlit--Leaf Branch. EK punch: Victorian Corners. ColorBox Cat Eye--Navy (ink distressing). Size: 4-3/4" x 6".
Monday, June 1, 2020
Essence of Love Is Kindness!
This is a continuation of the Splitcoaststampers' Virtual Stamp Night Mini Challenges. The second challenge was issued last Friday night at 6:00 p.m., ET and is entitled: Don't Stand So Close! Sound familiar? Our hostess is doing a sketch challenge with a take-off from our COVID-19 social distancing and a song by The Police...Don't Stand So Close to Me! This challenge requires that we use the sketch provided and incorporate 4 corners on our center panel all of the same shape...all circles, all stars, etc., which depict keeping our distance from one another.
My 4 shapes are the sparkly circular beads on each of my corners. I dressed up my sketch interpretation by adding a few more layers below the centered rectangle. . . 3 base layers: vanilla cardbase, black mat, and newsprint mat, plus 3 layers for my centered rectangle: Calypso Coral, black, and vanilla. This card was saved and given to my wonderful Mom for her birthday. See her finished card below:
Thursday, January 30, 2020
Pines at Christmas!
This card came together with a multitude of Stampin' Up products from lots of different catalogs and years, starting way back in 2012! I have always loved the old Evergreen tree stamps and really wanted to find a way to use it again. After deciding on my basic layout and to using the Ornamental Pine stamp as may oval's background, I had to find a way to make the tree stand out. Gold embossing seemed just right and allowed other elements of gold to be added...a gold foil layer and oval frame, plus the gold metallic stamped sentiment. Take a peek below at the finished card and simple inside card design to coordinate.
Tuesday, January 21, 2020
A Beautiful Frosty Non-Traditional Colored Card!
My daughter-in-law
loves purple. Deciding which Christmas card to give her and my son was
not a difficult choice that's for sure. I made some Christmas card at a
September 2019 card class, and this design by Luci Kirschbaum was one of the
cards we could make. The Feels Like Frost dsp patterns
are so pretty and just stand alone without almost any embellishments or add-ons
needed.
I loved Luci's design so much I decided to keep it pretty much as she
presented, but I did add a Purple Posy mat layer and increased the size of the
white card base to accommodate that addition. This card was made by
stamping the white card front with the snowflake grouping in the Frosted
Foliage stamp set with the Purple Posy ink. A 1-3/4" vertical panel
of the Feels Like Frost dsp was adhered about 3/8" from
the left side. The sentiment was stamped with Basic Gray ink and
die-cut with the ticket stub corner stitched die. Snowflakes were added
to the corners with Purple Posy ink. The Purple Posy mat layer was
added and Purple Posy die-cut snowflakes using the Snowfall Thinlit dies from
the November 2019 Showcase Snowflake Promotional stamp and die sets.
Take a peek at my finished card with my coordinated inside design and Christmas
verse:
I loved Luci's design so much I decided to keep it pretty much as she presented, but I did add a Purple Posy mat layer and increased the size of the white card base to accommodate that addition. This card was made by stamping the white card front with the snowflake grouping in the Frosted Foliage stamp set with the Purple Posy ink. A 1-3/4" vertical panel of the Feels Like Frost dsp was adhered about 3/8" from the left side. The sentiment was stamped with Basic Gray ink and die-cut with the ticket stub corner stitched die. Snowflakes were added to the corners with Purple Posy ink. The Purple Posy mat layer was added and Purple Posy die-cut snowflakes using the Snowfall Thinlit dies from the November 2019 Showcase Snowflake Promotional stamp and die sets.
Take a peek at my finished card with my coordinated inside design and Christmas verse:


--Liz%20Thayer.jpg)