Showing posts with label SU cardstocks. Show all posts

Friday, August 19, 2022

A Just Right Day!

My daughter-in-law's birthday falls in mid-August two days after my Mom's birthday. I went to a card class back in March or April and several of those cards remained unfinished because I wanted to change them a bit rather than follow the original design exactly. As Ginger loves flowers, and I think she would love to have a greenhouse added to her backyard, I decided one particular unfinished card lent itself well to Ginger, as well as several challenges I wanted to enter.

First, I add a few more flowers and extra foliage inside my greenhouse, plus one more blossom outside as I like the look of an odd number of blooms rather than just two, which is an even number. I finished the greenhouse and attached it to the planned white stitched rectangle panel.

The original cardbase design used the same Just Jade cardstock color under the Just Jade embossed brick layer. I wanted to add larger underlying layers and more color. I decided on a Pale Papaya cardbase to match the sentiment die-cut and to use this new cardbase in a picture frame look with an added white mat, and then the Just Jade Brick & Mortar 3D embossed layer. 

I trimmed brick embossed layer about an 1/8" smaller all the way around. I decided to add Clear heat embossing over the 3D bricks to give them a bit of sheen and bring out the texture. I added a little sponged Pale Papaya ink to a recycled scalloped doily for the edging that peeks out just below the greenhouse white stitched panel.  I shaped the doily into a double fan look.  

Next, I offset this same white mat panel quite a bit more to the right than in the original card design to accommodate for the sentiment overlap, which was placed in this location with a specific challenge requirement in mind. I really like my changes and additions to the larger card size, the new Pale Papaya cardbase, the white mat layer, the Clear heat embossing over the 3D brick dry embossing, the extra blooms, and the fan-like doily as I think they all added and enhanced the original card design, which was presented by Luci Kirschbaum!  Take a peak below at my newly-made finished card inside and out:


Ingredients: Stampin' Up: Cardstock--Pale Papaya, Whisper White, Just Jade, Soft Succulent, Vellum. Stamps/Dies--Garden Greenhouse/ Greenhouse Dies. Dies--Stitched Rectangles, Message Dies. Ink: Just Jade, Pale Papaya, Versamark. EF--Brick & Mortar 3D. Elegant Faceted Gems. Other: WOW Clear Matt Embossing Powder. Rectangle doily from stash. Chatterbox verse. Size-4-3/4" x 6".

Tuesday, June 21, 2022

A Bohemian Chic Paper Weave!

 About four times a year, Splitcoaststampers hosts a Virtual Stamp Night challenge, which starts a month earlier than the official challenge date with three mini challenges.  When the official event happens, it starts on a Friday evening with four challenges, each on the hour, starting at 5:00 p.m. to 9:00 p.m. The second day starts at 1:00 p.m. and goes under 11:00 p.m., also with a challenge each hour.  My first goal was to at least get the mini challenge completed and at least six the next two days.  I was being realistic that I'd probably not get all challenges done in the time limit allotted for uploading the the gallery.  My fondest wish is that someday, maybe I'll actually complete all challenge and get them uploaded on time!


Well, this year, so far, I'm really random.  I may finish the minis, but I'm diving right into one of the later challenges, which I didn't really see myself completing, because I thought the challenge would be difficult to design a card for. But while browsing a few of the possible inspiration photos, I ran across one that really sparked my interest and reminded me of a collection of papers I recently bought, which motivated me to get started.  I also check for other challenges that might help me in my design, but I will have to add them later because of the short timeline to make and upload cards!


Take a peak at my completed card, which uses the bedroom color scheme and floral idea found in the paper:


Ingredients: Stampin' Up: Cardstocks--Crumb Cake, Calypso Coral, Basic White, Gold Foil. Patterned Paper--Symbols of Fortune DSP. Stamps-- Here's A Card (sentiment). Ink--Soft Succulent. Embellishments--Brushed Butterflies. Technique--Layered Strip Weaving. Other: Copics--Butterfly colors...R09 (orange), G29 (green), Y38 (Golden Yellow). Chatterbox inside verse. Size--4-3/4" x 6."

Saturday, February 26, 2022

A Shower of Wishes for Your Birthday!

 I needed another February birthday card for a cardmaking friend. In looking over my Splitcoaststamper Challenge Catch-up List, I decided I needed to make a card that had something to do with rain showers and umbrellas.  I pulled out an old but never used die by Elizabeth Craft Designs, Rainy Day, and I began to create my design with this umbrella in mind.  


I thought it would be fun to dress up my umbrella card front by using the Basket Weave edging technique.  It is a technique that looks difficult and classy when complete, but is actually quite easy to do.  I've used it on five or six cards in the past, but the last time was way back in 2018!  It's definitely time to dust it off and use it again!


I've finished my card with my design evolving as I sorted through and chose multiple SCS challenges to include.  I think my cardmaking buddy will enjoy her birthday card!  Take a peek below:


Ingredients:  SU Cardstock--Coastal Cabana, Calypso Coral, Basic White. Elizabeth Craft die--Rainy Day. SU Embossing Folder--Perfect Polka Dots (retired). EK Punch--Victorian Corners. K&Co. Butterfly Stickers. SU Rhinestones. SU Glitter--Dazzling Diamonds. Stash--1/4" satin ribbon (Copic colored-R14). SU sequins--Iridescent Sequins-Asst. Wink of Stella/Clear (umbrella & inside corners). Technique--Basket Weave (aka Braided Edge; aka Lattice Edge). Chatterbox sentiment/verse. Size--4-3/4" x 6".

Monday, February 21, 2022

Oops! Things Got Missed!

I missed several friends' birthdays in January, but at this late date, I decided it was better to send Thinking of You cards rather than belated birthday cards! For my first card, I found the end of my crocheted flower stash. My Mom made these crocheted flowers back about 10 years ago when they were all the rage in cardmaking! I thought I'd finally use my last flower for this card...sort of a little present for the recipient! I've also asked Mom to make me more, as they seem to be coming back in style!


To find my final card design, I followed my normal pattern of checking the Splitcoaststamper website for challenges that I could give me some prompts for my design.  For instances, to use two challenges, I needed a wobbler, so I inserted this into my inside verse.  The challenges I will be using range from current ones to some really old ones. Most of the time when I'm making a card, I am usually having fun fulfilling my Challenge Catch-up goal that I've set for myself!  


Here was a happy surprise! While doing my challenge search, I found my planned card recipient was featured on a specific challenge that was to have a "Thinking of You" theme! It was a stroke of serendipity, for sure! Thus, this card will now fulfill two events for my friend! One for the challenge, and one for her belated birthday acknowledgement in the form of my planned "thinking of you" card! Take a look at the finished card inside and out. I'm thinking she will be quite happy with it, as I am with the finished results!


Ingredients: SU Cardstock--Basic Black, White Glimmer (retired). Patterned DSP--Fancy Pants Designs/ Country Boutique. Reverse Confetti stamp--Beautiful Banners. SU stamp--Butterfly Gala (mini butterfly-inside). Spellbinders Dies--Grand Labels LG (inside). SU punch--Butterfly Duet. SU Embossing Folder (by Sizzix)--Tufted Dynamic. Washi Stash--3 B&W patterns. Ribbon Stash--3/4" Black Sheer-White Stitch. Recollections Detail--White embossing powder. JoycieB--Crochet Flower. Stash--Black Rhinestone Gem. Sentiment Flag--Hand-cut. Chatterbox-1 verse. Size--4-3/4" x 6". 

Thursday, February 17, 2022

February Birthday Happiness!

 I have another friend and cardmaking buddy whose birthday is in mid-February, so yet another birthday card is needed.  I was in the mood for flowers, so I thought I'd look for a Splitcoaststamper Inspiration Challenge to get me started.


While in my E - F stamp set boxes back in January, I ran across a wonderful flower stamp set, Field Flowers, that I had used for its flourish in the past but not the flower.  I pulled it just in case I found that I could use it in the near future and here was my chance.  After finding the SCS Inspiration Challenge, I was delighted to know that this stamp set would work, but I would be able to add other challenges if I added butterflies and glitter as well.  Take a look at the finished card inside and out below:


Ingredients: SU Cardstock--Sahara Sand; Retired: Always Artichoke, Lucky Limeaide, Tempting Turquoise. Stamps (retired)--Field Flowers, Elements of Style. Dies--Sizzlits Embosslit/ Beautiful Wings. Inks--Sahara Sand (over-the-edge stamping/ distressing), Old Olive (distress L. Limeaide cs), Early Espresso (distress T. Turquoise).  SU White Embossing Powder.  SU Dazzling Diamonds glitter. 3/8" Stitched Satin Ribbon--Gumball Green. Punch (retired)--Scallop Trim Border.

Friday, February 4, 2022

January Celebrations...Just A Little Bit Late!

I missed a few birthdays in January and here I am playing catch-up!  I think that word, "catch-up" might be imprinted on my DNA!  I'm still finding myself in the mood to search out oldies to use from my stash.  I've decided if I don't think I'm ever going to reuse it (or even use it for the first time), it might be time to send it on to some other pasture, however that old saying goes!  I found an old 2008 wood stamp set a friend gave me.  Since I really don't like wood stamps, it was time to unmount it if I'm going to keep it and use it an even better idea!  I thought I'd give it a go and see how it might fit my card.  Then, I found the 2013 SAB Feeling Sentimental stamp set...I love the penny-farthing bicycle, I and have used it, but not the sentiment "Celebrate," which could be used for this birthday card.  Before letting my creative mojo get ramped up to far, I needed to take a look at my Splitcoaststampers Challenge List to add those guidelines into my thoughts.


With my two stamps in mind, I was able to find 11 SCS challenges that I could use if I designed my card just right!  Take a look at my finished card inside and out after letting all my notes percolate.  I'm hoping the recipient likes her card when it finally arrives!


Ingredients: SU Cardstock--Early Espresso, Pool Party, Soft Suede, Very Vanilla. Patterned DSP--stash scraps. SU Ink--Soft Suede. SU stamps--Eastern Blooms (2008 Fall-Winter), Feeling Sentiment (2013 SAB-sentiment). SU punch--3/4" circle. Lace--stash. Copic marker (pearl coloring). Colorbox Ink--Dark Brown (edge distressing). Chatterbox verse (computer). Size--4-3/4" x 6".

Tuesday, February 1, 2022

Love of Chocolate & Friends

I needed a little friendship appreciation card for someone who is always helpful, kind, and makes my life easier whenever she can!  I always have it in the back of my mind to use old stuff in my stash whenever I can probably because of the Splitcoaststampers' Use It Challenge, which requires just that...bring out the dusty old stuff and use it!   Read on to find out why that's just what I did for this card.


My friend and I have a love of chocolate, plus we are both involved in Stampin' Up products and cardmaking.  Thinking about chocolate, brought to mind a stamp set from way back when...2011 as it turns out!  Pulling out these old stamps led to using other old and retired items as well!  Take a peek below at the inside and outside of the finished already mailed and on its way!


Ingredients:  SU Cardstock--Crumb Cake, Chocolate Chip & Pretty in Pink (retired).  Ink: Early Espresso, Soft Suede (ink distress).  Retired SU products: Stamps--Eat Chocolate (2011 Occ.-retired); Decorative Label punch; Polka Dots Embossing Folder; 1/4" Grosgrain ribbon (stash).  Zutter Corner Rounder punch.  Size: 3" x 6" Mini Slimline.

Saturday, January 29, 2022

A Shen Yun Celebration!

I've been intrigued by the wonderful cards being posted on Splitcoaststampers for the Alphabet Challenge, Letter "J" for JUNK.  Some fabulous creations can be seen from collages of pieces of "junk" possibly ready to be thrown out, to magazine pictures, junk mail, old envelopes, package wrapping, etc.  There are "junk" backgrounds, "junk" collage cards and mini-albums, elements made from "junk" throw-aways, etc.  I have been saving a beautiful picture and advertisement about the upcoming Shen Yun ballet to be performed in the Seattle area in April that I received several months ago for just for this kind of challenge "junk" challenge.  


It would be my dream to attend with my "girls," which includes my two daughters, my daughter-in-law and myself.  I was hoping I might feel comfortable enough to attend and buy tickets for all of us to celebrate our birthdays past that we have missed due to Covid.  I remember several such festive occasions to the ballet, to musical plays, etc. in years past!  So, here is my card depicting my dream night out made into a birthday celebration card, which would be perfect with those tickets enclosed as a birthday gift:


Ingredients:  SU Cardstocks--Blushing Bride, Melon Mambo. Recollections Glitter Paper (Copic colored). Celebrate die. SU Curvy Corner Trio punch. Recollections Colored Pearls.  Shen Yun Advertisement Picture. Colorbox Chestnut Roan Ink (ink edge distressing).  Size: 4-3/4" x 6".

Tuesday, January 25, 2022

Happiest of Birthdays for an SCS Friend!

One of the ladies on Splitcoaststampers has a birthday in January, and she has kindly sent me a few cards over the years.  I seems to always be behind the eight ball and never have enough cards finished to send timely.  Even though that was still the case, I made up my mind that I would send her a card in January this year even if it was late.  It is on the way!


Take a peek at the cheerful little card sprinkled with lots of color and sequins that I made for her.  I'm hoping the Post Office is speedy in their delivery since she lives out of state from me and it's already late.  


Ingredients: Stampin' Up products:  Cardstock--Basic White, Lemon Lime Twist, Bermuda Bay, Daffodil Delight.  Pattern Paper--Bubbles & Fizz (2018 SAB).  Ink--Bermuda Bay, Lemon Lime Twist, Daffodil Yellow.  Stamps--Picture Perfect Birthday sentiment + confetti).   Dies--2-3/8" Stitched Circles.  Ribbon--1/8" Satin Bermuda Bay (2018 SAB Shimmer ribbon pack).  Other products:  Dies--Lifestyles Eyelet Circles.  Pretty Pink Posh--sequins.  EK Victorian Corner punch. Chatterbox computer verse.  Size:  4-3/4" x 6".

Sunday, November 14, 2021

Triangle Christmas Trees!

This is a Christmas card design by Luci Kirschbaum from a Stampin' Up card class I attended at the end of September. I brought it home to think about what it needed, if anything, before I felt it was finished.  It has been sitting in my unfinished Christmas cards for well over a month!  It was time revisit it and make up my mind what I wanted to do. . .leave it as is or add something more.


The design is geometric, not normally my style especially in a Christmas card, but somehow I found this card very appealing.  I decided I liked it, but maybe it needed a little sparkle and be a bit larger to fit the card size I generally prefer.   I added some rhinestone tree toppers for sparkle and a new Always Artichoke card base, enlarging its size to 4-3/4 x 6-inches.  I do like the sparkle, extra color, and layering that I added to tweak just a little.  See my finished card below:


Ingredients: SU Cardstock--Evening Evergreen, Basic Gray, Always Artichoke. SU 2021 July-Dec Mini: Peaceful Place Specialty DSP & Sweet Little Stockings stamps. SU Dies--Stitched Triangles. SU Ink--Evening Evergreen. SU Embossing Folder--Evergreen Forest 3D. SU Basic Rhinestones. Colorbox Charcoal ink distressing (trees). Chatterbox computer verse.  Size: 4-3/4" x 6".

Saturday, October 9, 2021

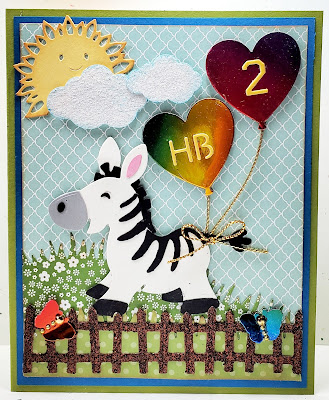
A Lovable Birthday Zebra for Evie!


Ingredients:  Stampin'Up: Cardstock--Lucky Limeaide, Pacific Point Blue, So Saffron; Patterned Papers--2013-14 Subtles Dsp Stack-Pool Party, 2016-17 Subtles Dsp Stack-Wild Wasabi, 2012-13 Subtles Dsp Stack-Certainly Celery; Ribbon--Gold Metallic Cord; Gems--Gold Metallic.  Other--Dies:
Marianne Collectables--Zebra-Donkey; Cottage Cutz Sun & Clouds; My Favorite Things--Frightful Fence; Lawn Fawn Party Balloons; IO Dies--Small Grass die, Insect Set (butterflies); Lawn Fawn--Grassy Hillside; Memory Box--Varsity Numbers; Poppystamp--Happy Birthday Banner Flags (Letters); Glitter--Impress Sparkle;  Wink of Stella/ Clear. Chatterbox verse--computer. Size: 4-3/4 x 6-inches.


CARD STORY & CONSTRUCTION NOTES

My youngest granddaughter will be turning two in mid-November, and I wanted to get her card finished early so I would be absolutely sure to have it on time!  Her birthday party theme this year will be butterflies.  

I had been fiddling around with my Marianne cute little zebra die many months ago when I was making last year's granddaughter birthday cards.  At that time, I die-cut the parts for several  zebras and though this little zebra girl turned out just as cute as I thought she would, I decided to go for 3D ballerina girls instead!  I got side-tracked and never quite decided what I was going to do with the little zebra, so she's been lurking around my craft for all this long while!  

I recently came upon a challenge that basically said to use up those items in your stash (or laying around) that were finished or partially finished or just throw them out.  I spotted the little zebra, and I knew I did not want to throw her out; therefore I was motivated to find her a home! 
 
Though a zebra did not exactly fit the butterfly theme, I thought I'd be able to fix that if I incorporated some butterflies flitting around a zebra card scene.  I even recycled a rainbow foil birthday party hat that this same birthday granddaughter had previously worn at a party.  Though it was torn a little, I'd been saving it as the perfect recycle paper to somehow use on a card for her.  The balloons and flitting butterflies I planned were the perfect thing!  Take a look at Evie's finished card below.  I'm pretty pleased with the results and think she will LOVE it!

Saturday, September 25, 2021

An Abstract Whimsy Christmas!

Here is a Christmas card for those who like a bold, abstract geometric flair with lots of bright and vibrant colors!  I like the design style, but usually not for Christmas cards, especially in such a non-traditional color combination!  (But, it actually grew on me as I worked with it!)

Ingredients:  All Stampin' Up products:  Cardstock--Night of Navy, Polished Pink, Mossy Meadow. DSP--Whimsy Wonder Specialty. Vellum--2021-23 In-Color Shimmer Vellum.  Dies--Layering Circles, Whimsical Trees, Christmas Trees. Ink--Polished Pink.  Wink of Stella-Clear.  Chatterbox computer verse (inside).  Size 4-3/4 x 6-inches.


 CONSTRUCTION NOTES WITH A STORY!


This is the first of four cards to be completed from a Christmas card class I attended this month.  Its original design was by one of our hostesses, Luci Kirschbaum.   Abstract Christmas cards are really out of my comfort zone, so it took time working with it before I began to appreciate its bold, totally non-traditional colors and abstract geometric design!  I loved the elements and dies Luci used in her composition, and I really like the changes that I made.


I started by switching the striped paper from a left vertical strip to an angled quasi-banner and built my card from there.  It was handy that I brought my mini-paper cutter with me to class!  The positioning of other elements are somewhat the same as Luci's, though I moved my tree a bit to the left and threw on a few more stars.  In addition, I added a new and larger framing card base in Blueberry Bushel.  I really liked this color addition as I was able to achieve my love of a larger card, plus the blue softened the bold colors and brought out the blue in the dsp stripes, which I liked.

Wednesday, June 16, 2021

Mother's Day for My Youngest Daughter

Our family decided to celebrate Mothers' Day and Father's Day together for several reasons. . .not everyone's double COVID vaccine would be optimally effective, plus there were so many mothers to celebrate, it just seemed the best solution to make it easier on everyone!  Here's the problem. . .did I remember this particularly important fact when it came to making the cards needed for this celebration?  NO!  I had just finished my third Father's Day card when I realized I should have made three Mother's Day cards as well.  Simultaneously, I also realized that I just had no time to fit them in before the week-end!  


Not the optimum solution, but this is how I solved my dilemma with no time to make three more cards. . .  My  youngest daughter, Jackie, lives the furthest away, and therefore, not as easy to just pop over to make a belated card delivery, which was my plan for the other two.  My oldest daughter and daughter-in-law live within a 10-minute drive from me.  So, I focused on at least getting Jackie's card done and delivered at our family barbeque event.  Another reason I chose her is that Jackie will be celebrating her third Mother's Day, and I have not yet been able to spend this holiday with her as I have with the other two. 


Back in May when we delayed our Mother's Day celebrations, I had already decided to do a flower garden theme for all my family Moms.  I had just bought a new Mother's Day die that I was anxious to incorporate in some manner.  For Jackie's card, I decided to use some papers and florals from Stampin' Up's Made to Bloom card kit from the 2019 Occasions catalog.  One thing that I've noticed is that there haven't been many who have branched out and made other alternative designs than those provided in the original kit.  But, if you've followed me at all, you know that I just can't make the card designs provided in the kits.  I usually make alternative designs before the kit designs, and this card is no exception.


For my card front design, I love layers, so I added a Blackberry Bliss cardbase and a gold foil mat layer before adding a third layer of one of the patterned papers provided in the kit.  I added a gold foil horizontal band to anchor the kit-provided gold-edged floral bouquet, plus I ink-distressed its edges.  My finishing touch was to sprinkle on a few gems for interest.  I decided to incorporate that new Mother's Day die on the inside as the sentiment and "verse" combined...how pretty it is in the gold foil!  Take a look below at the inside and outside finished card.  I think my youngest daughter will enjoy her card.


Ingredients:  Stampin' Up products:  Made to Bloom Card Kit (2019 Occ./ retired)--BG patterned paper, Gold foil-edged flowers.  Cardstocks--Blackberry Bliss, Calypso Coral, Gold Foil.  Ink--Crumb Cake (ink distressing).  Gems--Glitter Enamel Dots.  Punch--Curvy Corner Trio (retired).  Other: Sargent Art--Acrylic Glitter Glaze (flower centers).  Papertrey Ink die--To Die for Sentiments--Happy Mother's Day die.  Size--4-3/4 x 6 inches.

Thursday, May 20, 2021

Stepping To Church for Christmas!

Here is my first center-step card that I've made from start to finish with my own template design for a larger 4-3/4 x 6-inch card.  To help me redesign the dimensions, it is a remake of a card I made at my Stampin' Up demonstrator duo's card event back in the fall of 2017, which I loved!  What can I say, I'm not very adventuresome, especially since it involved refiguring the template dimensions in order to remake it into the larger size.  I kept the original card to use as a guide, which helped me figure it all out much easier. 


Because the card was larger, I was able to add a third layer.  I ended up with a black cardbase, followed by a white mat layer, followed by the card front layer with the die-cut pieces.  I really like the white on black look.  The original design just started off with the white cardbase, which didn't allow for as much contrast.  I really like my added contrast by having three layers, and starting with the black first, then white, then black again.  I stuck to the original card design, and I thank Luci Kirschbaum for always allowing us to CASE our class cards and modify them as we like.  Here is my enlarged, finished card below:


Ingredients:  Stampin' Up products:  Cardstocks--Basic Black, Whisper White, Gold foil.  Patterned paper--Merry Music Specialty (2017 Holiday).  Stamps--Hearts Come Home/ Dies--Home Town Greeting.  Punch--Confetti Stars Border.  Embossing Powder: Gold.  Size:  4-3/4 x 6-inches.

Saturday, May 15, 2021

Sending Sunshine on Mother's Day

I wanted to use my first Paper Pumpkin Kit...June 2020--Box of Sunshine kit pieces to make Mother's Day cards for my oldest daughter and my daughter-in-law.  For my daughter, I decided to use one of the papers in the kit that looked like an alcohol-inked background.  There were actually two different yet similar colored one...one in brilliant red-oranges, yellow golds, yellows, and gold metallic and the other in yellows, yellow-golds, and metallic gold.  For my daughter's card, I chose the one with red-oranges and yellows.   I loved the card design provided in the kit, except I like layers so here is what I did. 


I used the card design provided for this paper pattern, except I dropped the start of the stamped sunshine about 3/8" lower from the top and 3/8" to the right...closer to center than the original design.  Then, I followed through with the black dot horizontal paper, sentiment, and stamped lines as originally positioned in relation to the stamped sun.  I  added two mat layers beneath the card front...a new black cardbase, and a burnt orange mat layer between the cardbase and card front.  I also positioned my sequins slightly different.  For the most part, other than the added layers, you might not notice any difference from that of the original card front unless closely scrutinized.


I finished off with an inside verse sending sunshine and happiness.  Take a peek below at the finished card inside and out design.  I think my daughter, Michele, will like her card.


Ingredients:  Stampin' Up products:  Paper Pumpkin--June 2020/ Box of Sunshine:  AI-style dsp,  black & white dot dsp, stamps, irregular hexagon sentiment die-cut.  Cardstock--Basic Black, Whisper White.  Memento Tuxedo Black Ink.  Other products:  Core'dinations Foundations cardstock--Valentia Orange.  Bazzill Swiss Dot--Honey Yellow.  Colorbox Chestnut Roan pigment ink (edge distressing).  Stash--sequins & red-orange rhinestones.  Chatterbox computer verse.  Size: 4-3/4 x 6-inches. 

Monday, May 3, 2021

Enjoy Today...It's Mother's Day!

This is my second Slightly Alternative Mother's Day card for my daughter-in-law, using my first Paper Pumpkin Kit...June 2020--Box of Sunshine kit pieces.  For her card, I chose the gold metallic and white horizontal striped paper provided in the kit.  Again, I loved the card design provided in the kit for this paper, except I like layers, and I wanted to change the sentiment, so here is what I did. 


I used the card design provided, except I trimmed the top and bottom of the striped paper down a total of 3/8." I also dropped my pineapple about 1/4" lower and moved it 3/8" to the right closer to the center than the original design.  Then, I followed through with the black dot horizontal paper, sentiment fishtail flag die-cut in relation to the pineapple's position as in the original design.  I  added two mat layers beneath the card front...a new black cardbase, and a apple green and white dot mat layer between the cardbase and card front.  I also added more sequins and positioned them different.  For the most part, other than the added layers, you might not notice any difference from that of the original card front unless it is closely scrutinized.


I finished off with an inside verse sending thoughts of love and appreciation.  Take a peek below at the finished card inside and out design.  I think my daughter-in-law, Ginger, will like her card.


Ingredients:  Stampin' Up products:  Paper Pumpkin--June 2020/ Box of Sunshine: gold metallic/ white stripe dsp,  black & white dot dsp, pineapple die-cut, double-fishtail flag sentiment die-cut.  Cardstock--Basic Black, Whisper White.  Memento Tuxedo Black Ink.  Other products: Stamps--Penny Black/ Sweet Wishes.  Recollections--Primary Dots dsp; Bazzill Swiss Dots/ Honey Yellow.  EK punch--Victorian Corners.  Colorbox Chestnut Roan pigment ink (edge distressing).  Stash--sequins & black enamel dots.  Chatterbox computer verse.  Size: 4-3/4 x 6-inches. 

Friday, April 9, 2021

A Tropical Birthday Drink!

As I mentioned back February on my blog of a friend's birthday card, I made a variety of cards that would be needed in the future while I was on my August, 2020 craft trip with my sister and Mom to Sisters, Oregon.  This has been my first and only trip that I have ventured out during COVID!  Weren't we lucky that this trip happened about two weeks before the horrendous fires all over Oregon's forests!


I also mentioned that because my mojo had been stymied by COVID's intervention, I had purchased several kits and subscribed to Stampin' Up's Paper Pumpkin to try to spur myself into getting into my craft room!   I was really excited about the June 2020 Paper Pumpkin Box of Sunshine kit because of its beautiful, rich colors, and its pineapple die-cuts!  I brought this kit and several others along to work on while in Sisters.


I like to make cards for people where the theme fits the person, whether it be focusing on a hobby, their job, their favorite song, movie, etc.  My husband's job took our family to Hawaii to live for about three years, and Jackie, our youngest daughter, was born there, thus my excitement over the pineapples in the June 2020 card kit.  I saw an alternative card idea in June, just a few weeks after the kit arrived that I really, really loved.  I remembered it and thought the "idea" was perfect for Jackie, but I did not save it to Pinterest, nor could not find it again.  I remembered it used the kit paper supplies, and particularly that it used the black/ white polka dot paper on a center panel.  There was also a pineapple with its top cut off to form a tropical beverage receptacle, plus an umbrella, a straw, and a flower.  It used one of the cardbase folds with the bright alcohol-ink-style background as the card front.  I wished I could find the exact card I saw to give that cardmaker credit for my "memory casing," but alas, no luck!


For my card, I love layers, so I cut the alcohol-ink-style background off the folded card base to use as a layer.  I made a new and larger cardbase using black cardstock and added a second layer of gold foil.  My third layer would be the AI-styled panel that I had cut off.  I cut a set of smaller papers for the center layers...black and white cardstocks and the kit's black & white polka dot paper (similar to my "memory-cased" card, I think).  I fussy-cut the pineapple top off along the diamond pineapple scales and saved it to use as greenery (my "memory-cased" card did something similar, because I remember thinking it was a nice filler).  Next, I worked on my tropical beverage pineapple drink.


My sister brought lots of her My Favorite Things stamp sets with her, one of which had a Hawaiian theme, so I was able to use her Hibiscus stamp for my drink's flower.  I brought my new SU umbrella stamp/ punch set, because Jackie also loves umbrellas.  I thought I might incorporate that into her card theme if my pineapple idea didn't work.  But, the pineapple tropical drink worked very well with the parts and pieces I was able to use from here and there.  I Copic-colored the umbrella and flower stamped images, plus added a bit of  Clear Wink of Stella to the flower for a bit of sheen.   I used the geometric die-cut and a stamp from the kit for the sentiment.  Take a peek below at how Jackie's card evolved into the finished design.  She was delighted with it, and the inside verse's play on a bit of humor!


Ingredients:  Stampin' Up products:  June 2020 PP Box of Sunshine--Patterned papers, sentiment stamp/ die-cut shape, pineapple die-cut.  Cardstock--Basic Black, Whisper White, Crushed Curry, Gold Foil.  Stamps--Under My Umbrella.  Other:  My Favorite Things--Birdie Brown Polynesian Paradise stamps (hibiscus).  ColorBox Ink: Chestnut Roan (ink distressing).  Copic Markers.  Wink of Stella/ Clear (hibiscus).  EK Corner Punch--Victorian Medium.  Chatterbox Computer verse.  Size:  4-3/4" x 6-1/4".

Monday, February 15, 2021

Ladybug Birthday Greetings!

 I have several birthdays in February that I like to make cards for...one is for a dear friend and cardmaking buddy.  To lift her spirits and mine during this glum COVID pandemic, I thought we might both be in the mood for something lighthearted and whimsical.  This Little Ladybug stamp/ die set should be perfect for Carla, who loves to garden.  These little friends can be placed in her garden to multiple and flourish to eat to their heart's content while keeping her garden free of aphids come spring when it is full production!


If you've been reading my blog of late,  you know that I've had no creative mojo for months upon months.  In the last six months, I have resorted to kits, both homemade and purchased, and using them to try and spark my interest.  Another thing you may know from reading me in long ago posts, with a card kit, I just can't make the cards as they are designed.  They always spark ideas that I think I might make the card even better or will change something to make it a more me card!  Once an idea is sparked, I just can't resist, and I just have to try it out!


I have an old card kit from the Stampin' Up 2020 Sale-A-Bration freebie catalog, that I've only made one card with, using my own alternative design with the aqua kerchief paper.  I have not yet touched the red kerchief paper, and I thought it would be perfect with the cute little ladybug stamps.  Of course, this will be my own total alternative card design rather than one that came with the kit itself, which all feature popped flower designs with the die-cuts provided.


With this card, I got in some Copic coloring while creating my own card design...haven't done image coloring in many a month!  Take a peek below at my finished Red Kerchief paper alternative card design, both front and inside:


Ingredients:  Stampin' Up products:  2020 SAB Kerchief Card Kit (red kerchief paper / stitched sentiment die-cut); Cardstock--Basic Black, Real Red, Whisper White, Garden Green, So Saffron (inside); Stamps--Little Ladybug;  Dies--Stitched Scalloped Rectangles;  Ink--Memento Tuxedo Black.  Other:  Copic Markers (ladybug coloring); MFT /die-namics--Fresh Cut Grass; EK Punch--Medium Scallop Corners.  Pretty Pink Posh--gold small sequins.  Size--4-3/4" x 6.

Wednesday, January 20, 2021

Love & Prayers Bring Healing & Comfort

I needed two sympathy cards right after Christmas and the New Year, and my sympathy stash is ZERO!  I was in the middle of fulfilling my New Year's resolution to make at least 60 Christmas cards by the end of January before putting my Christmas materials away.  I had just finished a card design idea a  few days ago, based on a My Favorite Things sketch from April 2018...MFTWSC382.  I felt my new design would actually make an excellent sympathy card made exactly like I was planning to make the Christmas card.  


The cards are made from the Stampin' Up Feels Like Frost paper scraps, which was carried over from the 2019 Holiday mini catalog to the 2020 catalog. I got busy and changed my new card design yet again to use up all the leftover kit pieces, plus cutting a few more in order to make two cards the same.  One would be given locally and the other mailed to Denver, Colorado, so neither would ever know they received cards with the sames style.  


My design change involved using an envelope flap at the top of the card where I would place the sentiment.  It is actually adhered not a flap.  I used white cardstock and sponged it with Balmy Blue ink.  I added the sentiment with the computer/ printer and then measured and cut the triangle-shaped envelope flap to fit the card top.  On these two sympathy cards, unfortunately, I measured wrong, and the flap ended up too short to go all the way to the top of the card according to my design.  Not to worry, I placed it an inch lower from the top and added the planned ribbon band and bow onto the cardstock layer above instead on the flap.  Though I think I'll like it better almost all the way to the top as I will do on the Christmas cards, I decided it really didn't look too bad this way.  I used Stampin' Up's Snowflake Splendor Holiday ribbon, which is a sparkly iridescent white normally, but I colored blue it with the broad nib of a blue shade  of Copic Marker to coordinate with the blue shades in the card.  I randomly popped on some rhinestone sparkly gems, made a little sympathy verse for inside, and the card was done.

Take a peek below at both my modified Christmas card design made into a Sympathy card and the inside design and verse below:


Ingredients:  Stampin' Up products:  Cardstock--Balmy Blue, Night of Navy, Silver Glimmer; Patterned paper--Feels Like Frost 6x6 dsp; Ink--Balmy Blue; Ribbon--1/4" Snowflake Splendor.  Basic Rhinestones.  Other:  Punch--EK Victorian Corners; Copic Markers (color ribbon); Chatterbox computer sentiment/ verse; Size--4-3/4" x 6".

Wednesday, January 6, 2021

Christmas Flowers Bring Joy (Paper Pumpkin October 2020 - Joy to the World Alternative)

I think I mentioned several months ago that I finally signed up for Stampin' Up's Paper Pumpkin subscription hoping that would motivate my lost cardmaking mojo.  It helped a little, but not as much as I'd hoped.  I still didn't get started on Christmas cards until just a few days before Christmas...YIKES!  I did fall in love with the October 2020 "Joy to the World" Paper Pumpkin kit, and it did finally spark me to try some alternative designs of my own rather than just make the couple of designs provided in the kit. 
 
I received a cute little penguin card from Ann Otto, the hostess of the Splitcoaststampers' Christmas Card Challenge...one I have participated in many times in past years.  I loved Ann's simple layout design with its left side triangle so much that it immediately gave me the idea to use the bones of her layout and incorporate it into the Stampin' Up October 2020 "Joy to the World" Paper Pumpkin kit elements to create my own card.


My deviations to Ann's layout were to add several layers to the card background, enlarge the left-side triangle and add layers and embossing to it as well.  Instead of a cute little alcohol inked penguin, I positioned two layers of kit's Christmas rose flowers on the triangle to which I did a bit of fussy-cutting and coloring.  I also added gold sequins to the flower centers and added green to the leaves.  I wanted the leaves to show off more and wanted to add depth and texture with the layers, sequins and dry embossing.


The kit came with gold metallic "Joy" die-cuts, but I decided to use my own "Joy" die, cutting it in two colors and setting them in an off-set,  layered placement.  The kit provided two vertical Crumb Cake card bases with a gold-etched vertical patterned, but I wanted to make multiple numbers of my card design to build up my Christmas stash, so I found a background stamp that I thought would work really well.  I stamped and heat embossed the pattern in gold onto plain Crumb Cake cardstock to create eight more card fronts.  I also added ribbon and more sequins that were also not part of the kit.  (Unfortunately, the other seven pre-cut and prepared card pieces are still waiting for me to finish putting them together!)  

Take a peak below at my first alternative card design using the Paper Pumpkin kit supplies, plus some added items and supplies not provided by the kit.  I have included the card ingredients below for your information:


Ingredients:  Stampin' Up products:  Paper Pumpkin October 2020 "Joy to the World" kit elements.  Cardstock--Cherry Cobbler, Whisper White, Call Me Clover.  Gold Embossing Powder; Versamark Watermark Ink.  Polka Dot Tulle Ribbon.  Other:  My Favorite Things background stamp: Balloon Strings.  Alina Craft die: "joy."  Hot Off the Press:  Diamond Dots EF.  Pretty Pink Posh sequins.  Colorbox Ink: Chestnut Roan (edge distressing).  Size: 4-3/4" x 6".