Showing posts with label Poppystamp dies. Show all posts

Saturday, October 9, 2021

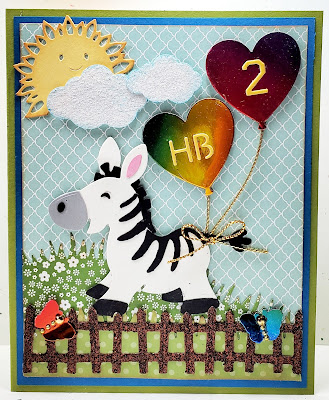
A Lovable Birthday Zebra for Evie!


Ingredients:  Stampin'Up: Cardstock--Lucky Limeaide, Pacific Point Blue, So Saffron; Patterned Papers--2013-14 Subtles Dsp Stack-Pool Party, 2016-17 Subtles Dsp Stack-Wild Wasabi, 2012-13 Subtles Dsp Stack-Certainly Celery; Ribbon--Gold Metallic Cord; Gems--Gold Metallic.  Other--Dies:
Marianne Collectables--Zebra-Donkey; Cottage Cutz Sun & Clouds; My Favorite Things--Frightful Fence; Lawn Fawn Party Balloons; IO Dies--Small Grass die, Insect Set (butterflies); Lawn Fawn--Grassy Hillside; Memory Box--Varsity Numbers; Poppystamp--Happy Birthday Banner Flags (Letters); Glitter--Impress Sparkle;  Wink of Stella/ Clear. Chatterbox verse--computer. Size: 4-3/4 x 6-inches.


CARD STORY & CONSTRUCTION NOTES

My youngest granddaughter will be turning two in mid-November, and I wanted to get her card finished early so I would be absolutely sure to have it on time!  Her birthday party theme this year will be butterflies.  

I had been fiddling around with my Marianne cute little zebra die many months ago when I was making last year's granddaughter birthday cards.  At that time, I die-cut the parts for several  zebras and though this little zebra girl turned out just as cute as I thought she would, I decided to go for 3D ballerina girls instead!  I got side-tracked and never quite decided what I was going to do with the little zebra, so she's been lurking around my craft for all this long while!  

I recently came upon a challenge that basically said to use up those items in your stash (or laying around) that were finished or partially finished or just throw them out.  I spotted the little zebra, and I knew I did not want to throw her out; therefore I was motivated to find her a home! 
 
Though a zebra did not exactly fit the butterfly theme, I thought I'd be able to fix that if I incorporated some butterflies flitting around a zebra card scene.  I even recycled a rainbow foil birthday party hat that this same birthday granddaughter had previously worn at a party.  Though it was torn a little, I'd been saving it as the perfect recycle paper to somehow use on a card for her.  The balloons and flitting butterflies I planned were the perfect thing!  Take a look at Evie's finished card below.  I'm pretty pleased with the results and think she will LOVE it!

Thursday, December 31, 2015

A Christmas Peek A Boo Window!

I purchased the Memory Box Woodland Oval die late last summer, and I really wanted to use it for several of my Christmas cards this year.  As I am in the midst of preparing for a wedding, I did not have time to make as many cards of totally my own design as I originally thought I would.  Instead, I gave all of the many cards I made from class events that I attended from summer through fall to friends and family who needed their cards "snail mailed."  The end results of my class cards represented either total rec-creation the event holder's original designs, or I tweaked their designs just a bit, or on several, I completely modified the original design using the card parts provided.  


My stash of accumulated of class cards helped a lot to fulfill my Christmas card needs, but though about half were completely finished, the other half were only partially finished.  I had to make quick work of moving all of my stash to the completely finished group.  I made a fast tally of those that needed to go by "snail mail," and I realized that I still did not have quite enough for the "snail mail" group; therefore, I really had to get busy and make some of my own design creation.  I was pleased I found time to use the Woodland Oval die that I so love for at least one Christmas card this year. 


To start, I prepared my cardbase with its creased fold.  Next, I embossed the front half of my card base with Stampin' Up's Softly Falling Embossing Folder.  As I made my card 6-1/2" tall in order to encompass the oval, the frame I wanted, and the sentiment to go under my framed oval window, I had to carefully re-position my embossing folder and emboss the lower half in a second pass through the Big Shot.  My third step was to cut my oval out with the Memory Box Woodland Oval die.  In using this die,  I did find that I wished the oval was not quite so long vertically and was more of a rounded oval so the card front would not have to be as tall.  After using it this one time, I do have some thoughts of how I might change that a bit, but that will be an idea to remember for next year!

I wanted to frame my oval, and to get the right size I ended up using my Spellbinders Grand Ovals, which was a surprise to me!  I used Oval #1 (the smallest) and Oval #2 (the next larger), which made a frame just the right width and to my liking.  I wanted some little red Cardinal birds on my branches, and I had purchased Poppystamps Cherry Cardinals for this purpose.  Next, I decided I did not want to leave my window open to the inside view of my card, so I die-cut another of the larger ovals from a white glitter paper by Core'dinations.  I adhered it on the inside directly behind the window cutout.   I backed my sentiment with the same red textured foil paper and framed the edges of the cardfront in this same red.  I decided I was pretty pleased with the outcome for a card I did not have a whole lot of time to dwell on!  Take a look below at the card front and its inside coordinating design and verse.


Recipe:  Stampin' Up products: Shimmery White cardstock.  Stamp: To You and Yours Too.  Ink: Real Red.  Dies: Memory Box Woodland Oval; Spellbinders Grand Ovals; Poppystamps: Cheery Cardinals.  Other papers:  Core'dinations: White Gloves Glitter paper; Recollections Signature Especial: Foil Texture Paper-Brilliant. Computer verse.