Sunday, January 31, 2021

Paint Your World a Happy Rainbow!

Moving on with Splitcoaststampers' Virtual Stamp Night Mini Challenge.  Challenge #3 was posted at 7:00 p.m., ET and was entitled: Always Be A Rainbow.  Our hostess asked us to be inspired by the song Rainbow by Kacey Musgraves and create a card with a rainbow or using all the colors in a rainbow.


I chose to go with the idea of using all the colors in a rainbow rather than an actual rainbow.  The song is a bit sad, but also depicts another way to see your life, as there's always a rainbow in your life if you just look.  I decided my card would choose a happy rainbow with the sentiment Paint Your World Happy!  Note that it depicted crafting paint brushes...aren't we all happy when we are crafting, thus the sentiment works perfectly!  This little happy card will be for my friend, Sandy, whom I am missing during this long, never-ending social distancing. See the finished card below:


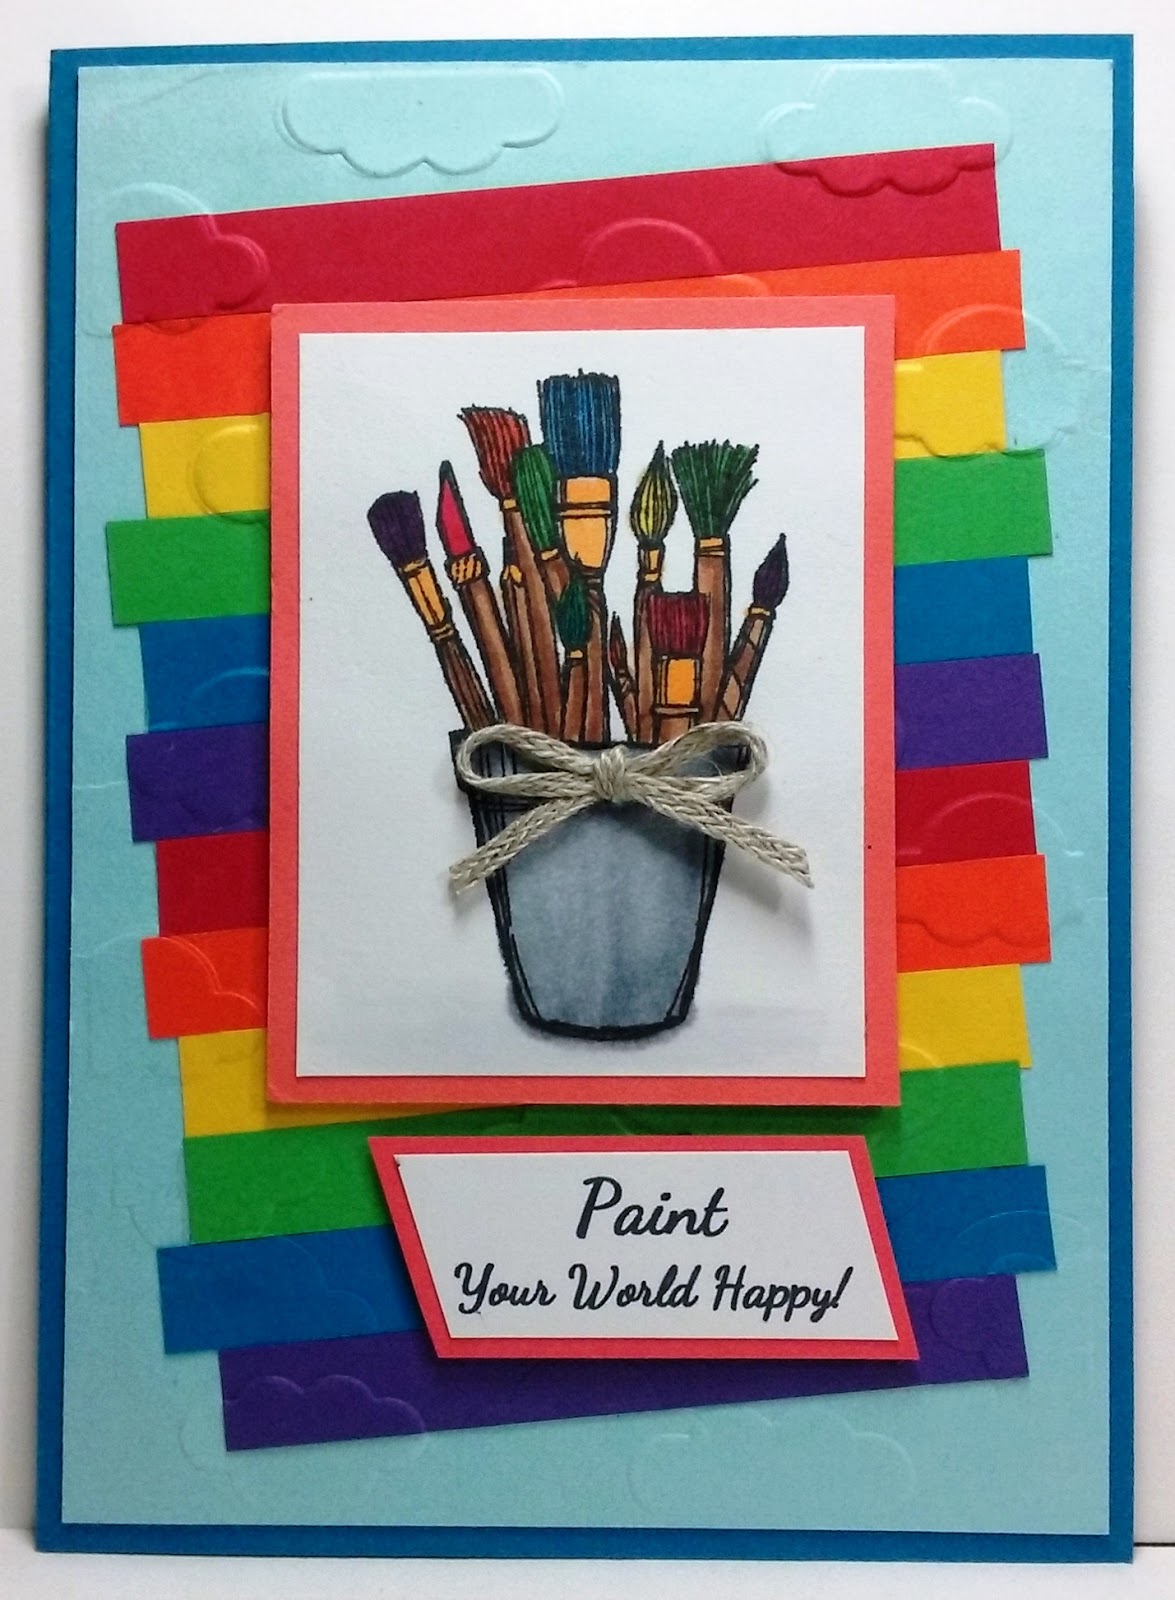
Ingredients:  Stampin' Up products:  Cardstocks:  Pacific Point, Balmy Blue, Real Red, Tangerine Tango, Daffodil Delight, Cucumber Crush, Pacific Point, Concord Crush, Poppy Parade, Whisper White.  Stamps--Crafting Forever (2017-19/ retired).  Trim--3/16" Braided Linen.  Wink of Stella--Clear.  Other:  Embossing Folder--Darice--Cloudy Sky.  Copic Markers.  Chatterbox sentiment (computer).  Size: 4-1/2" x 6-1/4."

Sunday, January 24, 2021

A Doily Gatefold Garden

I finally had the nudge to visit my craft room...yay!  I really wanted to put some cards together to send to some friends who have received no cards from me to celebrate their special times, even birthdays or Christmas while my mojo and cardmaking deserted me and ran amok for over a year!  My first thought was to motivate myself by trying to finish some cards already started that were gathering dust in the unfinished stash!


My first card is one I start back in the spring of 2019 when I traveled to visit my Mom in Redding, California before the COVID pandemic took over our lives.  While there, I attended a Stampin' Up card party given by Mom's Stampin' Up demonstrator, Darla Watson.   Darla is quite talented, and I always enjoy going to her parties when visiting Mom!  I am so glad my 95-year old "young" Mom still enjoys getting out and doing cardmaking with family and friends!


There were 5 card kits to make, all fun designs.  Some I completed at the party and others I took home half completed because ideas popped in my head while making them to add other layers or embellishments to the design.  This "popping into my head of ideas" is quite common when I'm making cards, my own or someone else's designs.  Most times, I feel pressured to pursue the ideas, or I will look at the finished card and say to myself, "what if" and drive myself crazy because I didn't at least see what I thought by using the "what if" ideas.  So, this card is one of those "what if" designs from Darla's long-ago designs that I found still unfinished and remembered my "pop in my head, what if" ideas.


As most of you know, who have read my blog for any length of time, I prefer cards larger than the standard A2 size.  The original card design had a white gatefold card base and a floral dsp layer added to the gatefold .  To me, it just needed more color, which meant layers, which automatically means...larger card.  I added a Blueberry Bushel (blue) bottom layer and a Call Me Clover (green) layer and then the white gatefold with flower dsp panels. 

 
It had a yellow belly-band as most gatefold cards do, but I decided to try a permanently attached horizontal band with Rose Red or Strawberry Slush scalloped edges.  The band starts on the center left side of the gatefold, under the doily, at the edge of the flower dsp and is adhered all the way around the back to the center right-edge of the gatefold.  The doily is only attached to the left side of the gatefold and becomes an overlay over to the right side.  Because of my modifications, I added a 1-3/4" white punched circle to the centerback of the doily underside to pretty it up now that its back shows when the card is opened.  


Thank you Darla for allowing me to modify your design many months later.  I always enjoy my visits and the fun times at your parties.  Here is my finished version of Darla's original card:


I'm send this card to a cardmaking buddy who did not receive cards from Chatterbox (me) while I hibernated in isolation.  Here is the added interior that she will received when she gets it in the mail!


Ingredients:  Stampin' Up products:  Cardstock--Blueberry Bushel, Call Me Clover, So Saffron, Melon Mambo, Whisper White;  Patterned Paper--Garden Impressions dsp 6x6;  Stamps--Eastern Beauty (sentiment);  Ink--Blueberry Bushel;  Punches--Bitty Blooms, 1-3/4" and 1-1/2" Circles, Leaf;  2-7/8" White Pearlized Doily; Bitty Basic Pearl Jewels.  Other products:  EK Punch--Victorian Corners. 

Wednesday, January 20, 2021

Love & Prayers Bring Healing & Comfort

I needed two sympathy cards right after Christmas and the New Year, and my sympathy stash is ZERO!  I was in the middle of fulfilling my New Year's resolution to make at least 60 Christmas cards by the end of January before putting my Christmas materials away.  I had just finished a card design idea a  few days ago, based on a My Favorite Things sketch from April 2018...MFTWSC382.  I felt my new design would actually make an excellent sympathy card made exactly like I was planning to make the Christmas card.  


The cards are made from the Stampin' Up Feels Like Frost paper scraps, which was carried over from the 2019 Holiday mini catalog to the 2020 catalog. I got busy and changed my new card design yet again to use up all the leftover kit pieces, plus cutting a few more in order to make two cards the same.  One would be given locally and the other mailed to Denver, Colorado, so neither would ever know they received cards with the sames style.  


My design change involved using an envelope flap at the top of the card where I would place the sentiment.  It is actually adhered not a flap.  I used white cardstock and sponged it with Balmy Blue ink.  I added the sentiment with the computer/ printer and then measured and cut the triangle-shaped envelope flap to fit the card top.  On these two sympathy cards, unfortunately, I measured wrong, and the flap ended up too short to go all the way to the top of the card according to my design.  Not to worry, I placed it an inch lower from the top and added the planned ribbon band and bow onto the cardstock layer above instead on the flap.  Though I think I'll like it better almost all the way to the top as I will do on the Christmas cards, I decided it really didn't look too bad this way.  I used Stampin' Up's Snowflake Splendor Holiday ribbon, which is a sparkly iridescent white normally, but I colored blue it with the broad nib of a blue shade  of Copic Marker to coordinate with the blue shades in the card.  I randomly popped on some rhinestone sparkly gems, made a little sympathy verse for inside, and the card was done.

Take a peek below at both my modified Christmas card design made into a Sympathy card and the inside design and verse below:


Ingredients:  Stampin' Up products:  Cardstock--Balmy Blue, Night of Navy, Silver Glimmer; Patterned paper--Feels Like Frost 6x6 dsp; Ink--Balmy Blue; Ribbon--1/4" Snowflake Splendor.  Basic Rhinestones.  Other:  Punch--EK Victorian Corners; Copic Markers (color ribbon); Chatterbox computer sentiment/ verse; Size--4-3/4" x 6".

Saturday, January 16, 2021

Reindeer Prancing & Dancing!

After my abysmal failure with getting 2020 Christmas cards made and sent to friends and family, other than my four children, and I was probably only successful with those, because I always make a gift pocket inside their cards to hold their Christmas checks...basically the "packaging" to hold their present.  These four cards were all one design with four different colors that I made just two days before Christmas.   


As the New Year approached and I was still in my funk, I woke one morning and was just fed up with my down mood that had persisted during all of the holidays.  I was really upset with myself and "kicking myself in the hindquarters" for not forcing myself into my craft room to make Christmas cards.  I felt that I had pushed by depressed vibes onto everyone else and not cheered them up if they needed it by getting happy mail at Christmas!  I vowed never to let another Christmas go by without me making and sending my cards, because with all my surgeries for my knees and hands in the previous three years, I had missed other Christmases as well.


In early January, I pushed myself into my craft area and gave myself a good talking to.  I made a wonderful New Year resolution.  I would stay in my craft area and make enough cards to cover family and long-time friends for Christmas 2021 (that would be around 70 cards) by the end of January; I was not allowed to make other cards; and I was not allowed to put what Christmas materials I had out away until I finished.  To help me out, my first two designs were alternative designs off the October 2020 Paper Pumpkin, "Joy to the World."


YAY! I completed my resolution, though I fudged a little on "other cards."  After I got over 3/4 of the cards finished, I had a few sympathy cards I felt I really needed to address...so I cheated a wee bit.  I spent many, many hours and literally a minimum of three weeks of January continually at my craft table getting my 70 Christmas cards finished, except for their inside design and verse.  I developed about 15 designs and made four to six of each.  This blog post is for my fourth card design, which is a take-off of an unfinished 2019 card kit from my Stampin' Up mentors, Daralee Peterson and Luci Kirschbaum.  Its design was originated by Dar, and I modified and embellished upon it, changing it to make it my own. 


The original design only had two layers and both were the same color...Very Vanilla.  I exchanged the Very Vanilla cardbase for one in a lovely, soft navy, called Blueberry Bushel, plus added additional layers in copper foil and Pretty Peacock.  I colored the stamped berries, peeking from under the foliage framing, with Copic markers to match the blueberry cardbase.  I added clear embossing and glitter to the Pretty Peacock foliage framing, and added an embossing folder design to the dashing deer.  I enlarged single layer sentiment, changed its shape to a double fishtail flag, and added a double fishtail blueberry mat layer beneath.  I moved it from a right off-center position, centering it up below the framing.  To finish, I Copic-colored rhinestones to match the color of the Pretty Peacock cardstock and added them to the four corners of the vanilla layer.  I am really pleased with all the colorful paper and embellishment additions.  It is so pretty and sparkly!  Take a peek below at my finished card:

Ingredients:  Stampin' Up Products:  Cardstocks--Blueberry Bushel, Pretty Peacock, Very Vanilla; Foil--Copper; Pattern dsp--Brightly Gleaming Specialty; Stamps--Frosted Foliage, Itty Bitty Christmas; Dies--Dashing Deer (2018 Hol.), Frosted Foliage (2018 Hol.), Stitched Rectangles, Lakeside Dies (sentiment banner) (2019-20 Annual) (coor. stamp: Lilypad Lake); Rhinestones (Copic-colored).  Other:  Spellbinders Mystique Embossing Folder.  Size: 4-3/4 x 6-1/4 inches.

Monday, January 11, 2021

Joy to the World Wreath (October 2020 - "Joy to the World" Paper Pumpkin Alternative)

 I was really please with my first alternative card for the Stampin' Up Paper Pumpkin October 2020 "Joy to the World" kit using the pretty Christmas rose flowers provided in the kit.  I had a little mojo going now, and I came up with some ideas for the wreath die-cut provided in the kit.  I thought I'd try my hand at another alternative card using it.


The pine needle wreath in the kit was so lightly colored that it was difficult to see what it even was...it really needed help.  I watched a few YouTube videos on completing this kit, and I saw that most were using the stamp set provided and stamping a new wreath with the leaf/ pine needle wreath stamp.  One particular video showed how to turn the stamp so that it fit best over the other wreath and did not cover up the red berries on the original...that was very helpful!  I used the wreath, the stamp set, and the red twine provided in the kit, but I added the other papers, loving the color combination from my first card, plus another "Joy" die that I had recently purchased from Stampin' Up.  I also loved the look of the first card's embossing folder so I thought I'd use that again as well.  Take a look at my finished card below:


Ingredients:  Stampin' Up products:  Paper Pumpkin October 2020 "Joy to the World" kit elements.  Paper/ Cardstock--Cherry Cobbler, Whisper White, Call Me Clover, Gold Glimmer.  Dies--Joy Dies (2020 Holiday).  Ink--Call Me Clover; Memento Tuxedo Black.  Other:  Paper--DCWV Kraft & Gold.  Hot Off the Press--Diamond Dots EF.  Pretty Pink Posh: red sequins.  Size:  4-3/4" x 6-1/4".

Wednesday, January 6, 2021

Christmas Flowers Bring Joy (Paper Pumpkin October 2020 - Joy to the World Alternative)

I think I mentioned several months ago that I finally signed up for Stampin' Up's Paper Pumpkin subscription hoping that would motivate my lost cardmaking mojo.  It helped a little, but not as much as I'd hoped.  I still didn't get started on Christmas cards until just a few days before Christmas...YIKES!  I did fall in love with the October 2020 "Joy to the World" Paper Pumpkin kit, and it did finally spark me to try some alternative designs of my own rather than just make the couple of designs provided in the kit. 
 
I received a cute little penguin card from Ann Otto, the hostess of the Splitcoaststampers' Christmas Card Challenge...one I have participated in many times in past years.  I loved Ann's simple layout design with its left side triangle so much that it immediately gave me the idea to use the bones of her layout and incorporate it into the Stampin' Up October 2020 "Joy to the World" Paper Pumpkin kit elements to create my own card.


My deviations to Ann's layout were to add several layers to the card background, enlarge the left-side triangle and add layers and embossing to it as well.  Instead of a cute little alcohol inked penguin, I positioned two layers of kit's Christmas rose flowers on the triangle to which I did a bit of fussy-cutting and coloring.  I also added gold sequins to the flower centers and added green to the leaves.  I wanted the leaves to show off more and wanted to add depth and texture with the layers, sequins and dry embossing.


The kit came with gold metallic "Joy" die-cuts, but I decided to use my own "Joy" die, cutting it in two colors and setting them in an off-set,  layered placement.  The kit provided two vertical Crumb Cake card bases with a gold-etched vertical patterned, but I wanted to make multiple numbers of my card design to build up my Christmas stash, so I found a background stamp that I thought would work really well.  I stamped and heat embossed the pattern in gold onto plain Crumb Cake cardstock to create eight more card fronts.  I also added ribbon and more sequins that were also not part of the kit.  (Unfortunately, the other seven pre-cut and prepared card pieces are still waiting for me to finish putting them together!)  

Take a peak below at my first alternative card design using the Paper Pumpkin kit supplies, plus some added items and supplies not provided by the kit.  I have included the card ingredients below for your information:


Ingredients:  Stampin' Up products:  Paper Pumpkin October 2020 "Joy to the World" kit elements.  Cardstock--Cherry Cobbler, Whisper White, Call Me Clover.  Gold Embossing Powder; Versamark Watermark Ink.  Polka Dot Tulle Ribbon.  Other:  My Favorite Things background stamp: Balloon Strings.  Alina Craft die: "joy."  Hot Off the Press:  Diamond Dots EF.  Pretty Pink Posh sequins.  Colorbox Ink: Chestnut Roan (edge distressing).  Size: 4-3/4" x 6".