Showing posts with label Glitter paper. Show all posts

Tuesday, September 27, 2022

A Spooktacular Birthday! ("Spooky Treats" Sept. 2022 Paper Pumpkin Alternative)

Believe it or not, this card started with the thought that I needed to make a birthday card for my son-in-law, which falls in mid-October. I began by perusing my Splitcoaststamper challenge list to see which challenges might spark ideas for my card design. I happened on a spider card in the Featured Stamper challenge that gave me the idea to do something about Halloween for his card as he loves really getting into Halloween and finding spooky places to visit to celebrate this holiday. This got me started with all kinds of other ideas about using the new September Paper Pumpkin Spooky Treats kit and making an alternative design card, etc. All ideas gathered from selected challenges eventually jelled into this Halloween card for his birthday: 


Ingredients: Stampin' Up: Cardstock--Basic Black, Pacific Point, Crushed Curry, Whisper White scraps. September 2022 Paper Pumpkin (plaid, spider, ghost, stars). Punch: 2" Circle. Embossing Folder--Square Lattice. Other: Core'dinations Core Couture--Black Tie glitter paper. Dies--Spellbinders Petite Scallop. Ink--ColorBox Cat Eye-Charcoal (edge distressing). Punch--EK Medium--Victorian Corner; Copic Markers--Spider re-color. Chatterbox sentiment & verse (computer-generated/ Font-Phantom Fingers). Size--Slimline = 3.75 x  8.75-inches.       


PAPER PUMPKIN SEPT. 2022 - SPOOKY TREATS - ALTERNATIVE DESIGN

This kit is all about Halloween treat boxes, but I decided my alternative would be a card instead. I used the plaid intended as a treat box and trimmed it for the slimline card front. To the plaid, I added a Pacific Point cardbase and a Black Glitter cs mat layer. I replicated a larger version of the white w/black scalloped edge sentiment circle, included in the kit, with a Black Glitter scalloped die-cut overlayed with a 2" white punched circle to host the kit's spider, web, and ghost die-cuts on my card. After adhering my three scalloped circles to the plaid card front, I embedded them by embossing the entire plaid card front plaid and circles with a retired Square Lattice EF. I adhered the spider, web, and ghost onto card front circles. I adhere the Black Glitter mat layer to the Pacific Point cardbase, and added my plaid card front on top. I printed my sentiment "We've Arrived!" onto Crushed Curry cardstock and fussy cut each words into a rickety, weathered, and distressed sign. Voila...there is my alternative design for the new Paper Pumpkin...definitely not a treat box!

Saturday, January 29, 2022

A Shen Yun Celebration!

I've been intrigued by the wonderful cards being posted on Splitcoaststampers for the Alphabet Challenge, Letter "J" for JUNK.  Some fabulous creations can be seen from collages of pieces of "junk" possibly ready to be thrown out, to magazine pictures, junk mail, old envelopes, package wrapping, etc.  There are "junk" backgrounds, "junk" collage cards and mini-albums, elements made from "junk" throw-aways, etc.  I have been saving a beautiful picture and advertisement about the upcoming Shen Yun ballet to be performed in the Seattle area in April that I received several months ago for just for this kind of challenge "junk" challenge.  


It would be my dream to attend with my "girls," which includes my two daughters, my daughter-in-law and myself.  I was hoping I might feel comfortable enough to attend and buy tickets for all of us to celebrate our birthdays past that we have missed due to Covid.  I remember several such festive occasions to the ballet, to musical plays, etc. in years past!  So, here is my card depicting my dream night out made into a birthday celebration card, which would be perfect with those tickets enclosed as a birthday gift:


Ingredients:  SU Cardstocks--Blushing Bride, Melon Mambo. Recollections Glitter Paper (Copic colored). Celebrate die. SU Curvy Corner Trio punch. Recollections Colored Pearls.  Shen Yun Advertisement Picture. Colorbox Chestnut Roan Ink (ink edge distressing).  Size: 4-3/4" x 6".

Monday, July 5, 2021

Magical Birthday Wishes!

My oldest daughter's birthday is at the end of June, but we delayed her family birthday celebration until mid-July as my husband (her father) had knee replacement on her birthday, and a week later, he ended up returning to the hospital for another week with gastric complications.  By mid-July, we were ready to host a barbecue to celebrate Michele and her Dad's continued recovery.  Needless to say, I needed to finish her birthday card!


I have written several times about our little unicorn, Michele's 20-month old, little daughter, so dubbed during her stay in the NICU after her birth.  Because her veins were so small, her care team inserted her intravenous application into a vein in her head, which stuck up almost straight up, giving her the look of a unicorn with its cute little horn.  My inspiration for Michele's card came from this scenario.  I have acquired a multitude of stamps and dies with a unicorn theme because of this story that became part of our lives, and I thought it time the mother of our unicorn received her very own  unicorn card!  Take a look at Michele's finished card both inside and out!


Ingredients:  Stampin' Up products:  apers--Bermuda Bay cs, White Glimmer, Vellum. Stamps (2019-21)--Leave a Little Sparkle, New Wonders. Dies--Stitched Shapes--sm. circle. Embossing Powder--White. Ink--Smokey Slate. Ribbon--1/4" Snowflake Splendor (2020 Holiday). Wink of Stella-Clear. Glitter--Iridescent (ret.)  Other: Paper--Recollections 12x12--Mom's Diner/ Salt. Copic Markers. EK punch--Victorian Corners. Chatterbox Computer Verse. Size: 4-3/4 x 6-inches.

Sunday, May 9, 2021

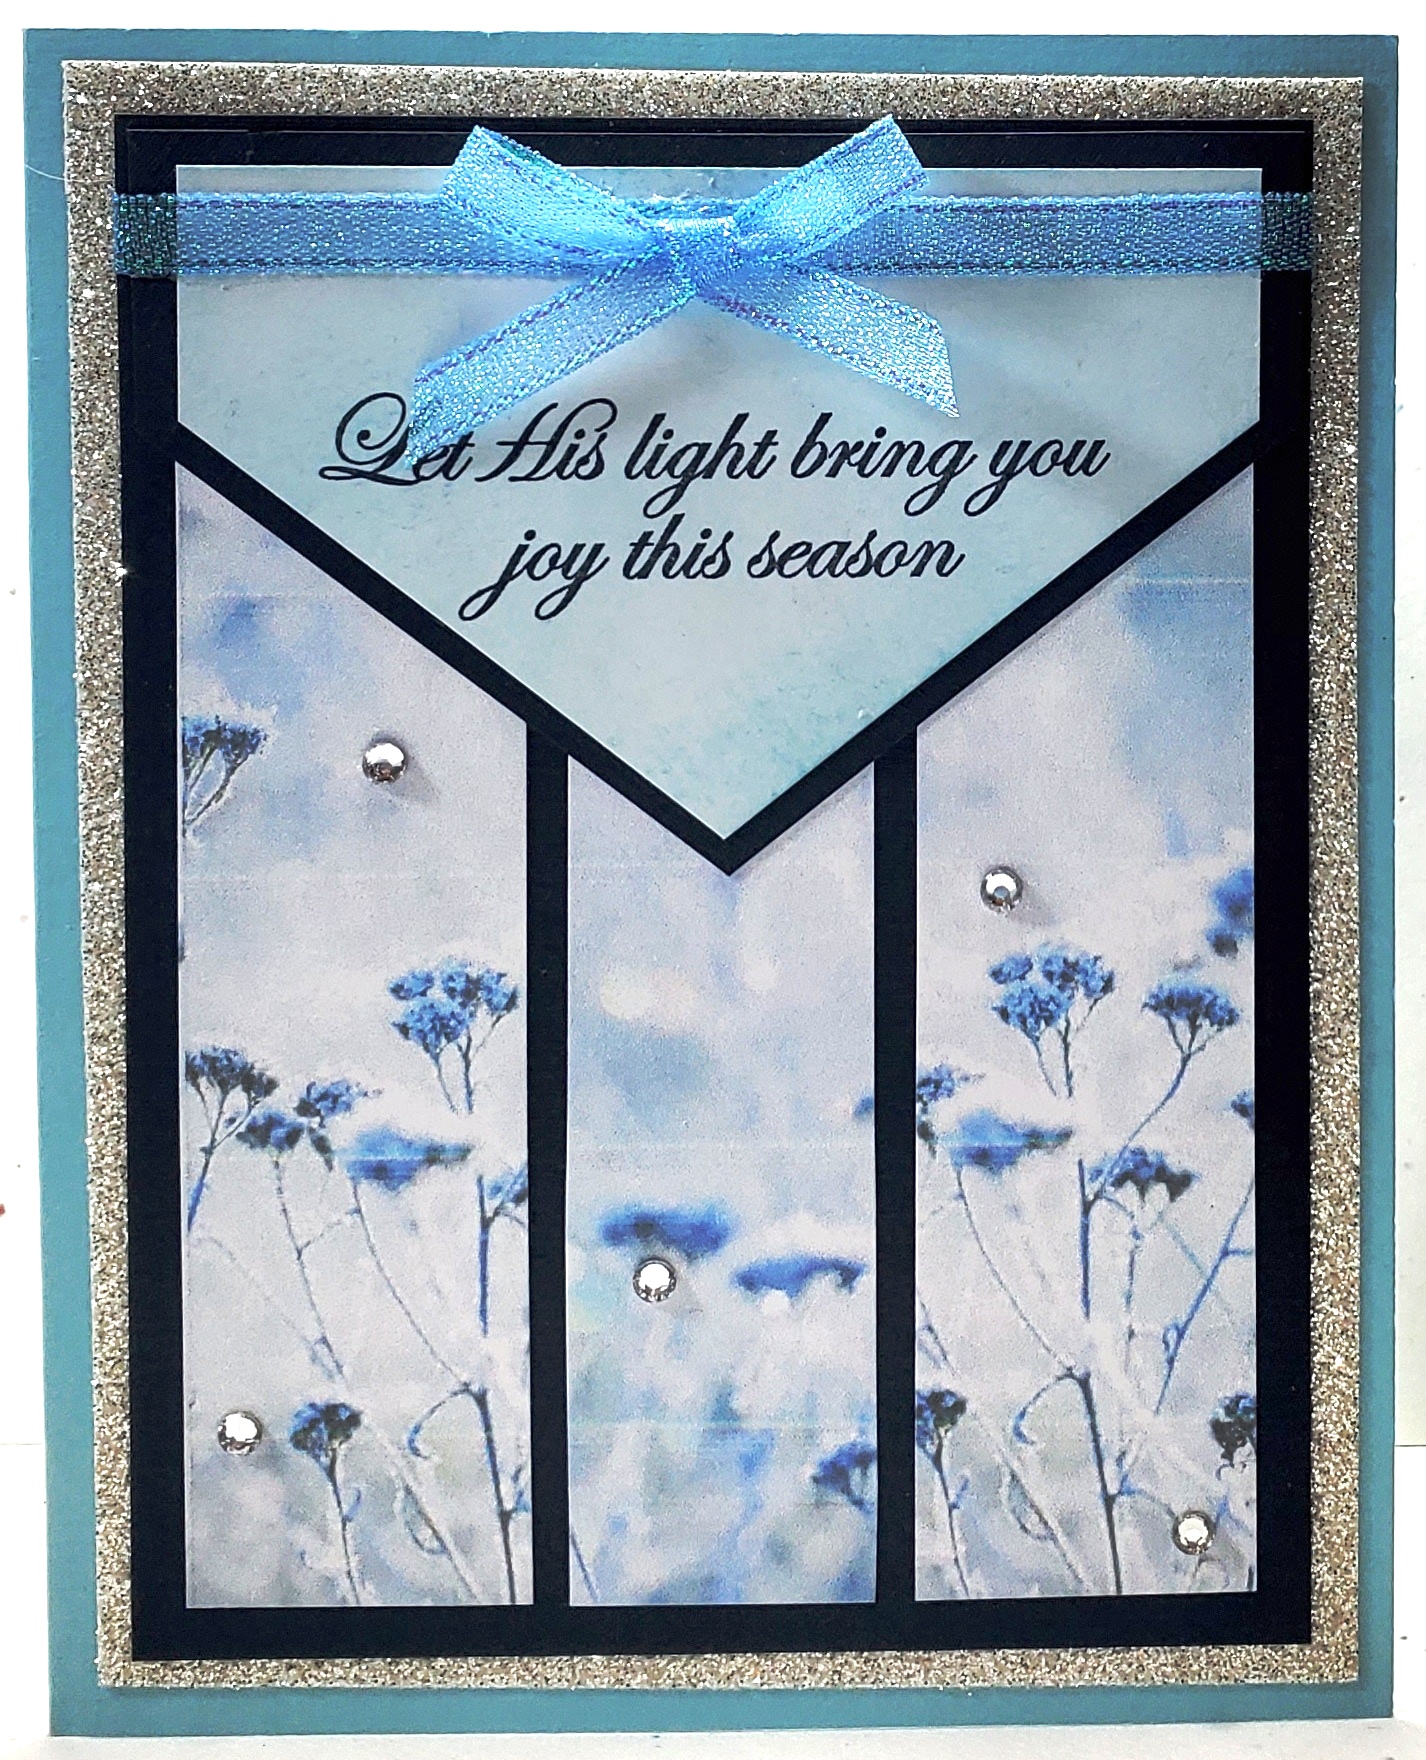
Let His Light Bring You Joy!

I'm trying to catch up on my blog posting, and I found this Christmas card that I made earlier this year that hadn't been posted.  I used this same card design for two sympathy cards back in January, but planned to remake it into several Christmas cards as well.   My card design was based on a My Favorite Things sketch from April 2018 - MFTWSC383, plus some Splitcoaststamper Challenge ideas as well.  


I liked the Feels Like Frost paper that I used on the sympathy cards, and I planned to use it on the Christmas cards as well.  I did not make the same mistake in measuring the flap this time, so it was plenty long enough to be positioned at the top of the layering scheme so the ribbon strip and bow would rested directly on the flap.  Take a peek at my finished  card:


My design rotated the sketch design to a portrait style and shortened the flap so it did not drop as low onto the body of the card.  I decided to place my sentiment on the flap similar to where MFT shows the white rectangle but lower in the angled area, and I layered the flap with navy.  In addition, I added vertical paper strips from top to bottom with the envelope flap overlaying the top portion of the strips.  Take a look at the My Favorite Things sketch that I based my card design from:


Ingredients:  Stampin' Up products:  Cardstock--Balmy Blue, Night of Navy, Silver Glimmer; Patterned paper--Feels Like Frost 6x6 dsp; Stamps--His Light (2018 Holiday); Ink--Night of Navy, Balmy Blue (sponging); Ribbon--1/4" Snowflake Splendor; Basic Rhinestones.  Other: Copic Markers (ribbon coloring); Chatterbox computer sentiment/ verse; Size--4-3/4 x 6-inches.

Saturday, March 27, 2021

But, Of Course, Evie Gets a Ballerina too!

Evie celebrated her first birthday in November, 2020.  Not to be outdone by her cousins, Evie did not receive a birthday card in 2020 for her first birthday from Grandma either.  Mama and Evie were busy moving into their new home, and Grandma was busy helping Mama move storage unit boxes, babysit, and unpack many boxes as well.  Grandma also masked up, brought hand sanitizer, clorox wipes, etc. and timidly ventured out with Mama and Evie, while eyeballing my six-foot minimum distancing as we bought furniture, carpeting, closet doors, window coverings, paint, lumber, and hardware for all of Mama's myriad of projects she wanted to complete before officially moving in.  With everything freshly painted, renewed or replaced, Mama and Evie moved into their new home with three weeks to spare!  Grandma's house became very quiet...we surely missed Mama and Evie, but not to fret...it was only a 12-minute drive to their new doorstep!


Evie's Zoom Unicorn Birthday Party day arrived after many hours spent decorating with streamers, a birthday banner, balloons, and unicorn tidbits everywhere.  Unicorn cupcakes were made and party favors delivered to each party participant's porch the night before, and Mama made and decorating a beautiful unicorn cake with whip cream frosting and a beautiful pink, turquoise, and purple mane.  Grandma had her gift all wrap with a note that said, "Evie's birthday card is 'under creative construction.'  Hopefully, it will arrived completed soon!"


I am happy to say Evie's birthday card and my third ballerina card is complete!  I have to say, I thoroughly enjoy making these gems for my lovely girls!  Evie gets a turquoise ballerina with a dab of pink.  She has light brown hair to match Evie's very short locks, but the little ballerina doesn't show off the reddish glints in the sunlight that we see sparkling off little Miss Evie's head!  Take a peek at Evie's card below:


If you are interested in the Ballerina construction check out this link: A Ballerina Birthday for Callie!

Ingredients:   SU cardstock: Bermuda Bay, Blushing Bride, Whisper White.  ColorBok Glitter Paper: Glacier Springs/ White.  Patterned Paper: Raspberry Road Design by Susan Darter--Mini Roses/ Stripes.  Recollections: Turquoise Foil.  Cote'dinations Sparkle cardstock: Fashionista.  Bubbley White Shimmer Paper.  Spellbinders dies: Floral Ovals, Petite Ovals Large.  Lawn Fawn die: Party Balloons.  MemoryBox die: Varsity Numbers.  Autone dies (Amazon): Balloon Message Strings (happy birthday cutout/ sentiment).  Turquoise Glitter tulle (stash).  Wink of Stella/ Clear.  Offray ribbon: Turquoise Organdy.  SU: Pearl minis.  Size: 4-3/4" x 6-1/4".

Friday, March 12, 2021

A Little Pink Ballerina for Sienna!

 I've now finished my second ballerina card, and this one is for my second granddaughter.  They get to be granddaughter #1, #2, and #3, by their age.  Callie, who was just 4, is granddaughter #1.  Sienna, who was just 2, is granddaughter #2, and Evie, who is 16 mos., is granddaughter #3.  I love them all dearly, and I'm sure you know, their number has nothing to do with how much I dearly love them!  All clever, cute, and darling girls for sure!


So, I missed making Sienna's first birthday card, as I was just returning from several trips to California, just in time to attend her birthday party, but not get a card done!  Within 5 days of her birthday party,  Covid arrived in Washington...the first state with a Covid case, then schools closed, gatherings closed, restaurants closed, and life became anything but normal!   It seems everything stopped, even my creative mojo and ability to get myself to my crafting table stopped!  I think we were all in shock, and my husband and I were certainly in the age range where every precaution was needed!  I am happy to say...a year later, both my husband and I have received the vaccine, and we are looking forward to an end of the pandemic!  At least we can now socialize with our family members who are vaccinated...we are almost to 75% of our immediate family at this point.


I am also happy to say that I have finally made little Sienna her card for Birthday #1 to save in her memory box...a homemade card from Grandma in honor of her first birthday!  Sienna dressed in a darling little frilly pink birthday dress, so it was only right that her card should be pink...and with her very blonde hair, her ballerina surely must have yellow hair.  I followed the construction instructions provided on Callie's purple ballerina card, and here is that link:  A Ballerina for Callie! if you are interested in the ballerina's construction.  Take a peak below at Sienna's sweet little pink ballerina:


Ingredients:   SU cardstock: Melon Mambo, Whisper White.  ColorBok Glitter Paper: Glacier Springs/ White.  Little Yellow Bicycle Patterned Paper: Baby Safari Girl--Pink Floral/ Girl Small Squares.  Bazzill: Hot Pink Foil.  Gemstone Shimmer Cardstock: Rose Quartz. Alina dies--Ballerina. Spellbinders dies: Floral Ovals, Petite Ovals Large.  Lawn Fawn die: Party Balloons.  MemoryBox die: Varsity Numbers.  Savvy die:  Happy Birthday cursive.  Rose Glitter tulle (stash).  Offray ribbon: Hot Pink Organdy.  SU: Pearl minis.  Wink of Stella: Clear (hair sheen).  Size: 4-3/4" x 6-1/4".

Sunday, March 7, 2021

A Ballerina Birthday for Callie!

March is a time to celebrate two granddaughter's birthdays as their actual birth dates are only two days apart.  Callie is my oldest granddaughter, and it will be her fourth birthday.  I have been so out of mojo for over a year that she did not get a Grandma birthday card for year three! Since a bit of my creative mojo has returned, I wanted to make a very special card for her for birthday #4.  


A friend made me a "Thinking of You" step card during my hand surgery recoveries, and I loved the card so much, I borrowed the die, thinking Callie would love it.  What little girl wouldn't...its a ballerina!  I've since decided I need to make one for each of my other two granddaughter's in different colors and different patterned papers.


The die is from Alina Crafts, and I found some YouTube videos on construction using the die.  It turns out that it's meant to be used with a companion body-parts die, which can be used with a variety of other theme and wardrobe  "people" dies.  The die comes as one main die including the head, hair, neck, upper body, and flowery vine tutu skirt.  It also has dies that cut out the dress bodice, ballerina slippers, and the eyes and cheeks.  I didn't like the way the video put the face and hair parts together...let's just say, to me, it was weird.  So, of course, I had to do my own thing, which I've tried to explain below the card picture.  And,  voilà, here is my finished card!  I think Callie will love it! 


Note:  Inside & outside are identical shades...somehow camera lighting didn't take it that way!

Ingredients:  Stampin' Up products:  Cardstock--Gorgeous Grape, Purple Posie; Punch--Detailed Trio; Pearls-mini; Rhinestones--Copic colored.  Other:  Papers--K&Co. mini floral (from Stash); Paper Adventures--Dazzle Purple-Pink Stripes; Colorbox--White Glitter paper.  Dies:  Alina Crafts--Ballerina; Spellbinders--Floral Ovals, Petite Ovals Large; Lawn Fawn--Party Balloons; MemoryBox--Varsity Numbers.  Balloon strings--Lyon Sparkly Mini Yarn.  Stash--Flower Gems.  Chatterbox Verse.  Size: 4-3/4" x 6-1/4"


Ballerina Construction:

Die-Cutting/ Punching/ Fussy-Cutting:
1) Die-cut the chest/ skirt die (and the ballerina slipper dies) from purple foil, leaving off the head and neck.  2) Using this same die, out of flesh-colored cardstock, die-cut two sets of heads with chest down to the waist...do NOT include the "skirt."  3) Die-cut a third flesh-colored cardstock head/ hair rounding the lower edge of the face without a neck.  This piece will be the "final" face for the ballerina.  4) Die-cut the head/hair only from black cardstock for the hair.  5) Using the eye/cheek die, out of black cardstock, die-cut the "eyes."  6) Using the bodice die, die-cut the dress top out of a sparkly lavender cardstock.  You could use glimmer paper, but I wanted a little less sparkle than that.  7) Again, using the eye/cheek die, you could die-cut the cheeks using pink cardstock, which is what Alina intended to be done.  I decided to use Copic marker coloring/ shading on all flesh colored areas that would show when the ballerina is complete: the face, neck, upper torso, and arms flesh.  I also Copic-coloring rosy cheeks and added a white gel pen dot rather than using pink half-circle die-cuts.  I also added Copic-colored blue eye shadow.


There were no dies for the lower body, legs, arms, or a leotard, so I fashioned my own.   1) Using a retired SU Small Oval punch (3/4" x 15/16") for the arms (with an arms behind the back look), punch one oval from flesh-colored cardstock.  2) Using the same oval punch, punch out the leotard from same sparkly cardstock used for dress bodice.  3) Using a retired SU Large Oval punch (1-3/4" x 7/8"), punch one large oval  from the flesh-colored cardstock for the lower body (hips) and legs.  4) Turn this large punched oval vertically.  Leave one end of the oval as is for the hips.  5) Fussy-cut and shape legs with pointed toes from the other end of the oval.  Now, it was time to put my body parts together!  


Head/ Hair/ Face/ Upper Body & Arms:

1) I adhered the two head/ upper body flesh pieces together to form a stronger upper body unit.  2) I trimmed 1/16" around the head/hair down just to the neck.  3) I trimmed 1/16" along the chest/ upper body along the sides from shoulders to waist.  The head/hair was done so when the third "head/ face" flesh piece was added this double thickness would not show...only the top third layer would show and its round without a neck would form the chin.  The sides of the chest/ upper body edges were trimmed to allow the flesh cardstock Small Oval to form the shoulders and arms, looking like she was putting her arms behind her back.  4) I  Copic-colored/ shaded the face at this step and I did the same to the neck and chest of the two-layer piece.   5) I adhered this third Copic-colored face (hair, which did not need to be Copic colored or shaded) to the double-thick body making sure the head fit nicely on top and formed a "chin".  Now, my head is 3-layers thick!  6) I trimmed off just a bit of the flesh cardstock around the edges of the hair area so that none of the flesh color would show around the edges of the black hair color.  7) I fussy-cut the black hair from the head black cardstock so it would fits nicely over the flesh-colored hair area and adhered it to the flesh-colored hair.  When it was dried, I applied Clear Wink of Stella for a bit of shine to her hair.  8) I applied a tiny bit of glue to the back of her black eye/ lashes and used tweezers for correct placement.  (Be sure you have them turned over for the correct sides of the face when applying the glue).  9) I Copic-colored her rosy cheeks and added a white gel pen dot to their centers.  10) When eye glue dried, I Copic-colored her blue eye shadow.  11) Now, I was ready to add her arms.  I Copic colored/ shaded the flesh-colored Small Oval, but didn't bother to color the center of the oval where the chest/ upper body would be glued.  I positioned the oval horizontally, fitting it behind the back so the shoulders flared out at the base of the neck and adhered it to the back of the torso with glue. 


Lower Body/ Leotard/ Legs/ Ballerina Slippers

My ballerine needed a lower body, leotard and legs!  1) Take the leotard...the Small Oval cut from the sparkly bodice cardstock; turn the oval vertically, and trim 1/16" off the end of the oval curve using a straight cut.  2) Fit this straight edge up to the flesh waist bottom and glued it to the lower edge of the arm oval (which you will see extending below the waist) and snug it up to the waist flesh.  3)  Turn over the ballerina and glue her "hip/legs fashioned larger oval" behind the sparkly leotard so her hips are behind the leotard and legs extend below.  4)  Adhere the ballerina slippers over her pointy toes with the wider part of the slipper down covering the "pointy toes."  Set aside your girl to thoroughly dry while you form her skirt/ dress.


Skirt/ Bodice Top/ Hair Bow
1) With the purple foil skirt/ chest die-cut, narrow the chest area, all around three sides, down to approximately 1/4" wide and 1/8" high just to waist where skirt flares out; set aside.  2
) Cut 5 or 6 pieces of tulle (sparkly best) 2" long by 3" wide.  Overlay the pieces one layer over the other.  2) Using the metal die as a guide only, fussy-cut the tulle to the same shape as the die skirt and upper body.  3) Adhere the layers together with bitty glue does and larger if needed, keep the edge-shaping even along the skirt sides and upper body to form a unit.  4) Take the purple foil skirt/ chest and attached to the tulle unit to the backside of the chest (make sure no tulle shows along the "chest" part of the skirt).  5) Lift the skirt vines and streak with glue, pressing them on the tulle to attach and dry.  6)  When skirt/ tulle is dry, attach the lavender leotard and legs behind the tulle at the torso back with glue/ glue dots as needed.  7) Glue sparkly lavender bodice onto ballerina chest top and foil skirting.  8) Add 4 string pearls along waist.  9) Take a 4" to 5" piece of 1/4" sparkly ribbon and tie a bitty bow, cutting and angling its tails.  (Tip: my sheer ribbon was too wide, so I trimmed it to 1/4" width.)  10) If desired, you can add 2 bitty pearls to the bow knot area as well.

Monday, December 16, 2019

Happiest Christmas Wishes!

Working on my sixth Totally Lovin' Christmas make over.  I loved the non-traditional colors on this card, but somehow the layout just didn't really send me over the top, so I changed up the whole card, which keeping most of the colors, the ornament image, and sentiment.

Meanwhile, I enlarged my card closer to an A6 card sized by adding an Early Espresso cardbase and a lime glitter paper mat layer.  Next, the original Perfect Peacock cardbase became the card front color.  I rotated the peacock foil patterned piece to vertical and added a lime glitter paper mat layer.  

For my image layer, I cut down the size of the ornament layer and added layers below the image to make it a three-layer combination.  I die-cut the bottom Pretty Peacock layer with a decorative layer die modified to leave only one curly bracket shape on its right side to host the vertical sentiment.  I wanted more color so I incorporated both the lime and peacock colors on my ornament with Copic markers.  To the lime coloring, I added a bit of Wink of Stella-Clear to give it some shimmer.  To finish, I Versamark stamped and heat embossed the vertical sentiment with Early Espresso embossing powder and popped on three peacock-colored rhinestones.

This is a very non-traditional colored Christmas card!  Take a peek below at the finished inside and outside designs.


Ingredients:  Stampin' Up products:  Cardstock--Early Espresso, Pretty Peacock.  Patterned--Noble Peacock Specialty paper.  Stamps--Lots of Cheer (sentiment/ ornament - 2019-20 Annual).  Dies:  Labels Collections (retired).  Embossing Powder--Early Espresso (retired).  Holiday Rhinestones (2019 Holiday).  Punch (inside): Curvy Corners (retired).  Other products:  DCWV Glitter Paper--Olive; EK Corner Punch: Victorian Corners.  Copic Markers (lt. aqua (pool parlty)/ olive (olive).  Wink of Stella: Clear.  A6-4-1/2 x 6-1/4 inch cards.

Friday, November 8, 2019

A Cardmaking Birthday Buddy to Celebrate!

One of my cardmaking buddies had a birthday in mid-October, and we finally got to celebrate with her a few days past a month overdue!  She made a wonderful week-long trip to Hawaii for her birthday, which delayed our original plan to celebrate in October.  Then, you know how it is...first their was my daughter's baby shower, then another friend's son went hunting and his sick dog needed babysitting, then my trip to visit my Mom...and on, and on, and on, it went!  But, we were determined and finally got it done with lots of fun and laughter to make the day special!

This was a card I made while visiting my Mom in California.  I got a card kit designed by Darla Watson, Mom's Stampin' Up lady, from her October card class. I put them together while visiting in Redding.  Of course, I always have to add a little personal pizzazz to make them more me, first by enlarging them, as I always like cards bigger than the traditional A2 sizing most commonly used.

For this card, I change its sentiment focus from thank you card to a birthday card.  I ink-distressed all edges to add a bit of a vintage flair.  I added an Early Espresso cardbase and a gold glitter mat layer and embossed the background of the front layer.  I framed the tree square with more layers and switched from Soft Suede to Early Espresso, plus a gold glitter mat layer between.  Instead of stamping the sentiment directly on the card front, I popped it up on a three-layer rectangle, which included the same Early Espresso and gold glitter paper.  I brayered my sentiment paper to match the brayering in the tree picture and stamped it with a sentiment befitting a birthday and added copper brads to finish.  I was super happy with the results and pretty sure my cardmaking buddy would enjoy it as well.  Take a peek below at the finished design inside and out.


Ingredients:   Stampin' Up products:  Cardstocks--Early Espresso, Mint Macaron, Whisper White, Pear Pizzaz.  Stamps--Snow Front (2019 Holiday), Express Yourself (sentiment).  Inks--Early Espresso, Pear Pizzaz, Mango Melody, Merry Merlot, Crushed Curry, Mint Macaron.  Embossing Folder--Square Lattice (retired).  Linen Thread.  Sponge Brayer.  Other:  Recollections Antique Gold Glimmer paper.  Copic markers to add extra fall leaves to trees/ ground.  Recollection mini brads--Copper.  EK Punch--Victorian Corners.  Size: 4-3/4 x 6 inches.

Thursday, November 15, 2018

An Angelic Heavenly Host Comes to Visit!

I wanted to finished the third and final Pre-Virtual Stamp Night Mini, which required a Christmas card made with the traditional colors of red and green, because these are the colors that Dr. Seuss' Grinch dislikes intensely.  I also wanted to play my personal "catch-up challenges" some more as well!  So, I went in search of what else I could put on my card beside red and green that would meet other challenges.  I found that winged things worked, and if it was a winged angel, formally called a heavenly host, my card would fulfill even more.

Last year while attempting to make my Christmas cards, I printed a darling pre-colored vintage digital image of a sweet little angel and two wee birds singing together, but it did not get used.  I was stoked...my winged creatures from my pre-made stash works for the VSN with no time against me!  I had three glittery frames in white, green, and red that I also made for last Christmas and did not get used when my Christmas crafting was cut short with my hand strain issues.  I found if I framed my image, another challenge could be met, and on it went.  I found some inspiration from the current Inspiration challenge, which is what prompted me to use the angel image.   Now, my mojo was really simmering!


An older Featured Stamper and Sketch challenge both helped with decisions regarding the layout.  Now that I had a basic layout idea in mind, it was time to gather all my materials and tools that I might possibly need.  My first step was to find the perfect paper that would work with one of my pre-made glittery frames, plus embellishments, ribbon, dies, punches, etc.  I find I always gather more than I end up using, but at least it is at my fingertips if I do need it as time is of essence in the Virtual Stamp Night challenges.


I set my timer for one hour, and let the fun begin!  I started to get nervous when I had used 40 minutes to cut my paper layers, complete the ink distressing, adhere the layers, add my ribbon band, cut my die-cuts, punch snowflakes, make my bow, and prepare my framed image and pop it up.  I still needed to make a computer sentiment layer to fit my red tag die-cut.  Fortunately, I had another sentiment saved in my computer that fit a one-inch circle punch.  I copy/ pasted it, changed the words and ink color, and it was good to go!  Thank heavens my printer did not give me fits as it can do from time to time!  


That was a close one...I used 55 minutes!  I used my extra five minutes to add some Wink of Stella glimmer to my pre-colored image angel and birds, which does not show up too well in the picture.  Take a peek at my finished card. . .I think I'm pretty happy with it.


I didn't like how much time it took to make the sentiment tag using the computer; it cut the deadline time too close for comfort.  Since I do like to use sentiment tags, I've decided to make a bunch in different colors and sentiments and pre-punched them for my stash.  They just might come in handy for the VSN main event in December.  If not, I am sure they will get used eventually.  


In addition, I plan to download, size, and print more pre-colored Christmas images that might come in handy, plus die-cut some additional frame styles using different types of paper and colors.  I punched more bitty snowflake in more colors.  I had white ones pre-punched, as well as silver, lime green and aqua, but no Emerald Green or Red...can you believe that!  Not sure why I had lime-green. . .that was interesting!


Ingredients:  Papers~  Stampin' Up cs--Chocolate Chip (retired); Recollections Glitter Paper--Cherry, Evergreen, Snow;  Stripe--Recollections Signature Sugar Plums Pad.  SU Ink: Soft Suede (edge ink distressing).  Dies~ Spellbinders: Triple Floral Squares (frame), Delightful Circles (tag back).  Punches~ EK--1-inch Circle; Recollections--5/8" Snowflake.  Ribbon Stash:  5/8" Emerald Sheer.  Pre-made Stash: Angel & Birds pre-colored digital image (3 in.), Green Glitter Frame.  Wink of Stella--Clear & Gold.  Stash: Acrylic Sheet (stablizing framed image).  Chatterbox verse/ sentiment.  Size 4-3/4 x 6 inches.

Thursday, November 8, 2018

Three Trees & Two Colors in a Christmas Forest!

I thought I might dabble in the Virtual Stamp Night Challenge on Splitcoasterstampers.  They started a pre-mini challenge in early November. . .the actual event takes place December 2 & December 3.  The first pre-challenge was all about trees, even scraggly ones like Charlie Brown's Christmas tree!

I decided to use my Sizzix tree dies that I bought last year and did not get to use due to some hand issues that cut my crafting time down to zip!  I checked out the Christmas Central website for the Inspiration challenge to see if it could give some ideas of what to do with a tree or trees.  I spotted some pretty black and white items, which got my creative mojo going, and I decided a night scene with snowy forest trees would be really pretty.

I had to be clever about this as the Virtual Stamp Night requires you to spend only one hour putting your card together.  Your planning, designing, gather papers, and tools don't count against you, plus you may have pre-fold card bases available, and even some mat layers stashed.  It took me 35 minutes to die-cut and assemble my card parts.  I used a timer, and was able to pause and "punch out" when  my brain went into a re-designing mode with changes to my original thoughts, which required more tool gathering time.  I "punched" back in and went to work with more die-cutting and assembling.  I am pretty happy with the end result; take a peek below:


Ingredients:  Paper:  Stampin' Up--Whisper White (cardbase); Recollections Signature Glitter Paper/ white; Core'dinations--Black Tie; DCWV--Silver Stag Star dsp.  Dies:  Spellbinders--Tear Drop Circles; My Favorite Things--Stitched Circle STAX, Stitched Snow Drifts; Sizzix TH-Alternations--Woodlands; Cottage Cutz Expressions--Merry Christmas.  Stampin' Up: Metallic Stars (retired).  Size: 4-3/4 x 6 inches.

Wednesday, October 31, 2018

Halloween Peeking Out All Over!

As mentioned in my previous post, it's that time of year when I get to make Halloween cards...ones I truly enjoy so I can let my imagination run away!  My next card is for DD#2, my youngest daughter, and her husband.  Since there is a man involved, I had to stay away from anything too feminine!

My son-in-law is a Halloween and theme park enthusiast!  The two of them just returned from a five-day Halloween adventure vacation to the Los Angeles area, visiting Halloween horror events and Halloween themed parks and thrill rides.  Warner Bros. Halloween Horror Nights was their primary attraction visited.

I actually started their card well over a month ago after I checking out several Splitcoaststamper challenges before I finally settled on the card layout I wanted to use, but I was unhappy with where it was going so I stopped and only recently got back to it.  I revisited the SCS challenges and finally felt like I knew where I was headed!  I incorporated four common Halloween images usually seen on the Day of the Dead and ones that I was fairly sure they saw in many different versions while on their vacation.  I ended up pretty happy with the results and was pretty sure they would enjoy it as well.  Take a peek below at the finished card:


I found a verse that was perfect for the card, with a few modification, but ended up having to hand-write it because my printer was on the fritz!


Ingredients:  Papers: Stampin' Up cs--Basic Black, Lucky Limeade, Very Vanilla; Bazzill cs--Yam; American Crafts POW Glitter Paper--Caramel; Best Creations Glitter paper--Lime; Pattern Paper--Doodlebug Designs/Ghost & Ghouls--Spookie Sprinkles (confetti), Host of Ghosts (stripe).  Dies:  Impression Obsession: Halloween Cutout Circles; Stampin' Up--Layering Circles; Little B--Halloween Phrases.  Punches: Martha Stewart edger--Cathedral Lace; Stampin' Up--Curvy Corners (inside-retired).  Embellishments: Offray Sheer Stripe--Yellow-Green; Recollections--purple mini rhinestones.  Verse/ modified by Chatterbox.  Size: 4-3/4 x 6 inches. 

Friday, October 26, 2018

Cute Skeleton Bones for Halloween

It's that time of year where I get to make Halloween cards.  I just really enjoy putting together interesting and offbeat cards, and my four adult children and their spouses enjoy receiving them.  For my DD#1 (darling daughter), I found two challenges at Splitcoasters that spurred along my imagination and my creative mojo began to rumble!


I wanted to use skeleton bones on my card, and I pulled out an old 2015 Stampin' Up set that I had not ever inked up.  Being that this card would be for my oldest daughter, I thought a few feminine touches might be nice, so my skeleton ends up being a wee girl skeleton but not so terribly scary.  I am really happy with the results that morphed as I put it together.  I completed the inside with my very own Chatterbox verse and added some embellishments to coordinate with the card front.  Take a peek below. . .I think DD#1 will be delight!


Ingredients:  Papers:  Stampin' Up Basic Black, Shimmer White, Whisper White, Happy Haunting dsp (stars); Darice Core'dinations Glitter Silk--Silver Mist. Stamp/Die set: Howl-O-Ween Treat/ Boo To You dies (2015 Holiday).  Dies:  Pierced Scallop Background.  SU Punch:  Ornate Tag Topper.  SU: Lucky Stars EF.  SU Embellishments:  3/8" Glitter Ribbon-White, Metallic Thread-Silver, Iced Rhinestone.  Chatterbox sentiment/ verse (handwritten/ computer printed).  Size: 4-3/4 x 6 inches.

Monday, June 25, 2018

A Little Brusho Work for Graduation Time!

We have a great-niece and a great-nephew on my husband's side of the family who graduated from high school this year, both are one of his brother's grandchildren.  My husband is the oldest of eight, so it is unusual that both would be from his same brother!  I wanted to make cards for both of them so that we could include a little gift of funds for them as they celebrate this happy occasion!

Before I begin any card, I check out the Splitcoaststamper challenges to see if any can give me inspiration and/or send me in a certain direction for the style of the card.  One challenge led me to the thought of using stars for sure.  Another gave me ideas on how I might like my Brushos to look.  Another had me looking on Pinterest for possible ideas.  A culmination of all these ideas and inspirations gave me great ideas my layout and design.

One thing I did know for sure was that I wanted to try out my new Brushos that my son and his wife gave me for Mother's Day!  I also checked out their high school colors to see which colors of Brushos I wanted to use.  Our grand-nephew's card will be Emerald Green and Golden Yellow and our grand-niece's card will be Brilliant Red and Golden Yellow.  With all the mojo running around in my head, these are the cards I came up, both using one similar style.  I think the recipients will be happy with their aunt's handiwork.  Take a peek below!


Ingredients:  Stampin' Up products:  Cardstock--Basic Black; White Shimmer Embossing Paste;  Stars stencil.  Other:  Papers--DCWV Shimmer Stack/ Gold; DCWV: The Glitter Cardstock Stack:  white and black; Tim Holtz Watercolor paper.  Colourcraft Brushos: Emerald Green, Yellow, and Brilliant Red.  Impression Obsession Dies:  DIE280-B/ Congrats; DIE-281-D/ Grad Hat/ Diploma.  Eclipse Technique (modified).  Chatterbox verse (inside).  Size:  4-3/4" x 6".  

Tuesday, June 5, 2018

Kind Thoughts Sent Your Way!

Just a few weeks ago, we received the heart-wrenching news that my niece just had major surgery and is looking toward a long and tedious recovery.  She is just nine months younger than my oldest daughter, and they were great pals growing up, flying back and forth each summer to spend a few weeks with one another to keep in touch.

We, of course, sent flowers right away. alternating weeks sent so she would always have a fresh bouquet, but my daughter and I wanted to each send a special card, made from the heart, to remind her we are keeping her in our thoughts and prayers.  About two months ago, we bought card kits from Stampin' Up that would make four each of four different card designs, and this last week-end was the time to get it out and spend time making the cards we needed.  We, of course, did not want to follow the four design samples exactly, because we did not want four sets of four designs exactly the same.  With this in mind, we went to work finding our own design deviations and remodels.


I like to participate in Splitcoaststampers challenges, so I did a little research before getting started.  I decided to start with the Old Olive green card parts from the card kit from my research.  Take a peek below at my change-up, alternate-design for the "green card," which I think my niece will enjoy.


Ingredients:  Stampin' Up products:  Cardstock--Old Olive, Dapper Denim, Whisper White, Flirty Flamingo, So Saffron, Myths & Magic Glimmer paper.  Stamps--You're Inspiring.  Ink--Dapper Denim, Baked Brown Sugar (ink distressing).  Dies--Pretty Pines framelits.  Punches--Leaf, Boho Blossoms (ret.), Petite Petals (ret.); Heart Confetti Border (ret.).  Glitter Enamel Dots (Copic colored).  Blue Fishtail Curvy Banner: Hand-drawn/ Fussy-cut.  Perennial Birthday Kit: materials from two card designs: green bg + white diagonal die-cut + white curvy banner + ribbon/ twine).  Other: Punch: EK Victorian Medium Photo Corners. Wink of Stella/ Clear (flowers).  Chatterbox verse (Bob Marley quote modified).  Size: 4-1/2" x 5-3/4".

THE CARD-MAKING STORY
The papers and patterned papers provided in the card kit coordinate with Dapper Denim, Old Olive, Flirty Flamingo, Whisper White, and Gold Foil colors. My first step with my kit was to cut the front and the back of the folded card base into two separate pieces, because I planned to add new cardbases and layers using one of the coordinating cardstock colors to supplement where needed.  This actually gave me the potential of 32 different cards instead of just 16, though I would probably use some of the solids for inside layers to host my verses, so ultimately, I will not create 32 different cards. 

I decide to start with the "green card" materials.  This card was supposed to have balloons layered onto of the white diagonal lattice.  I used the solid olive paper that came with the kit and added it to a white cardbase.  I added an olive glitter layer under my white diagonal lattice, and flowers below.  I borrowed the curvy double fishtail banner from another of the card design and hand traced and enlarged its curvy shape on Dapper Denim cardstock to add the under mat.  I finished with Dapper Denim photo corners to add more blue, seeking to eliminate quite so much olive.  I added a different sentiment from a another stamp set than that recommended for the kit cards.  

Friday, September 8, 2017

Christmas Card from an Oldie But Goodie!

 MORE GOOD NEWS!  

THIS CARD IS NAMED A

SPLITCOASTSTAMPERS FAVORITE OF THE

WEEK ENDING - SEPTEMBER 9, 2017!!


I own what is now considered a vintage stamp, produced in 1995 by Personal Stamp Exchange (PSX) Stamps.  It is a stamp I have actually never used, but always wanted to.  There is, of course, a story behind my owning it, but never using it.  Well, I decided it was time to dig it out and use it to make my second Christmas card for 2017, and enter some challenges at Splitcoaststampers as well!  Take a peek below at my finished card, and then jump down to "The Story" below if you are interested.


Ingredients:  Papers: Master's Touch 140# Watercolor Paper (WalMart); Core'dinations Silk Glitter Opulent Oval cs; Stampin' Up Night of Navy (card base).  Stamp: PSX (Personal Stamp Exchange)--Dasher Dash Away All!  Stamp: Ink--Stampin' Up: Night of Navy, Rose Red, Marine Mist; Versamark--Watermark Ink.  Paint: Folk Art Metallic Pearl White (splatters).  Gelly Roll White Gel Pen.  Stampin' Up White Embossing Powder.  Offray Ribbon: White/Silver Organdy (stash).  MISTI Stamping Tool.  Techniques: Heat Embossing; Watercolor background; Splattering.  Size: 4-3/4" x 6".  Inside: Computer verse.


"The Story"


In 1996, I was the office manager for a brand new elementary school to which our staff had been transferred.  The principal was a very classy lady with whom I got along famously.  She really wanted our Christmas card for our new school to be very original, handmade, and using our school colors, which were navy, forest green, and maroon.  I went out on a search for the perfect idea, thus visiting Joanns, Michaels, and the local craft store.  I found this Night Before Christmas stamp that I fell in love with, but didn't really know if it would suit the principal...I could see it with gold stamping mat layers of navy and forest green, with some possibly in navy and maroon.  


I was crafting, but if you've read my blog at all, you will know that I did not become a cardmaker until 2008!  I knew nothing about papers, stamping, ink, embossing, etc., etc....so I had no idea how any of this could be accomplished, but I decided when we made a decision on what we'd do, I learn somehow!


I bought the stamp personally, because I thought it was too pricey for our school budget, and I love it.  My youngest daughter, who was a teen-ager, loved to stamp thinks and had lots of little stamps and cheap inks, so I figured eventually it would not go to waste, right!  I inked up the stamp and tried to stamp it, and found it had lots of gaps in the printing, and I could not get a good, clean image...so we did not use it at school.


When I began making cards, I did not learn embossing right away, so still didn't use it.  I did find that I did not LIKE wood stamps because it was difficult to tell where they would land and were often difficult to ink up, especially if large...so my stamp continue to stay buried away.  As the years passed, I see it every now and then at Christmas time, but by then I really didn't like wood stamps and knew it didn't ink up well.

A year ago or so, I learned wood stamps can be unmounted and made into rubber stamps used on an  acyrlic block, but not being too familiar with this trick...the stamp continue to sit.  Then came my MISTI, and I seriously became interested in unmounting this lovely Christmas stamp to see if I could get a better imprint with my MISTI.  Recently, I saw a challenge on Splitcoaststampers called "Oldies but Goodies," and I seriously became interested. 


A few nights ago, I wasn't sleeping well, so up I popped, the stamp to the microwave and stripped it with foam pad attached from its wood.  The image on this stamp was not an acyrlic sheet glued to the wood, but rather it varnished right onto the wood, therefore, I could not remove it.  My solution for this problem is to ink up the stamp and stamp on a small sheet of white printer paper just larger than the stamped image.  I take this stamped paper and many strips, vertically and horizontally, of my tape runner, and glued it down to the foam pad.  Next, I cover this stamped paper with 3" wide clear 3M tape covering the entire paper surface (at school, we called this library tape) and then fussy-cut around the taped paper up to the edge of the rubber.  When I'm ready to stamp with it, I run a few very small tape strips on the clear tape and stick it to my MISTI.  Now, it's ready to use just like any other stamp!

My first card above is done with Versamark Watercolor Ink in order to apply an embossed finished...in this case white embossing powder, which is heat set with your heat embossing tool (like a very hot mini blow dryer).  When the powder is heated, it becomes shiny.  The stamp was still difficult to ink up and took 6 applications over and over of Versamark to get it all inked, especially the word Vixen and Away, after Dash!  But, I managed and I do LOVE the stamp!!  I'm so excited that I finally used it!

Monday, July 31, 2017

An Anniversary Twosome Sail With the Breeze!

I'M SMILING AGAIN!  

THIS CARD IS NAMED A

SPLITCOASTSTAMPERS FAVORITE OF THE

WEEK ENDING - AUGUST 6, 2017!!


We are celebrating our youngest's eleventh anniversary this year!  WOW! is it difficult to realize it has been that many years since this lovely couple married.  But, these two also celebrated the birth of their first child just a few months ago, so now it is easier to recognize that they've been married a few more years than five or so!  I wanted to make them a special card celebrating their first anniversary with Miss Callie Page in attendance as well.  Take a peek below at the finished card front and inside with my composed verse via the computer: 


THE BACK STORY!

I recently purchased this whimsical die-cut from Spellbinder, named Dandylion, which depicts the dandelion's seed head after flowering.  I thought I'd use it as an anniversary card with the two little seedlings sailing off in the breeze as a couple to begin their own family.  I dare say my imagination is a bit whimsical today!


My background is made with Stampin' Up re-inkers in Tempting Turquoise, Wild Wasabi, Daffodil Delights, and a touch of Lemon-Lime Twist, and the Danylion die-cut is made using black glitter paper.  I made the sentiment using my computer and printing directly onto my finished watercolor background.  I decided to add a perky little sheer ribbon and bow, and pop the watercolor front and its black mat up off the Tempting Turquoise cardbase.  I'm pretty happy with my watercolored background since I have not used this technique much, and I'm not totally comfortable with it yet.


Splitcoaststamper's is also hosting their annual Dare to Get Dirty Challenges for their members who are SCS Fan Clubbers.  Since we are not supposed to mentioned what the basis of the challenge is, I will just say this one is for the very first challenge initiated by *Understanding  Blue (*the hostess' SCS nickname).  There is a color challenge going on as well, which requires the use of the three colors I chose for my card, so it will be entered that challenge as well.


Ingredients:  Stampin' Up products: Cardstock--Tempting Turquoise, Basic Black, Watercolor paper; Inks--Tempting Turquoise, Wild Wasabi, Daffodil Delight, Lemon-Lime Twist.  Darice core'dinations Glitter Silk-black.  Die: Spellbinders Dandylion.  Ribbon: Stash-3/8" Offray.  Computer sentiment.  Size: 4-3/4" x 6".  Inside: EK Medium Scallop Photo Corner punch; SU: Daffodil Delight cs; Computer verse.  Technique: Watercolor...Let It Run.

Friday, October 14, 2016

New Son-in-Law Has An October Birthday!

I jokingly told my youngest daughter when she became engaged that one of the criteria I should have demanded in her choosing a husband be that his birthday did NOT fall in October. . .but, wouldn't you know. . .another October birthday!!  Now, I needed to figure out what kind of a card would be best for my new son-in-law.  He has a number of activities and hobbies that he enjoys, which include car racing, riding ATV quads in the sand and dirt, dirt bike riding, hiking, and planning vacations.  These two just returned from a belated two-week honeymoon to Florida, where I am positive they went to every amusement park and tourist attraction in that State!

After giving it some thought, I decided I would do a racing car card, because Josh has a 1979 baby blue Chevy Camaro race car.  He and his father have been involved in short-course racing since Josh was a young boy.  Though he has not raced his baby blue Camaro for a few years now, I am sure that at some time in the future, he will pick up this life-long hobby again.  Since I could not find a 1979 Chevy Camaro image to color, I decided on a 1969 RGX Camaro, which according to what I read is a much desired car.  Personally, I did not see a lot of difference between the two cars when I looked a photographs of actual cards, especially with the digital image that I found online of the 1969.  Take a look at Josh's finished card inside and out. . .I think he will be very pleased with one of his mother-in-law's homemade birthday cards made with only him in mind.


Ingredients:  Stampin' Up cardstock: Night of Navy, Old Olive, Vintage Natural.  Darice Core-dinations Glitter Paper: Ball Gown. My Mind's Eye pattern: Lost & Found Two/ Breeze Boyish Plaid.   Graphic 45: Happy Haunting (black/cream check).  Spellbinders: Deckled Ovals LG, Nested Ovals SM.  Sizzix BigDie: Weathered Clock.  EK Punch: Scalloped Corners-LG.  WRMK Punch: Deco Corner.  Heidi Swapp Metallic Accents.  Stampin' Up Glitter Brad.  Google Online: 1969 Chevy Camaro digital image.  Copic Markers.  Computer-made sentiment/ verse.  Size:  5-3/8" x 6".  

Saturday, September 24, 2016

Birthday Niece #1 Turns A BIG Four!

I have two great nieces who have birthdays in late September.  For niece #1, I decided to use a little punch art to make a cute little girly dress on her card for her special day.  Over the last several years, I have seen several little girl dresses on card on Pinterest, some  done with punch art and some with dies.  Needing to get my creative juices flowing, I decided to re-visit "little girl punch art dresses" on Pinterest to see what I could find.  I found one that looked like a little tutu made from pink vellum for the skirt, using Stampin' Up's Blossom Builder Punch, which is now retired, but, I am happy to say is part of my tool stash.  


Looking at this Pinterest card brought to mind several little girls I had seen shopping with their Moms wearing tutu-style dresses, as it seems to currently be a part of a lot little girls' wardrobes.  These dresses seem to come in all types of styles and fabrics from really frilly and fancy silky fabrics with ruffled tulle layers to a little more casual style with a knit top and gathered ruffles layered about three layers deep.  


Well, my juices were flowing. . .I would use my seldom used Blossom Builder punch to make my skirt and my Spellbinders Decorative Dress dies for the bodice.  I would not use tulle or vellum, but rather complimentary paper patterns.   My little tutu dress card is VERY girly and VERY pink, and I think my two-year old great niece will love her new little dress card.  Take a look below at the finished card, both inside and out.


Ingredients:  Stampin' Up Shimmery White.  Darice Core'dinations cardstock pack: Soft Side.  BoBunny Tutu Double Dot.  Recollection Glitter Iridescent White cardstock.  Recollections Itsy Bitsy Ditsy: Cherry Pie (floral).  Stampin' Up sentiment stamp:  Teeny Tiny Wishes.  Stampin' Up Ink: Melon Mambo.  Stampin' Up Labels Framelits.  Stampin' Up Punches: Blossom Builder, Curvy Corners; Word Window (all retired).  Ribbon: Stampin' Up-Melon Mambo 1/8" Taffeta; Offray 3/4" pink check.  Size: 6-1/8" x 5-1/4".

Tuesday, October 28, 2014

Spooky Halloween Mini Album Card!

I so enjoyed finished my little witch's accessories mini album card for my friend Liz, that I thought I'd make another for my friend, Sandy.  One of Stampin' Up's stamp sets for Halloween that I've always thought were very, very cute was the Spooky Bingo Bits, which retired after the 2011-12 annual catalog.  I made a Halloween inchies card using this stamp set several years ago, but used four different bits.  I really wanted to use it again, and thought an inchies cover would make a cute mini album card.  This time, I thought I would be focused on the little witch and spooky things related to her, so I chose the witch, her black cat, her haunted house, and her friend, Mr. Bat.  I wanted to double mat my inchies to set them off more and to add more color interest.  I used the Spellbinders Inverted Scallop Squares for the mat, which remind me a lot of the postage stamp effect, but more pointy, and maybe more apropos for Halloween???

After I made the decision to do red-orange and black mats for the inchies, I went ahead and put them together because I thought it would make it easier to decide on paper patterns that I thought would coordinate and blend well together.  I went back to my stash of old papers, feeling I should really use some of this stuff that I have had around for three or four years now.  There are so many patterns in the DCWV Halloween/Fall stacks, and I have two: the 2011 and 2012 versions!  I found five patterns that I thought went well together and also worked with my inchies.

Next, I had to decide on embellishments to accents each of the four pages.  It is surprising that even with oodles of Hall0ween embellishments, papers, punches, etc., it's still a challenge to make choices.  I'm pretty happy with my little card-book, and I think my friend, Sandy, will enjoy it as well, letting her know that she is well thought of!


Inchie Front Cover


Middle - Page 2/ Page 3


Back Cover


Recipe:  Papers:  SU Black/ Whisper White cs; Bazzill Navel cs;  DCWV Halloween & Fall (2011/ 2012); Core'dinations - Black Tie Glitter; Making Memories Halloween Journaling Book (houses pinked pocket).  White paper sack: 9" x 4-3/4" (Michaels).  SU stamps:  Spooky Bingo Bits.  Ink: Memento Tuxedo Black.  Copic: 100/Black.  Dies:  Spellbinders - Inversted Scallop Squares #3/#4; Labels 11 (tag); Sizzix - Wingo Dingo Alphabet.  Die-cuts:  K&Company (Spooky); Martha Stewart--Haunted (raven); Creatology foam cat.   Punches:  WRMK Deco Corner Chomper.  Other:  SU - Baker's Twine; Celebrate - 3/8" solid-sheet ribbon; Recollections - charcoal rhinestones.