Thursday, December 31, 2015

A Christmas Peek A Boo Window!

I purchased the Memory Box Woodland Oval die late last summer, and I really wanted to use it for several of my Christmas cards this year.  As I am in the midst of preparing for a wedding, I did not have time to make as many cards of totally my own design as I originally thought I would.  Instead, I gave all of the many cards I made from class events that I attended from summer through fall to friends and family who needed their cards "snail mailed."  The end results of my class cards represented either total rec-creation the event holder's original designs, or I tweaked their designs just a bit, or on several, I completely modified the original design using the card parts provided.  


My stash of accumulated of class cards helped a lot to fulfill my Christmas card needs, but though about half were completely finished, the other half were only partially finished.  I had to make quick work of moving all of my stash to the completely finished group.  I made a fast tally of those that needed to go by "snail mail," and I realized that I still did not have quite enough for the "snail mail" group; therefore, I really had to get busy and make some of my own design creation.  I was pleased I found time to use the Woodland Oval die that I so love for at least one Christmas card this year. 


To start, I prepared my cardbase with its creased fold.  Next, I embossed the front half of my card base with Stampin' Up's Softly Falling Embossing Folder.  As I made my card 6-1/2" tall in order to encompass the oval, the frame I wanted, and the sentiment to go under my framed oval window, I had to carefully re-position my embossing folder and emboss the lower half in a second pass through the Big Shot.  My third step was to cut my oval out with the Memory Box Woodland Oval die.  In using this die,  I did find that I wished the oval was not quite so long vertically and was more of a rounded oval so the card front would not have to be as tall.  After using it this one time, I do have some thoughts of how I might change that a bit, but that will be an idea to remember for next year!

I wanted to frame my oval, and to get the right size I ended up using my Spellbinders Grand Ovals, which was a surprise to me!  I used Oval #1 (the smallest) and Oval #2 (the next larger), which made a frame just the right width and to my liking.  I wanted some little red Cardinal birds on my branches, and I had purchased Poppystamps Cherry Cardinals for this purpose.  Next, I decided I did not want to leave my window open to the inside view of my card, so I die-cut another of the larger ovals from a white glitter paper by Core'dinations.  I adhered it on the inside directly behind the window cutout.   I backed my sentiment with the same red textured foil paper and framed the edges of the cardfront in this same red.  I decided I was pretty pleased with the outcome for a card I did not have a whole lot of time to dwell on!  Take a look below at the card front and its inside coordinating design and verse.


Recipe:  Stampin' Up products: Shimmery White cardstock.  Stamp: To You and Yours Too.  Ink: Real Red.  Dies: Memory Box Woodland Oval; Spellbinders Grand Ovals; Poppystamps: Cheery Cardinals.  Other papers:  Core'dinations: White Gloves Glitter paper; Recollections Signature Especial: Foil Texture Paper-Brilliant. Computer verse.

Tuesday, December 29, 2015

Silent Night!

I attended a mini card class in late August this past year where the Stampin' Up 2015 Holiday catalog was first introduced to me.  There is a darling stamp and coordinating die set that is shown off in this catalog, using both the stamps and dies together, and also using them separately as well.   Our class sample card was designed by Dar Peterson, and she used the coordinating stamps and die sets together.


This was such a pretty card, I made it exactly like our sample card presented during class.  The background is sponged on with Night of Navy ink onto Whisper White cardstock, trying to leave white streaks in the sky.  I think mine ended up more opague than the sample.  To get the white splatter effect, we mixed about 1/2 cup of water with with 3 to 4 drops of Stampin' Up's White Craft Re-inker.  Then using a small paint brush we dipped it in the water/ ink solutiom and tapped it against our forefinger over the sponged navy background.  Check it out below:


I finished my inside coordinating design and verse, and I thought I'd show that  off to you as well.


Recipe:  Stampin' Up products:  Cardstock--Night of Navy, Whisper White, Silver Glimmer, Gold Glimmer.  Stamps:  Jingle All the Way (sentiment: silent night).  Ink: Night of Navy, White Craft Re-Inker.  Edgelit Dies:  Sleigh Ride (houses and snow slope).  Punch: Itty Bitty Accents-Star (larger Gold Glimmer star); Confetti Stars Border (smaller silver stars).  Rhinestones (colored with Copic Markers).  EK punch: Victorian corner.  Computer verse. (Thank you Dar Peterson for card design sample).

Monday, December 28, 2015

Woodland Scene (Christmas X10 Card #10)!

I finished all of the Christmas X10 event cards in time for my Christmas mailings.  I was so busy before Christmas that I did not get all my posting completed, so since my daughter is getting married in about two weeks, my cardmaking time is now very limited, so thought I would post a few more of those Christmas cards that I didn't get posted yet.  This card, though a Christmas card because of its sentiment, really doesn't have to be.  It could be a winter birthday or even a thinking of you.  The possibilities seem endless when you actually think about it. . .the sentiment is often the determining factor!


For my card, I stayed pretty true to the Dara and/or Luci's original design, but of course, I did make some changes.  A normal change for me is adding one or more layers, and I certainly did so here.  I added Rose Red cardstock as the bottom layer, which became my new cardbase in lieu of using the Delightful Dijon layer as the original suggests.  I chose to usd a little Impression Obsessions die set that is full of Cardinal birds in different poses and two different sizes instead of stamping a Cardinal onto the vellum and then trying to color it as was featured in the original design.  I did try that method at the event and found it very difficult not to smear the bird or color out of its lines.  My little die-cut Cardinals work super well!  


A trick I learned about vellum is how to adhere it to its underlayer without the adhesive strip showing. . .try to bury it somewhere.  For this card, that was quite easy to do by using my tape runner on the back side of all the trees.  This tape does not show at all!   This is also the first time I have inked the backside of vellum to create color through to the front.  The tree trunks were colored on the backside with a Soft Suede Stampin' Write Marker.  Take a peak below at my finished product.


Recipe:  Stampin' Up products:  Cardstock--Rose red, Delightful Dijon, Mint Macaron, Whisper White, White Vellum.  Stamps--Among the Branches (2015 Holiday).  Ink--Delightful Dijon.  Punches--2-3/8" Scallop Circle, 2" Circle.  Embossing Folder--Woodland Texture (2015 Holiday).  1-1/4" White Jute.  Stampin' Write Marker--Soft Suede.  Impressin Obsession dies:  Cardinals.  (Thank you Dara Peterson & Luci Kirschbaum for sharing the original card design).

Sunday, December 27, 2015

Wishing You Joy in the New Year (Christmas X 10 - Card #9)!

I'm onto Card #9 from the Christmas X 10 card event that I attend in October. . .almost at the end of the tunnel.  This particular card design had great potential, but it just didn't sit quite right with me.  It was pretty, but just needed more.  Creative thoughts jumped right on out at me. . .what if I added a three-dimensional layer snowflake and just left off the little fishtail flag, and that is just what I did.

I decided that my snowflake needed to be delicate to compliment the really pretty dainty snowflake vellum.  I decided to use two different Memory Box snowflake dies, creating larger and smaller snowflakes to layer on top of one another.  It occurred to me, as well, that if I incorporated the two shades of purple cardstock into my snowflake it might be better than just a white or silver snowflake.  I added both the Wisteria Wonder lavender and the Elegant Eggplant deep purple along with a silver and white designer paper and a little silver glimmer flake to finish off the center along with a rhinestone.  Next, I added another layer below the pale Wisteria Wonder lavender layer, repeating the rich dark purple as a new cardbase.  


I have to say, I am totally in love with my revamped card, and I thank Luci Kirschbaum for the original card design as a jumping off point to help me come up with my finished card.  Take a look and see what you think.  I'll add the original design below my card so you can see what I changed.


Here is a peek below of the original card design.  You can see that it had good "bones" and maybe what I mean by it just need more!  Of course, I do realize that many times in a "class" card, it can not be too elaborate or the participants would never get them all done, especially on a ten-card event!


Recipe:  Stampin' Up products:  Cardstock--Elegant Eggplant, Wisteria Wonder, Whisper White, Winter Wonderland Vellum (2015 Holiday), All is Calm (snowflake); Silver Glimmer.  Dies--Wonderful Wreath Framelits. 5/8" Silver Satin ribbon.  Rhinestones.  Memory Box Dies:  Telluride Snowflake (large); Snow Burst (medium).  Recollections: 5/8" Snowflake (small).  (Thank you Luci Kirschbaum for the beautiful original design, which I took the liberty of modifying and making it mine!)

Friday, December 25, 2015

Peaceful Pines @ Christmas (Totally Lovin' Christmas #7)!

Totally Lovin' Christmas card #7. . .OMGosh, I'm within three of finishing!  Have I said this before, but I'm saying it again. . .I love this card.  It has that homespun Christmas feel to it with the rustic Hardwood background in a weathered cedar look, and the cutest little Christmas tree ever!  It so reminds me of Christmas along the coast of the Pacific Northwest while growing up with the fog rolling in on Christmas Eve and hanging around until late morning, except I would have been looking at Redwood trees, not cedars, pines, or firs!


I only made two very little changes to the original design, and one was to add another layer, making a new cardbase in Cherry Cobbler cardstock.  The second was to just add a gold cording thread to my button rather than leave the holes empty of thread; just gave it a more finished look I think.  Just got to say again that I love, love that rustic weathered wood for the background.  I also have to say that seeing the Peaceful Pines stamp set actually used and in color makes it even more appealing than I thought just looking at it on the catalog page or the stamp case.  Take a look below at this little gem of a card.


Recipe:  Stampin' Up products:  Cardstock--Cherry Cobbler, Basic Gray, Old Olive, Very Vanilla; Farmer's Market dsp; Gold Glimmer.  Stamps--Peaceful Pines (2015 Holiday); Hardwood background.  Ink--Cherry Cobbler, Old Olive, Basic Gray.  Punches--1-1/4" Scallop Circle; Itty Bitty Accents-Star.  Regals Designer Buttons.  1/8" Gold Metallic ribbon.  Gold Metallic Cording.  (Thank you Liz Thayer for the marvelous original design).
  

Thursday, December 24, 2015

Christmas Greetings of Peace - Christmas X10 - Card #8!

In the post, I will be presenting card #8 from the Christmas X10 cardmaking event, which is a card made by one of our hostesses, Dara Peterson.  I love Christmas cards made with blacks, navys, grays, and silvers, and this one meets all of the qualifications to love it!  The only change I made from the original design was to add a silver mat layer between the navy cardbase and the gray card front base.


Just a note: in stamping your black silhouette scene, when your stamp is photopolymer, as this stamp set is, do NOT use StazOn black ink, which is a petroleum based product, and it is not compatible with polymer.  It is best to use Memento Tuxedo Black ink.  


The night sky is achieved by sponging lightly in a vertical downward stroke from the top of your scene's sky down to the tree line, lighting the pressure on your stroke as you move toward the horizon.  It also helps to place a piece of scrap paper under your white scene cardstock and starting your stroke on that scrap paper and then lightly moving onto your scene's cardstock.  This helps to alleviate sponging stroke marks.  Repeat your strokes until you achieve the depth of coloring you desire.


I love the end result of this card, and I think my addition of the silver glimmer layer absolutely adds to this cards already beautiful look.  And now, it is time for the reveal. . .see below.


Recipe:  Stampin" Up products:  Cardstock--Night of Navy, Smokey Slate, Basic Gray, Basic Black, Whisper White, Dazzling Diamonds Glimmer.  Stamps: To You & Yours (scene); Holly Jolly Greetings (on earth).  Ink:  Memento Black, Night of Navy (sponged).  Dies:  Hearth & Home Thinlits (window).  Christmas Greetings Thinklits (peacy).  (Thanks Dara Peterson for this wonderful card design.)

Wednesday, December 23, 2015

Festival of Trees - Christmas X10 - Card #7!

Card #7 from the Christmas X 10 cardmaking event mentioned in several previous posts uses a stamp set introduced in the 2014 Holiday mini catalog.  It was not retired can now be seen in the current annual catalog under the Christmas section.  The set features seven variations of Christmas tree styles, which allows for lots of design creativity!


I really like the trimmed off circle that is layered with a second circle and enhanced with scallops, which is off set with the left curve trimmed vertically and offset to the left of the card front, but I decided the card itself need another layer, adding more Real Red as a cardbase.  It only had one tree and it look very lonesome and bare all by itself, so I place a different tree on the right than shown on the original design, and placed the card's tree overlapping on the right.  I also added some red dimensional stars for the tree toppers instead of an Iced Rhinestone. . .somehow a star shape just looks better to me as a tree topper rather than a round rhinestone.  I also dressed it up with three little sequins.  Somehow, the big white circle just begged for more embellishing.  I love the items I added and now I really love the card!  Take a look below:


Recipe:  Stampin' Up products:  Cardstock--Whisper White, Real Red, Mossy Meadow.  Stamps: Festival of Trees.  Ink: Mossy Meadow, Real Red.  Circle Framelits,  Tree Punch.  Embossing Folder: Stylish Stripes.  Queen & Co.: Twinkle Stars.  Stash: Red Sequins.  (Thank you Luci Kirschbaum for the wonderful card design I took the liberty of modifying a bit).

Tuesday, December 22, 2015

Jolly Stars (Totally Lovin' Christmas #6)!

I'm rolling along finishing another card that I started at Liz Thayer's Totally Lovin' Christmas cardmaking event!  This one if full of jolly stars, and indeed, we did have a jolly time making cards, seeing old friends, and socializing as we made Liz's superbly designed cards.

I have to confess that I can seldom make a card exactly as it is designed and presented at an event such as this.  For some reason, when I see an already designed and finished card, my creative mojo starts zinging into my mind, and I have all sorts of ideas of how to tweak or change a card just a bit to make it more me.  Everyone has their own style and ideas in cardmaking, and I hope my hostesses do not take offense if I don't end up with the exact same card as designed.  One thing I know for sure, I love larger than A2 sized cards and I also like more layers of color than many other do.  My changes usually incorporate adding layers, which ultimately makes the card a bit larger.


On this Jolly Stars #5 card, I was not fond of the Iridescent embossed smaller stars, it changed the color too much, and made it so they didn't quite match the shades intended.  I thought I'd try clear embossing, which turned out so well that I decided to clear emboss the larger stars as well.  While I was at it, I embossed the Jolly greeting with Cherry Cobbler embossing powder rather than just stamping it in Cherry Cobbler ink.  Next, I decided the layers needed to have a bit more of an edge between layers, and also I felt it needed a white layer to set off the Mossy Meadow and the Red Glimmer papers.  Thus, I added white as a bottom layer making it my new cardbase.  My final addition was to add Clear Wink of Stella all over each of the stars and to the Crumb Cake band to add a bit of shimmer.

For those of you who are not familiar with the "Winks," they are a liquid brush pen that adds a coat of thin shimmer gloss to any surface by painting it on with its brush tip.  It comes in many colors, clear, black, gold, and silver to name a few.  Spoiler Alert:  the new Occasion mini catalog, which will be introduced on January 5, 2016 and run through May 31st, introduces the Wink of Stella Clear and Gold pens for purchase.  I know you'll like them.  Unfortunately, it doesn't really show up all that much in my card photo, but you certainly can see it when you view the actual card!


Recipe:  Stampin' Up products:  Cardstock--Whisper White, Mossy Meadow, Crumb Cake, Cherry Cobbler, Red Glimmer.  Merry Moments dsp.  Stamps--Oh, What Fun.  Star Framelit dies (size #1/ #2; #1 = smallest).  Decorative Label punch.  Clear Embossing Powder.  1/4" Real Red Cotton ribbon.  Other:  Clear Wink of Stella.  (Thanks Liz Thayer for the original card design).

Monday, December 21, 2015

Delicate Ornaments on Your Tree - Christmas X10 - Card #6!

Card #6 from the Christmas X10 card event is a non-traditional color combination for Christmas, but oh my, it is a beauty. . .black with gold and silver shiny foil!  It utilizes one of my favorite of all time designer paper collections, WinterWonderland dsp, all in black and gold coloring with the foil element incorporated right into the papers.


I did tweak this card's design just a bit, because I wanted my card to be larger to give more room for the ornament design elements, which are good size.  Also, I wanted to pop up the sentiment instead of affixing it directly onto the card front. Therefore, I made my card a 5-1/2 inch square rather sticking with the traditional A2 card size of 4-1/4" x 5-1/2."  I also add a third layer, in-between the two layers on the original card, in the gold foil. . .I truly think this really enhanced an already beautiful card design. Again, thank you Dara Peterson & Luci Kirschbaum for this wonderful card event, but most of all, for the magnificent card designs.  You two out did yourselves for sure!


Recipe:  Stampin' Up products:  Cardstocks--Basic Black, Gold Foil, Silver, Winter Wonderland dsp.  Stamps:  Embellished Ornaments - sentiment.  Delicate Ornaments Thinlit dies.  Gold Embossing powder.  1/8" Gold Metallic ribbon.

Sunday, December 20, 2015

Wonderous Wreath - Christmas X10 - Card #5!

Did I tell you I was excited to go to two card events:  Christmas X10 (hosted by Dara Peterson and Luci Kirschbaum) and Totally Lovin' Christmas (hosted by Liz Thayer).  These two events featured making Christmas cards from this year's Stampin' Up 2015 Holiday mini catalog, plus those Christmas items presented in their annual catalog as well!  In addition, Dara & Luci hosted a Christmas Tag class with ten really cute tags, which I fully intend to incorporate into a card design of my making.  


I was so far behind starting my Christmas cards this year that I really need that boost get me started and from these three classes did just that.  I came away with 20 card designs and 10 tags to incorporate into my own card designs. . .such a big help and so much fun as well!  As you know, cardmaking isn't only about the fun of making cards and learning new techniques, but it's a social event as well!  You meet such wonderful and fun-loving people, many of whom become fast friends as well.


Oh. . .yes, this post was about presenting a card. . . so let's get to it!  This will be card #5 from Dara & Luci's Christmas X 10 event. . .another keeper for sure!  A fabulous card with a silver embossed wreath and sequins in the non-traditional more modern coloring of Bermuda Bay, Vanilla, and Silver. . .such a fabulous combination of colors.  Again, I really liked this card's design as presented, so I stuck right to its design.  Thank you Luci & Dara for this very eye-appealing card!

Recipe:  Stampin' Up products:  Cardstock:  Very Vanilla, Bermuda Bay.  Stamps--Wondrous Wreath.  Ink--Bermuda Bay.  Bermuda Bay Sequin Trim.  Metallic Baker's Twine--Silver.  Silver Embossing Powder.  (Thank you Dara Peterson & Luci Kirschbaum for this lovely card design).

Saturday, December 19, 2015

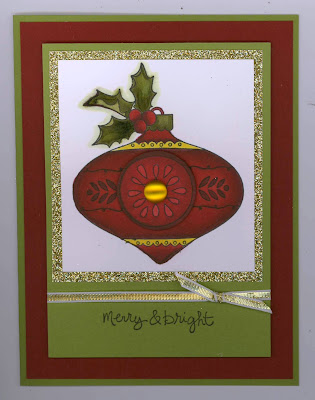
Christmas Bauble...Merry & Bright!

Do you remember when Stampin' Up came out with their very own alcohol markers in 2014?  Unfortuantely, they did not stay around, because Stampin' Up is very particular about their products, and these pens just didn't end up meeting their high standards.  Too bad, because alcohol markers and wonderful to use and I believe make coloring images, stamped or digital, so easy!  Well, my upline, Liz Thayer, hosted a mini class to introduce Blendabilities and let us doodle with coloring by providing us with some stamped images, and some sample cards where these images had been colored and incorporated into her card design, one of which was made by the Christmas Bauble stamp in the 2014 Holiday mini catalog.


As it turns out, I have been coloring with Copic Marker alcohol-based markers for about five years, which allowed me to see the difference between Copics and the new Blendabilities.  I found it more difficult to control my coloring with the Blendabilities, because their ink flow was just a bit too fast for my taste, which made me nervous!  Long story short, I love Liz's Christmas Bauble design, but I thought I would finish it at home where I could use my own Copic markers to tweak the coloring of the bauble just a bit more.  
I had already colored my bauble with the Cherry Cobbler Blendabilities set of three markers, but used Copics to incorporate a bit more shading without bleeding into the white background.  I also finished the leaves with Copics and I added some yellow-gold trim coloring as shown.


Looking over the card design provided, I felt it need a bit more of my added yellow-gold color to make it pop.  I found a Martha Steward gemstone in the exact yellow-gold shade, which was just too perfect rather than using just a rhinestone.  Next, I added another layer of Old Olive at the bottom, forming a new cardbase, which accomplished two things:  it added more color dimension to my card and also increased its size just a bit.  I thought these additions helped keep the rather large bauble from overwhelming other features of the the card's original design.  Thank you Liz for such a beautiful card idea to work with.


Recipe:  Stampin' Up products:  Cardstocks--Old Olive, Cherry Cobbler, Whisper White, Gold Glimmer.  Stamps--Good Greetings.  1/8" Gold Metallic ribbon.  Ink: Memento Tuxedo Black.  Copics Markers (+ Cherry Cobbler Blendabilities - discontinued).  Martha Stewart: Bright Large Gemstones.

Friday, December 18, 2015

Candles Flickering - Christmas X10 - Card #4

We are on to card #4 from the Christmas X10 card event, which features a lovely trio of candles.  This one could be classified as punch art, much like the first angel card, as the composition of the card is composed by using a variety punches.  The candles themselves are cut in varying lengths of 3-1/2 inches, 3 inches, and 2-3/4 inches and all one inch wide, the wing of the Bird Builder punches out the glimmery candle flames, and a shallow punch with the 1-1/4 inch circle defines the wick's "well."   The background is textured with the Brick embossing folder, which reminds me of candles displayed on your fireplace mantel with a bower of pine branches to create that wonderful piney smell of Christmas!   


Again, I loved this card just the way it was created by Dara & Luci, and I find when this happens, no creative editing juice flow to make me want to tweak it in any way.  Christmas X10 card #4 can be seen below.

Recipe:  Stampin' Up products:  Cardstock--Whisper White, Old Olive, Cherry Cobbler, Gold Glimmer;  Merry Moments dsp (Holiday 2015).  Stamps--Festive Fireplace (Holiday 2015), Teeny Tiny Wishes (sentiment).  Ink--Old Olive.  Brick Embossing Folder.  Punches--1-1/4" Circle, Bird Builder-wing (flames), Itty Bitty Accents-flowers. Pearls.  


Thursday, December 17, 2015

Holly Jolly Christmas!

I am, once again, on my let's use some of that old stuff that been hanging around for several years, some of which has never even had the box cracked!  About time wouldn't you say!


Trying to decide what old stuff I should use, I started thumbing through my Stampin' Up Christmas stamp collection.  I came across a cute little set, Tags 4 You, that addressed a little bit of this holiday and a little of that one, from Halloween, to Thanksgiving, to Christmas, to Valentine's Day!  Though this particular stamp set has retired, its coordinating punch, Label Bracket, has not.  Wow! at least maybe I'll use the punch before it retires!  In this card, I even incorporated an old embossing folder, Stripes, that was introduced in the 2011-2012 catalog year, but retired two years ago. 


Next, I needed to decided on what papers and what colors to use.  There is something about the words "holly jolly" that makes me think of Santa, and immediately, that means red and white to me.  After playing with those two colors, I knew that I had to add a pattern to the card's design and maybe some glitz!  I ended up with festive red and white dots from the Polka Dot Parade designer paper, which retired after several years running in 2014.  I paired it up with a current paper, the glitzy Gold Foil, which I intended to emboss to add some depth and dimension.  After all my playing and trying this and that, I think I'm pretty happy with the end results.  Don't you just love that shimmery stripe organdy ribbon that I found in my stash and added at the last minute?


Recipe:  Stampin' Up products:  Cardstock--Real Red, Whisper White; Polka Dot Parade dsp (retired); Gold Foil sheets.  Stamps:  Tags 4 You (retired).  Embossing folder:  Stripe (retired).  Other:  Pink Posh sequins.  Stash: Red Shimmery Organdy ribbon.

Wednesday, December 16, 2015

Flurry of Wishes - Christmas X10 - Card #3

This will be Card #3 from the Christmas X10 card event. . .certainly another keeper!  This one is another look and style, showing off the Flurry of Wishes stamp and coordinating Snow Flurry punch.  I love the fact that this card uses the Falling Softly embossing folder, washi tape and sequins. It also uses a two-tone set of snowflakes.  It's a great look!    


I decided to deviate a bit from the original card design, by re-arranging the layout of my popped-up snowflake design and adding a fifth snowflake and more sequins.  I wasn't thrilled with the flakes lined up diagonally, so I decided to place them randomly on the card front.  I also like the use of odd numbers, thus why I used five snowflakes instead of four as in the original design!  How very feng shui of me. . .LOL!  Take a look at my feng shui car
d.


Recipe:  Stampin' Up 2015 Holiday catalog:  Stamps/ Punch: Flurry of Wishes/ Snow Flurry.  Embossing Folder: Softly Falling.  Winter Wonderland Washi.  2014-15 Annual catalog:  Ink: Marine Mist. Metallics Sequins. Carstocks: Whisper White, Mint Macaron.

Monday, December 14, 2015

Jingle All the Way - Christmas X10 - Card #2

And then there was card #2 of the Christmas X10 Card Event; it certainly was not to be out done by #1 that is for sure.  I just love this little layered ornament being shown off with the Softly Falling embossing folder design.  Looky see. . .it uses the very traditional Christmas color...real red and emerald green!  I love it!


One again, I stuck pretty close to the original card's design.  The only think I change was the sentiment.  The original sported the "merry everything" sentiment from the Jingle All the Way stamp set, but I could just hear bells jingling as the sleigh slid through the newly fallen snow.  I just had to use the"jingle all the way" sentiment for sure!  Again, another crisply beautiful but simple card.  You really do need to take another peek. . .I am sure you will love it!


Recipe:  Stampin' Up products:  Cardstocks--Real Red, Whisper White, Garden Green, Smokey Slate.  Stamps:  Jingle All the Way (2015 Holiday).  Ink: Real Red.  Dies:  Sleigh Ride Edgelits, Delicate Ornament Thinlits.  Embossing Folder: Softly Falling (2015 Holiday).  1/8" Silver Ribbon.  Silver Cording Trim (2015 Holiday).  (Thank you Dara & Luci for the wonderful card design.)

Sunday, December 13, 2015

Punch Art Angel - Christmas X10 - Card #1!

October was a busy month.  I went to another Christmas cardmaking event, Christmas X10, which was hosted by two great ladies and Stampin' Up demonstrators, Dara Peterson and Luci Kirchenbaum.  This is the first time I have been invited to one of their annual events, and I was thrilled with the ten card designs presented by these two wonderful ladies.  What a great and fun way to teach and demonstrator Stampin' Up products. . .a partnership where everything is shared.  I am sure these two have a great time together.  I met several new cardmaking ladies who love to craft as much as I do.  It surely was a fun-filled and enjoyable event.


Our first card was made from products featured in the annual catalog rather than the new 2015 Holiday mini catalog.  I so loved this card's design that in making my own card, I stuck to an exact replica of the class sample.  The cute little punch art angel and the tree were formed by using the Tree punch, and the angel's wings were formed by using the smaller round-winged butterfly from the Bold Butterfly framelit die set.  This was such a lovely card, presented in a beautifully simplistic style.  Please take a peek. . .you'll like what you see!


Recipe:  Stampin' Up products:  Cardstock--Whisper White, Shimmery White, Dazzling Diamonds & Silver Glimmer paper.  Merry Moments dsp,  Stamps: Merry Everything.  Ink: Cherry Cobbler.  Punches:  2-1/2" Circle, 3/4" Circle, Tree, Itty Bitty Accent-Star.  Framelit dies: Bold Butterflies.  (Thank you Dara & Luci for the wonderful card design).

Saturday, December 12, 2015

Flurry of Wishes (Totally Lovin' Christmas #5!)

This will be #4 from the Thayer Totally Lovin' Christmas cardmaking extravaganza where we actually made a total of ten delightfully lovely cards all with a Christmas theme.  


On this #4, I stuck pretty close to the original design, but I did cut down to one large snowflake on my card.  My bow just insisted on twisting a direction that made the second snowflake on the original card overlay the sentiment and hide it so you couldn't actually see all of the word Christmas.  I decided it just had to go, and I don't think it takes away from the card's finished look.  Hiding part of Christmas just disturbed me, without the extra flake Christmas is now visible. . .that makes me happy, so one snowflake is just right!


This is such a cool and refreshing card. . .just like a snowy day at Christmas time.  Take a peek, I think you'll like it!


Recipe:  Stampin' Up products:  cardstock--Marine Mist, Whisper White.  Winter Wonderland Vellum Stack (Holiday 2015).  Stamps: Flurry of Wishes.  Ink: Marine Mist.  Punch: Snow Flurry.  Embossing Folder: Softly Falling.  Iced Rhinestones - Large/ Small (Holiday 2015).  Basic Rhinestones.  5/8" Organza Ribbon.  1/8" Silver Ribbon.  (Thank you Liz Thayer for the card design sample).

Friday, December 11, 2015

A Delicate Ornament Merry Christmas! (Totally Lovin' Christmas #9)

This will be Card #9 from the Thayer Totally Lovin' Christmas event early in the Fall.  I have to admit that I did a little doctoring on this one.  I wanted my ornament to be as though it were hanging from the tree, so I added a narrow silver ribbon to the top, plus I raised my ornament up toward the top of the card considerably, because I very much wanted to add a sentiment under my ornament.  Because of the sentiment that I wanted to use, I decided I needed my card to be larger so that all of the elements would all fit much better.  


Because I decided to make all of these changes, I need to re-emboss top white layer under the ornament.  I was stoked because, though I did not currently have the embossing folder needed, I had already ordered it and knew that it was on its way.  I prepared all the elements I could, and then put the pieces aside until the embossing folder arrived.   I was sad to see that it was the smaller A2 size folder and not the new 6-inch size that Stampin' Up is currently offering their folder in.  This required me to emboss once, and then change the location of the folder on the paper by re-positioning and matching it very carefully and ultimately, making a second pass through the Big Shot.  It did leave a bit of a mark where the new and old embossing met, but it was well hidden by the sentiment layers.


I took my silver foil layer and adhered my newly prepared embossed layer and popped this unit up onto the pre-prepared white and red layers.  I added my prepared ornament and sentiment and voila, it was done.  I was very please with my new version of this card, and I thank Liz Thayer for the original design to use as a jump-start to my card.  I am going to attached my card and then the original so perhaps you can better understand my ramblings!


Recipe:  All Stampin' Up products.  Cardstock--Whisper White, Real Red, Silver Foil, Red Foil, Silver Glimmer. Stamps: Greetings of the Season.  Ink:  Real Red.  Embossing folder: Elegant Dots.  Framelit dies:  Delicate Ornaments.  Silver Cording.  Iced Irridescent Rhinestone.  Size: 5-1/2-inch square.

Thursday, December 10, 2015

Embellished Ornaments (Totally Lovin' Christmas #4)!

Oh, and here is an especially pretty one from Liz Thayer's October Totally Lovin' Christmas card event that I attended.  I made this design exactly like the sample Liz Thayer shared during the class, though I did decided to make my separation between layers a bit larger because I wanted the pink layers to pop a bit more.  I also dropped the sentiment in the upper right corner just a bit more and decided to gold emboss it like the ornaments.  (I think Liz had her's stamped with Crumb Cake ink if I remember correctly).


I know many people don't like to use non-traditional colors in their Christmas cards, and I most definitely think pink falls into that non-traditional category.  But, I absolutely love this color combination. . .don't you think ornaments made from Stampin' Up's Embellished Ornaments stamp set cut out
 with their coordinating Delicate Ornaments Thinlit dies are simply beautiful! 

Now here's something that has always puzzled me!  I can't, for the life of me, figure out why they don't name their dies the same as the coordinating stamp set with which the die set is first introduced?  I do realize that in the future, they often add a new stamp set named something entirely different, but for me, it would still be easier if they just named it the same as at least one of the stamp sets with which they coordinate.  As I say, it's a puzzle to me, and of course, that is my personal opinon!  Getting back to the pink color with the gold embossing, doesn't it makes an absolutely lovely finished card?


Recipe:  Stampin' Up products:  cardstock--Blushing Bride, Pink Pirouette, Very Vanilla. Winter Wonderland dsp (2015 Holiday).  Stamps/ coordinating die:  Embellished Ornaments/ Delicate Ornament Thinlits (2015 Holiday).  5/8" Gold Satin Ribbon, 1-1/4" Very Vanilla Subtle Stripe Ribbon.  Gold Embossing Powder.  Pearls.  (Thank you Liz Thayer for the beautiful card design).

Tuesday, December 8, 2015

Home for Christmas (Totally Lovin' Christmas #3)!

Here is another bedazzling card design by Liz Thayer from her Totally Lovin' Christmas card event, which was held in October of this year.  All parts of the card are from products in the Stampin' Up 2015 Holiday mini catalog, if you are interested in trying to order them.


I made this card exactly as Liz designed it, except I added another layer, creating a new Real Red cardbase.  The card just seemed to call out for a little more of the red featured in the Home for Christmas designer papers and the little red ribbon.  I also added a red rhinestone on one of the little deer that was more centered on my card...just a bit more of my own flair.  Feast your eyes on this cuteness!


Recipe:  Stampin' Up:  cardstock--Real Red, Crumb Cake, Pool Party, Very Vanilla, Gold Glimmer.  Home for Christmas dsp (deer, music & red stripe).  Stamps: Endless Birthday Wishes.  SU Ink: Soft Suede.  Punch: Washi Label.  7/8" Sahara Sand lace, 1/4" Real Red Cotton ribbon.  Wood Snowflake Elements (2015 Holiday - colored with marker).  Rhinestones.  (Thank you Liz Thayer for the very cute card design).

Sunday, December 6, 2015

Making Spirits Bright (Totally Lovin' Christmas #2)

I've been finishing this little reindeer Making Spirits Bright card today. . .it's my second card design from Liz Thayer's Totally Lovin' Christmas.  This card is a fun-loving, whimsical card for sure, and it uses some of Stampin' Up's newest products from their 2015 Holiday mini catalog, such as the Reindeer clips and the Holiday Fancy Foil Vellum.  I had to bring this one home from the event to finish, because I had such a terrible time getting the Making Spirits Bright solid sentiment to stamp out correctly.  Now, I know I'm a perfectionist, but believe me, I wasn't even close to the problem!

In looking at the card pieces and then the picture of the card design, I decided that my first step was to tackle and stamp that most difficult sentiment.  I recently bought myself a MISTI stamping tool (MISTI = Most Incredible Stamping Tool Invented), and it finally arrived about a week ago.  I knew this sentiment would be quite the test for it, but it was time to see if it could live up to its advertising.  I mounted the stamp onto the MISTI cover, inked it up, gently closed the lid, and pressed firmly and evenly on the cover where the stamp was adhere.  Voila, it worked...it truly lives up to its advertising!

The more I looked at the card's original design, the more I thought I just had to add some red and green foil papers to coordinate with the green foil trees on the vellum.  I replaced all of the red cardstock with red foil and added another layer in green foil underneath, and I also added a white cardbase to start it off.  I thought the card was looking good so far; therefore, it was time to give the little reindeer a look see.  I decided he need a perky little bow under his nose instead of a double-trailed knot, and he definitely need some eyes; Googlies eyes would be just right.  You take a look see and see if I got it right.

Recipe:  Stampin' Up products:  Shimmery White cardstock; Holiday Fancy Foil Vellum.  Stamps: Among the Branches.  Ink:  Real Red.  1/8" striped ribbon-green.  Reindeer paper clips.  DCWV Foiled Cardstock Stack.  Darice Googlie Eye.  Recollections Large Rhinestone.  (MISTI by My Petunia).  (Thank you Liz for the original design sample.)

Saturday, December 5, 2015

Happy Scenes (Totally Lovin' Christmas #1)!

Every year I attend an annual Christmas cardmaking event sponsored by my Stampin' Up upline, Liz Thayer, which she aptly names Totally Lovin' Christmas.  Each year she bedazzles us with ten magnificent cards made with the newest Stampin' Up materials presented in the Holiday mini catalog.  It is always such a fun and enjoyable event, that I would be really sad to miss it.  Miss it I did NOT, and the following card is one that Liz designed that I made at the event.


I love the theme and design of the card, but I did want a popped up sentiment under my window instead of a sentiment stamped in white directly onto the black card base, and I thought it would be very pretty stamped with metallic gold ink and set off with a black layer underneath.   I also decided not to put on the little tiny bow at the top of the window frame, but to sparkle up the frame with some Gold Wink of Stella (a gold inked glitter pen).  


Recipe:  Stampin' Up papers:  cardstocks--Basic Black, Whisper White, Very Vanilla.  Winter Wonderland dsp.  Stamps: Happy Scenes, Versatile Christmas.  Framelits: Hearth & Home.  Ink:  Pool Party, Basic Black Archival.  3/8" Gold Glitter Ribbon.  Dazzling Diamonds Glitter Adhesive.  Encore: Gold Metallic Ink.  Copic Marker: C0.  Wink of Stella: Gold Metallic (window frame). (Thank you Liz Thayer for the lovely card design sample).

Thursday, December 3, 2015

Mixing the Old & the New @ Christmas!

As Christmas is looming every closer, I'm still working on Christmas cards, but  wanted a change of pace.  For the fun of it, I decided I wanted to do a card using some of my many old cardmaking Stampin' Up products instead of using those that are currently on sale, plus I wanted to maybe mix them with a few of my newest items.  This led me down memory lane where I remembered a few cards I had seen with a Christmas wreath made by using an embossed scalloped circle.  I am sure this was before the plethora of wreath coordinating stamps and dies were available from numerous cardmaking companies.  I thought it was a clever idea at the time, but never got around to trying one myself.  I was feeling my creative juices flowing, so this seemed like a good project to use my "mixing the old & the new" idea.


My wreath idea could be made by using a scallop circle die or a punch, but I decided to go with punches.  I chose the 2-3/8" Scalloped Circle punch, which was first introduced in the Stampin' Up 2008 annual catalog, and is still in the current annual catalog!  I decided that the 1-3/8" plain circle would be perfect to cut out the center of the scallop circle, and thus, the beginnings of my wreath was born.


To get a leafy look on the wreath, I used the Petals-A-Plenty Embossing Folder, which retired at the end of the 2013-2014 annual catalog.  Another punch that was around for many years before it retired two years ago was the Scallop Trim Border punch, and I chose that to embellish my card. With a little bit of Cherry Cobbler Dazzling Diamonds glitter adhesive for holly berries and a small wreath bow created from a narrow red stitched ribbon, and I was true finished with my wreath and ready to pop it onto my card front.  The Rejoicing with you. . . sentiment takes center stage at the top of the card, coming from the brand new 2015 Holiday stamp set: Versatile Christmas.  I like the way it came together, and I'm done. . .take a peek below:


  Recipe:  Stampin' Up current products:  Cardstock--Whisper White, Real Red;. Stamps--Versatile Christmas; Ink--Real Red; Dazzling Diamonds glitter glue--Cherry Cobbler.  Stampin' Up 2014 retired products:  Cardstock--Gumball Green; Birthday Basics dsp; Embossing Folder--Petals-A-Plenty; Punch--Scallop Trim Border; 1/8" Stitched Grograin ribbon.

Tuesday, December 1, 2015

Christmas - To You & Yours Re-design #2

I looked at the calendar and my heart took a big pitter patter...OMG..osh, it is only 21 days to Christmas and I am no where near even half way through making my Christmas cards!  I need to get BUSY, BUSY!!!


I brought out my Stampin' Up To You & Yours Card Kit again, and decided to fiddle with it just to see what creative mojo might seep into my being.  If you recall, I had cut all my cardbases in half, as one Pinterest video suggested, thus increasing my foil card fronts to 36 instead of the 18 if the kit was put together exactly as designed.  You know me, I can never follow directions exactly as it seems my creative mojo always tempts in lots of different directions other than what is right in front of me!  LOL


I love the paper with the diagonal red foil and white stripes, and decided to use it with one of the star window cutouts.  Next, I remembered the flat plastic glitter ornaments that I purchased at WalMart a month or more ago thinking they could be incorporated as an embellishment with Christmas cards.  I thought, "Gee, those white glittery snowflakes might be pretty peeking through my star window."


Then, I thought the star window needed to be framed as it is in the kit itself, but the kit provides a gold star frame, and I wanted red.  So, I pulled out by star dies, and found that if I used one of my Spellbinder Stars with one from the Stampin' Up Star framelits, I could replicate almost the exact cutout that the kit provided in any color I wanted.  Thumbs up...am I excited!  


I cut the height of the white star window layer smaller at both the top and the bottom, because I wanted to fit a separated Christmas sentiment underneath.  I added white glitter paper as a trim next to the foil stripe at the sides and adhered it all to a Real Red cardbase.   And thus, with NO shaker on this one, my very modified To You & Yours card was created!!


Recipe:  Stampin' Up cardstock: Real Red, Whisper White; Dazzling Diamonds Glimmer; Red Foil (2015 Holiday); To You & Yours kit: Red Foil stripe.  SU Stamps: Versatile Christmas (2015 Holiday).  SU Ink: Real Red.  Holiday Time: Glitter Ornaments (WalMart).  Craft Medley: red sequins.

Sunday, November 29, 2015

Thanksgiving Pressies!

My good friend and cardmaking buddy, Sandy, sent me the cutest darn Thanksgiving card.  She has been on a bing of cardmaking using her flip-it framelit die, because, as she says, "I've had it for close to a year now and never used it...shame on me!  Don't you think it's about time!"  But, not only did she use her flip-it framelit die, but she also created her cute little scarecrow with punch art, added with felt leaves and a bit of washi tape.  Take a look at this darling little scarecrow with the goolies eyes and yarn hair!  Isn't it just the most adorable thing ever!


Next came a thank you card from my sister, using Papertrey Ink's Quilted: Autumn stamp and coordinating die set.  Love that copper metallic crocheted lace bordering the leaf panel and the bit of burlap setting off her quilted leaf!  Thank YOU, Heidi, for such a lovely card!


Tuesday, November 24, 2015

Live the Life You've Imagined!

I needed a quick card to go along with a little gift for my bride-to-be daughter.  I thought I would use some of the Stampin' Up tools and stamps that I have had lurking around my crafting area, but somehow never actually used.  Shame on me!  


I remembered this Really Good Greetings sentiment stamp set, and have always love the idea it conveyed...just the idea I wanted.  The message to my daughter is to go into her marriage and "live the life she has always imagined," and I chose the butterfly embellishment to represent my daughter, who has always brought beauty to our lives and a smile in our hearts, just as butterflies do when we see them in our gardens.


This little butterfly is actually fashioned from a flower stamp that is punch out with its coordinating Blossom punch and then fashioned into a butterfly by trimming away two of its petals.  I have seen samples of this done before on Pinterest, Splitcoast Stampers, and on Stampin' Connections.  I revisited samples before making my card to be sure my memory served me correctly.

My butterfly black antennae are trimmed from the curve of the flower punch as well.  My little butterfly also needed a bit of sparkle and bling to bring it to life, so I added some rhinestones...so very elegant when finished!  I am pretty please with the result.


Recipe:  Stampin Up products:  Cardstocks - Basic Black, Primrose Petals, Whisper White.  Ink - Primrose Petals.  Stamps: Really Good Greetings, Mixed Bunch (butterfly) (both retired).  Punch:  Blossom (retired).  Embossing Folder - Snowburst (retired).  Ribbon - 3/8" Primrose Petals Stitched Satin.  Rhinestones.  (cased/ modified from ideas on Pinterest, Splitcoast Stampers, etc.)

Thursday, November 19, 2015

Christmas To You & Yours Star Shaker!

I recently purchased the To You & Yours Shaker Card Kit from Stampin' Up's 2015 Holiday mini catalog.  It is a very versatile kit, and it will complete 18 cards of three designs if you follow the instructions provided, plus there are oodles of leftovers in the kit that can be used to create additional cards of your own designs.  In addition, if you cut the foil designer card bases in half and added these halves as a front layer to another colored cardbase, you can actually end up with 36 cards using the three different patterned foil papers that are provided, which was exactly what I decided to do.

The kit provides three different sets of die-cut white card fronts for your shaker windows consisting of: star cutouts, circle cutouts (to make round ornament shakers), and tree-shaped cutouts.  I decided to start with one of the star cutouts.  I decided to modify my card a bit from the design provided on the instructions.  I added a white card base and adhered a layer of brushed gold cardstock.  This would be an added layer under the green, white, and silver foil diagonal striped designer paper.  So, now instead of having just a striped designer paper cardbase, I now had a white layer (the card base), a brushed gold layer and then the striped foil layer.

Next, inside my star shaker window, I decided to stamp a filigreed snowflake from the Letterpress Winter stamp set (2014 Holiday catalog), stamping with Silver Metallic ink to incorporate more silver to bring out the silver foil in the diagonal striped paper.  My snowflake was large enough that it just forms a filigreed background pattern inside the star shaker window.  On opposite diagonal corners, I used the tiny stars stamp from the To You & Yours Too stamp set as recommended by the kit instructions, but decided to add a few more stars and to use a combination of metallic gold and silver inks instead of just the Crushed Curry they recommended.  I think I just wanted a bit more verall bling!  Also, my reasoning was to coordinate with both the gold foil outlining the star cutout that was provided for this card, as well as the silver foil in the diagonal striped paper.  In addition, I thought the card needed a bit more silver than shown in the original design.  I am pretty happy with all the modifications I made so that my card is more mine and not just a copy of the design provided.  


My goal is to try different variations for each of my star shaker cards so they are not all exactly the same.  I may even mix match my papers from the original directions given!


Recipe:  All items other those additionally listed provided in the Stampin' Up: To You & Your Shaker Cards Kit (Holiday 2015).  SU cardstocks:  Whisper White (card base); Brushed Gold (retired); Cucumber Crush (inside).  SU Stamps:  To You and Yours Too; Letterpress Winter.  Encore Metallic Inks:  Gold; Silver.  My Favorite Things dies: Photo Corners.

Following is a copy of the original card design provided by Stampin' Up in the card kit.

Sunday, November 15, 2015

Hugs & Kisses for the Bride!

My youngest daughter, Jackie, is getting married, and the hostesses for her bridal shower party are my oldest daughter, Michele, and my son's wife, Ginger.  They have been very busy for the past month and a half planning the menu for the invitation design, the luncheon, the games and entertainment for the guests, and prizes to be won.  


Ginger came up with a vision of theme for the shower invitations, which she thought would be fun to craft ourselves.  This, or course, is where I entered into the planning as well!   From her ideas of having a gatefold card to use Jackie's wedding colors of black and red, she thought it would be elegant to add a black and white damask patterned paper and add ma wedding dress to the front of the card.  I thought a doily-fold wedding dress would be just right and the "sisters" agreed after they saw my completed dress.  I tweaked Ginger's other ideas here and there and came up with a suggested card design.  It took a lot of collaborating between the three of us before we settled its a final design.  We were all excited to see a sample card putting all our ideas together.


I shopped for supplies, meanwhile deciding to use a larger doily than most of the design instructions that I found on Pinterest, because it was to represented a long wedding gown.  When the sample card was completed and several changes made, we were excited to get together to make up our little beauties to send out to our guests.  I prepared and cut multiple card parts and we were ready for the next step to convene one Saturday morning over a month ago and "whip" out multiple replicas of our sample invitation card.  Michele has made a few cards with me in the past, so she had a good idea that this would not be a one- or two-hour job as Ginger thought.  Much to Ginger's surprise, Michele was very right. . .we needed about five hours to get them all done!


Michele and Ginger planned the luncheon menu and shopped together for ingredients, plus game prizes.  The main course was able to be assembled ahead and frozen until ready to bake.  They got together on another Saturday to complete these task and brainstorm the decorating ideas and games to be played. 


Michele and I have been working on the house and party decorations.  I was happy to lend my papercrafting and computer graphic skills, plus oodles of papercrafting tools to make her ideas become a reality.  It has been an exciting and fun time brainstorming ideas to come up with our finished products!  Once decisions were made on basic ideas, I went to work using my computer skills complete everything from signs for the Mimosa Bar, game instructions to game parts using papercrafting tools.  Once the parts and pieces were designed and printed, Michele and I worked together on at least four different occasions to assemble all the parts.


Last night, after coming home from another night of shower crafting and decorating, it dawned on me that the shower was the next day, and I had not had time to sit down and create a card to go with Jackie's shower gift.  Oh my!  I could see another late night looming!  


I got busy and whipped up this simple card below, which borrows the wedding colors and the bridal shower theme.  For a "short-timer" card.  This is what I call a card that is made with very little time. . .a just get it done card. . .create the design quickly, do it fast. . .no procrastinating allowed.  For the very little time that I had in the wee hours of the morning, I was pretty please with my results.  Also, when the card was finished, I realized it could make a good Valentine's Day card as well.  Jackie always loves almost every card I've ever made, so I'm pretty sure she will like this one too.


Below is a peak at the inside, using the outside theme to create the inside design.  I used my computer to whip up it's little verse.


Recipe:  Stampin' Up cardstock:  Whisper White, Basic Blake, Red Glimmer paper.  Recollections: Black Glitter.  Recollections: Hollywood  & Vine (damask).  MFT Die-namics: Layered Hearts; Photo Corners.  Cottage Cutz die: Hugs & Kisses.  Stash: Offray ribbon. Computer-made verse.  (Size: 5-1/4" x 5-1/4" square).

Wednesday, November 11, 2015

Drum Roll, Please! Foil Heat Transfer Christmas Card #6!

Here it is. . .my final foil heat transfer card using the card kit supplies from my October scrapbook shop class!  And, as in most of my other five cards, I finished this one at home as well, because of mojo inspiration during the class that told me I had some items at home that would enhance my finished card.

On this card, I chose a Have a Very Merry Christmas tag to use, to which I chose to add a Christmas green foil heat transfer.  My home adds were a green foil layer and a white backing cardstock to my vellum.  I followed the same plan with my green foiled tag, using green foil and punching the top with my Stampin' Up Ornate Tag Topper punch.  Though the tag topper is only built for a two-inch tag, I was able to insert my 2-1/16" larger tag into it very carefully, by holding the tag above the 2" path and an angle and watching for it on the underside of the punch...making sure it was inserted evenly from side to side and top edge to top edge.  I punch my 2-1/4" green foil backing layer in the same manner.  I was really happy with the way this turned out. . .and now with care, I can repeat this process in the future.  I added Pink Posh sequins to my shaker envelope to match my card colors.  I also added a Christmas green 5/8" double-sided satin ribbon to dress up the top of my card.  I've always like using true Christmas green rather than off shades, like olive, on my Christmas cards!


Recipe:  Bazzill: White cardstock.  DCWV Foil Cardstock Stack (green).  Studio Calico Seven Paper Amelia Gold Dot Vellum.  Heidi Swapp Minc Tags (. . .Merry Christmas) (made with Minc Heat Machine + Minc Reactive Foil: Green.  Stampin' Up: Ornate Tag Topper.  Pink Posh: green, gold, crystal mini sequins.  Offray: 5/8" Double-Satin ribbon.  WRMK Photo Fuse sleeve (made with WRMK Photo Fuse Tool).  (Size: 4-3/8" x 5-7/8").

Sunday, November 8, 2015

Christmas Heat Transfer Card #5!

Oh yes, I have more; that is, six all together, and this is only #5!  I do love these techniques. . . creating shaker envelopes, made to size by using my WRMK Photo Fuse Tool, and the foil heat transfer technique, which in the class I took at my local scrapbook store, was accomplished using Heidi Swapp Minc Heat Foil, Tags, and her Heat Machine.  As mentioned in a previous post, the heat machine is very much like a small laminator only a bit more elaborate, as it has six heat settings.  I also might add that it is a pricey little machine as well ($79.99 retail).  Thus, if you've read any of my previous posts, I have mentioned the use of a inexpensive laminator and using a laser toner printer or laser toner copy machine to create your heat transfer item.  A trip to your local copier business might be in order if you do not own a laser toner printer/copier as inkjet printer/copiers do NOT work.

My fifth card used most of the items offered in the class card kit, but again, I had some ideas of my own. . .after all our instructor challenged us to make our cards different than the samples offered in the class.  Give me a challenge, and I will certainly try to accommodate!

I decided to use the olive-colored Holly Jolly sentiment tag in my card kit and to heat transfer a small and a large snowflake with the gold heat transfer foil and layer the snowflakes together by popping the smaller snowflake up on the big snowflake.   At this step, once again, I had to stop because my creative mojo was telling me I needed to use a bit more of the olive color in my card to tie it all together.  I also wanted to use both the gold-dot foil cardstock and the gold-dot vellum and I needed some white cardstock to back the vellum so that the gold foil would not show through the translucent vellum.  My thinking was that this would show off the gold foil snowflakes in my my shaker envelope better.  I made a large-sized white cardbase and added an olive cardstock layer to it before I added the gold-dot foil and gold-dot vellum layers.  I also added olive sequins to my shaker bag.  Now, I was satisfied that all my colors and elements tied together to creative a cohesive looking Chirstmas card.


Recipe:  SU cardstock: Whisper White, Old Olive.  Jen Hadfield Gold Dot Foil.  Studio Calico Seven Paper Amelia Gold Dot Vellum.  Heidi Swapp Minc Tags (snowflake) (made with Minc Heat Machine + Minc Reactive Foil: Gold.  American Crafts: Remarks Holiday Dimensional sentiments.  American Crafts Christmas Sequins & Buttons.  Cake Sprinkles (snow).  WRMK Photo Fuse sleeve (made with WRMK Photo Fuse Tool).  (Size: 4-7/16" x 5-9/16").

Thursday, November 5, 2015

Christmas Deer Foil Heat Transfer!

Again, I'm posting another foil heat transfer card that I finished after my demonstration tool card class held at Running Scissors in Kent, WA almost two weeks ago.  I really love this heat transfer technique, but there are other ways to achieve almost this very look, which I thought I'd throw out there.  I have a deer-head die, by Savvy dies, almost identical to the deer-head tag that was in our heat transfer pouch of tags that we received at the beginning of the class.  I think that if you die-cut this deer-head die with a gold foil cardstock and adhered it to a piece of white stock and then trimmed the white cardstock to whatever shape you desire, you would end up with almost the exact look!


The deer-head tag on my card was achieved by heat transferring gold transfer foil onto my specially designed tag, which was manufactured to accept foil heat transfers.  I finished my card at home, because I wanted to add several other features that required materials that were not offered in our card kits.  These were:  a red cardbased upon which I layered white glitter cardstock.  I also wanted to back my gold dot vellum with a piece of white cardstock and then frame it with a red foil layer.  I layered my deer tag with red foil cardstock as well, and to the cake sprinkles and gold sequins provided in my kit, I added red sequins to tie all my card colors together with the shaker envelope goodies.  I really love these trendy deers that I see popping up all over Pinterest!  Here is my little deer-head Christmas card for your viewing:


Recipe:  SU cardstock: Real Red, Whisper White.  Core'dinations Silk Glitter: Opulent Opal.  DCWV Foil Cardstock Stack (red).  Studio Calico Seven Paper Amelia Gold Dot Vellum.  Heidi Swapp Minc Tags (deer head) (made with Minc Heat Machine + Minc Reactive Foil: Red.  American Crafts: Remarks Holiday Dimensional sentiments.  American Crafts Christmas Sequins & Buttons.  Pink Posh: red mini sequins.  Cake Sprinkles (snow).  WRMK Photo Fuse sleeve (made with WRMK Photo Fuse Tool).  (Size: 4-3/8" x 5-7/8").


Monday, November 2, 2015

Photo Fuse Christmas Shaker w/Foil Transfer. . .

I want to show you my third shaker Christmas card that I made using the WRMK Photo Fuse Tool, which makes your acrylic shaker envelope by heat sealing the edge.  Inside my shaker envelope I chose to use the 'tis the Season... tag after using the Minc Heat Transfer technique that adhere red foil to my tag.  As I noted in several previous posts, I recently saw these tools demonstrated at a card class held at our new Running Scissors scrapbook store in Kent, Washington. 


To my shaker tag, I decided to adhere a red foil cardstock layer to my tag a cut their corners using the WRMK Deco corner punch.  I added several layers to my white cardbase using red foil cardstock and a Christmas tree patterned paper featured just under neath my tag shaker envelope.  Next, I dressed it up with a little sheer organdy ribbon that a colored with my Copic markers to move its color shade a bit closer to my patterned paper.  I am really pleased with the results, and I hope you like it as well!


Recipe:  SU Whisper White cardstock; red foil cardstock (2015 Holiday catalog).  DCWV Christmas Mat Stack.  Heidi Swapp Minc Tags ('tis the season...), Minc Reactive Foil: Red (used with Minc Heat Machine).  Pink Posh: red mini sequins.  Craft Medley: green sequins.  WRMK Photo Fuse sleeve (made with WRMK Photo Fuse Tool).  Cake Sprinkles (snow).  Offray 5/8" Sheer ribbon (colored with Copic marker).  (Size: 4-5/8" x 5-3/4").