Sunday, May 29, 2016

A Big Thank You Needed!

I received the most lovely pair of diamond hoop earrings from one of my daughters for Mother's Day, because I had so been admiring these same earrings on her ears every time she wore them for the past three months.  She said I made it easy for her to decide what to give me for my special day.  In addition, she left this lovely gift here in California while visiting her Grandma, because she knew I would be coming to California to celebrate my Mom on Mother's Day, and I would be away from home.  I wanted to thank her by sending her a handmade thank you card for all her many kindness she has given me this Mother's Day as well as for a good many years in the past!


I completed my first masked watercolor, bokeh background card at a stamping event given by my Stampin' Up upline, Liz Thayer back in February.  I absolutely loved the bokeh effect with the rich shades of  watercoloring, and stamping with as well.  I knew I would be saving it for a very special person, and it was perfect in every way to add a little thanks inside to finish it off just for my daughter.  Take a peek below at my finished card inside and out:


Recipe:  Stampin' Up products:  Cardstock & Inks--Rich Razzleberry, Coastal Cabana, Pear Pizzazz; Pistachio Pudding (inside).  Stamps--Kinda Eclectic (front); Sunburst Sayings (inside).  Punches--Elegant Butterfly, Bitty Butterfly, 1" Circle; Curvy Corner (inside).  Die--Wonderful Wings (inside/ retired).  Pearls.  Ribbon--1/4" Cotton-Coastal Cabana.  Techniques: Watercolor background; Bokeh background.

Wednesday, May 25, 2016

Girls' Crafting Get-Away Fun. . .Mt. Shasta CA

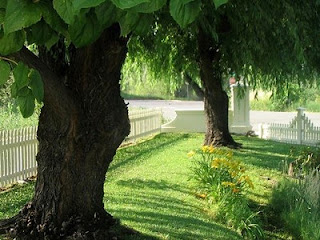
My mom, sister, and I planned a little girls' crafting get-away. . .a little crop retreat. . .to a wonderful vacation abode called the Angel House.  What a delight, just an hour's drive north of Redding, CA to the Mt. Shasta area.  We were thrilled with our accommodations. . .a vacation home that won the Best of 2015 Mt. Shasta Vacation Homes, and it surely lived up to that award.  We have rented a total of four different locations over the last six years and found this to now be our #1 location for future get-aways!  The front of the house with its cream-colored picket fence, its pond, and trees surely creates a truly relaxing atmosphere, and the cute little fenced backyard patio and BBQ area in the are very inviting!


Our delightful host, Shantam, made a stop several hours after we arrived to be sure everything was in order and that we did not need anything.  We also saw that he stopped by and did some yard and pond work, but did not interrupt our crafting mojo!  In my opinion, his house will always be top-notch, because you can tell that he really cares about it and its presentation to his guests.  The decorations were delightful with unusual quality knickknacks here and there throughout the house, and the kitchen was well stocked with everything you might need.  I would suggest you bring a few refrigerator dishes if you are cooking and might have leftovers and some "baggies".  Another suggestion, if you can't do without a salad spinner to swirl your lettuce dry, throw that in for good measure. . .I personally can not due without it!


On the main floor downstairs, the house has an open and airy living area, a nice big kitchen, and an inviting dining area.  The kitchen and dining areas not only look out on the cozy, fenced patio but also majestic Mt. Shasta as well.  We used the dining area for crafting, and were able to seat three comfortably using my 24" x 60" fold-up craft table perpendiular to the wood house table.  It would really be pretty tight for more than three, but if you brought more fold-up craft tables and chairs, you could probably seat at least three more in the living room by moving the small coffee table.  Below I will share pictures of the downstairs area.


Upstairs we found an inviting hallway area, three very large bedrooms, which were extremely comfortable and fitted with Tempurapedic matteress (my back was in aww!), plus two large double-sink bathrooms, and a laundry closet.  The largest bedroom, which we called the purple room, has a Murphy Bed that can be fold up against wall, which opens up this bedroom for group gathering.  It would make a nice crafting area if one brought all portable tables and chairs, except then you have eliminated a bedroom for sleeping.  Take a peek at these accomodations:


The Mt. Shasta area has absolutely beautiful scenery all around, walking trails, a park in town, snow skiing golfing, and boating and swimming on Lake Siskiyou' if you are into that.  The town is small and quaint with several restaurants, shopping boutiques offerning lovely clothes, trinkets, jewelry, books, holistic supplies, etc.) plus a bakery, a small movie theatre, a good size grocery store, and drug store.  Really everything to make your visit away from home interesting and conventient.  We had a spectacular view right at the base of the mountain outside our kitchen and dining room with an entry to a walking trail throuh the Sisson Wetlands.  I'll share just a few pictures of the scenery. 

 On the drive up

On the drive through Mt. Shasta City
to the Angel House

Our kitchen view

Look what we saw returning from dinner!

Walking Trail - Sisson Wetlands

 Mt. Shasta City Park

 Mt. Shasta City Park


 Lake Siskiyou view of Mt. Shasta

Brown Bear Diner for breakfast

Casa Ramos for dinner

As you can tell, we loved our house, we loved the scenery, and we thoroughly enjoyed our girls' get-away.  There were only two problems!  The first problem was. . .six days/ five nights was just not long enough.  We would have been glad to stay another three or four days!  The second problem was. . .we chose to go see two movies while away. . .they were both duds.  Now, whose fault was that!

Friday, May 20, 2016

Oh Dear. . .Another Belated Birthday Card!

My niece had a birthday way back in April!!!  WOW...I am LATE!  But, I did want her to know I really did think about her on her birthday.  To save total face, I did send her a Facebook note with a birthday image on her day. . .but let's face it, that's not like getting a handmade card in the mail!  So, I am catching up.


I chose a card I started at a Stampin' Up cardmaking event hosted by the dynamic duo. . .Dara Peterson & Luci Kirschbaum.  This card was createded by Luci and uses a Splitcoast tutorial called the folded skirt as part of its design.  I re-created the card with a few modifications as follows:  I added a third layer for more color, using Melon Mambo, and I reversed my sentiment cut-out to the right side of the card and my flowers to the left.  Luci's design idea is really lovely. . .don't you just love that skirt design.  Since starting this card at the event, I have now seen other cards with the skirt design and some even have three pleats instead of just two.  You should try one. . .it's fun.


Below is my niece's finished card with my few modifications, and following the card is a picture of my interior design with its verse to compliment the occasion.  I think my niece will be pleased with her card even though it is a whole bunch LATE!

And the inside: 


Recipe:  Stampin' Up products:  Cardstocks--Whisper White, Melon Mambo, Mint Macaron, Delightful Dijon.  Pattern:  It's My Party DSP Stack (2016 Occasions).  Stamps--Grateful Bunch.  Inks--Mint Macaron, Delightful Dijon, Soft Suede.  Rhinestones.  Other products:  Papertrey stamps: Inside & Out: Birthday (sentiment/ verse).  Spellbinders: Labels 4 die.  Skirt Fold Technique (Splitcoast Stampers).

Monday, May 16, 2016

Belated Birthday for Long-Time Friend

A long-time and good friend of mine had a birthday early in May.  With all of the doings down here during my visit to my Mom's in California, I am late with everything.  I do have to give myself credit for at least getting the three celebrations in my brother's household off to them in a timely manner:  my brother's birthday, his wife's birthday and their anniversary.  All of those celebrations happen within one week in early May.  


Unfortunately, my friend's birthday got missed and is now belated.  You might have experience what happens then. . .it is difficult to find sentiments and verses that fit a belated birthday (or at least, ones that I am happy with).  Not to give up though, as one day while my mother was gone taking care of appointments and errands, I went through her stash of birthday stamps and verses from Papertrey Ink that she had added since my last trip down to visit.  Yeah, she had several that I really liked.


Now for my friend's card. . .I took a partially completed card from a stamping event with my favorite cardmaking hostess, Liz Thayer.  I had not finished this partcular card because it had some off-stamping along the edge of the sentiment layer.  I was very disappointed to find that I could not perform this particular technique with my new MISTI stamping tool (Most Incredible Stamping Tool Invented) that I had brought along to try out.  Me being me, I was determined to find a way to do this so I set the card aside to finish later.


Several months later, I was introduced to a Maureen Wong YouTube video by a fellow-cardmaking friend who had been using a MISTI for quite a while.  In this video, Maureen demonstrates a technique to make the MISTI more versatile.  She uses 8-1/2" x 11" grid printed acrylic sheets used to make templates for quilting patterns.  Maureen cuts an acrylic sheet into different width strips, which become new bumper corners for use in the middle of your MISTI pad.  This allows over-stamping where parts of a stamp are stamped along an edge of your paper and the rest of the stamp hangs beyond your paper edge.  She recommends using a piece of scrap paper to "catch" any stamping ink on the "overhanging" part of the stamp.  When using the MISTI in the traditional manner that overhanging stamp hits the MISTI's ruler edge and does not allow its top "door" to close; thus the stamp can not reach your paper to ink the stamp's image onto it.  Here is a link to Maureen's YouTube video: https://www.youtube.com/watch?v=95OldeznYdY.


I loved this card's design just as Liz presented it for us to re-create.  I did make a few minor changes, such as the sentiment, which I changed to a belated birthday greeting.  I used Stampin' Up ink and an Aqua Painter to color my flowers and leaves rather than a Blender Pen with markers.  I also added soft gold rhinestones and Wink of Stella-clear to add a little sheen to my flower petals.  Unfortunately, the picture does now show this detail to any degree.  Below is my friend's card showing my successful use of my MISTI to off-stamp my flowers and leaves along the paper edge. 


My last task was to design a complimentary inside where I used one of those sentiment and birthday verses I found in my Mom's stash.


Recipe:  SU products:  Cardstock--Old Olive, Elegant Eggplant, Whisper White.  Pattern--Wildflower Fields (2016 SAB).  Stamp--Grateful Bunch.  Ink:  Memento--Black Tuxedo; Elegant Eggplant, Wisteria Wonder, Old Olive, Pear Pizzazz.  Punch--Blossoms; Curvy Corners.  3/8" Crumb Cake Stitched Satin Ribbon.  Metallic Gold Cord.  Wink of Stella-Clear.  Stash: Gold Rhinestones.  Fiskars stamps:  Make A Wish.  Papertrey Ink stamps: Birthday Basics, Inside & Out: Birthdays.  Size:  4-3/8" x 5-5/8".

Thursday, May 12, 2016

More Celebrations in My Brother's Household

My sister-in-law, Diane, celebrates her birthday in May, and I definitely needed to send her a card to let her know I am thinking about her and sending her happy wishes.  She has been under the weather a bit as well, so I wanted to be sure to get her birthday card off in time.  With my short timeline due to vacationing to visit my Mom in California, I chose to use a birthday card that I made in a January card class.  I loved this design just as it was presented, so I re-created my card just as shown in Liz Thayer's original design.

I just love balloon cards for birthdays, and I especially liked the glitter effect added to each of the tri-colored balloons.  It gave them a sensational look with the sentiment nestled amongst these balloons and featured center-front.  The two-layer die-cut shapes in black and white really set off the sentiment and made it pop!  Take a look below at my finished card:


Featured below is my completed card interior.  I chose to create a design using colors that coordinated with the card's front, and I also made up a little verse to fit the birthday occasion.


Recipe:  Stampin' Up Products:  Cardstocks:  Basic Black Whisper White, Wisteria Wonder, Marine Mist.  Stamp--Birthday Celebration.  Ink--Basic Blake, Wisteria Wonder, Pink Pirouette, Marine Mist.  Punches--Baloon Bouquet, Curvy Corner, Petite Petals, Itty Bitty Accent/ Flower. Die--Lots of Labels Framelits.  Pearls.  Stash: Pink Rhinestone Flowers (inside).  Size:  4-1/4" x 5-1/2". 

Monday, May 9, 2016

Mom's Are Special!

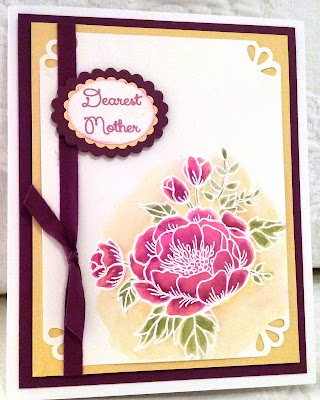
Mother's Day was coming up and really needed to make a special card for my mother for Mother's Day.  I attended a card class hosted by Liz Thayer last month in April, where I re-visited and practiced watercoloring with Stampin' Up Ink and an Aqua Painter on a stamped & heat-embossed image.  The embossed image creates a resist affect when applying the stamp pad ink with the aqua painter.  It is easy to created wonderful blended colored images using multiple colors of ink.

For this class, Liz had created a card that we were to re-create.  I chose to modifying the layout design of her card just a bit, though I stuck to the flower's color palette while applying the watercoloring as used in the original card.  My moifications included a sentiment change and adding a double layer of scallop oval die-cuts underneath.  I also used a decorator corner punch on my top layer, and added an additional color mat layer to bring out all the colors in my watercolored Rock Rose.  (I think this stamp's image looks just like a Rock Rose, though it is also similar to a double-frilled poppy as well).  Take a look at my finished card below:


My next step once the front of the card was finished, was to create an inside design to compliment the front, and also a verse suitably perfect for the occasion---Mother's Day.  It is ready to take a look-see below:


Recipe:  Stampin' Up Products:  Cardstocks--Whisper White Rich Razzleberry, Daffodil Delight.  Stamps: Birthday Blooms.  Inks--Rich Razzlebrery Daffodil Delight, Rose Red, Old Olive, Mint Macaron.  Punch--Curvy Corner.  White Embossing Powder.  Rich Razzleberry 1/4" Cotton ribbon.  Spellbinder Dies: Ovals, Scallop Ovals,  Computer sentiment/ verse.  Size: 4-7/8" x 6". 

Thursday, May 5, 2016

An Anniversary to Celebrate!

My brother and his wife, Diane, are celebrating their ten-year anniversary in the early days of May.  They married in a country-style wedding in the historic Silver Queen Hotel Wedding Chapel in historic Virginia City, Nevada.  I remember the day fondly, as family and friends celebrated the wedding, which was followed by a reception also in the hotel.  The wedding festivities were followed by a bit of rebel-rousing at the Red Dog Saloon.


I really love visiting historical place and learning a bit about it, so I have add a little history lesson to this post.  Virginia City was founded as a boomtown in 1859 with the discovery of large silver deposits known as the Comstock Lode.  The Comstock Lode was the first major silver deposit discovery in the United States.  The population in Virginia City peaked in the mid-1870's at 25,000 people.  The present-day population is 855!  At the time of this silver discovery, silver was considered as valuable as gold.


I wanted to remind them that I was thinking of them and the celebration of their wedding with a homemade card just for them.  I decided to use the Graphic 45 Curtain Call/ All That Jazz paper collection, because it has a vintage feel to it depicting events of yesteryears, which reminded me of the feel of Mike & Diane's wedding.  My completed card posted below for you to have a look-see.


After completing my card, it was time to concentrate on finishing the inside with a design to compliment the front and adding a verse to suit the occasion.  Take a look at the finished interior below:


Recipe:  SU: Whisper White cs, Basic Black cs, Real Red cs. DSP: Graphic 45-Curtain Call/ All That Jazz. EK Fancy Photo Corner punch; SU Modern Labels punch; SU Word Window punch; SU Scallop Trim Border punch. Computer-made sentiment. Stash Ribbon: 1/8” black + red satin; 5/8” red satin edge lace; 3/8” black scallop trim; Queen&Co. black rhinestones-nightfall.  Size: 5-1/2" square.

Monday, May 2, 2016

Celebrating My Brother on His Birthday!

My brother celebrates his birthday in the early days of May, and with my travels, I was a little behind getting my cards finished and off in the mail so his will be a few days late.  


I decided to use a card that I had already completed in a card class back in January that I brought with me on my travels.  The original card was designed by Luci Kirschbaum and I re-created my card exactly like the original design.  It features one of the new, fun stamp and die sets in the 2016 Stampin' Up Occasions Catalog.  I loved this card's design when I made it and knew I would probably save it for a Mike's birthday.


With the inside of the card totally blank, I needed to create an inside that complimented the front design by using paper layering, embellishments and a nice verse suited to my brother's birthday.  Below is my finished inside design to share before I ship it off in the mail:


Recipe:  Stampin' Up products:  Cardstocks--Daffodil Delight, Hello Honey, Whisper White, Pool Party.  Ink--Delightful Dijon, Basic Black.  Stamps/Dies--Sunburst Sayings/ Sunburst Thinlits.  Punches--1-1/2" Circle, 1-1/4" Circle.  Rhinestones.  EK Punch--Scallop Corner (inside).  Computer-made verse.  Size:  4-1/4" x 5-1/4".